Define a Project
Overview
To manage project schedules and effort, you must first create a project.
By setting the following for the created project, the actual work entered by each member will be linked to the project data.
- Register members to the project.
- Assign members as resources for work items.
We also provide convenient functions for setting the above.
Creating a Project
To manage project planning and progress, create a project.
Projects are created by following the wizard screen.
Please refer to the first video. : "Link to video"
Operation Procedure
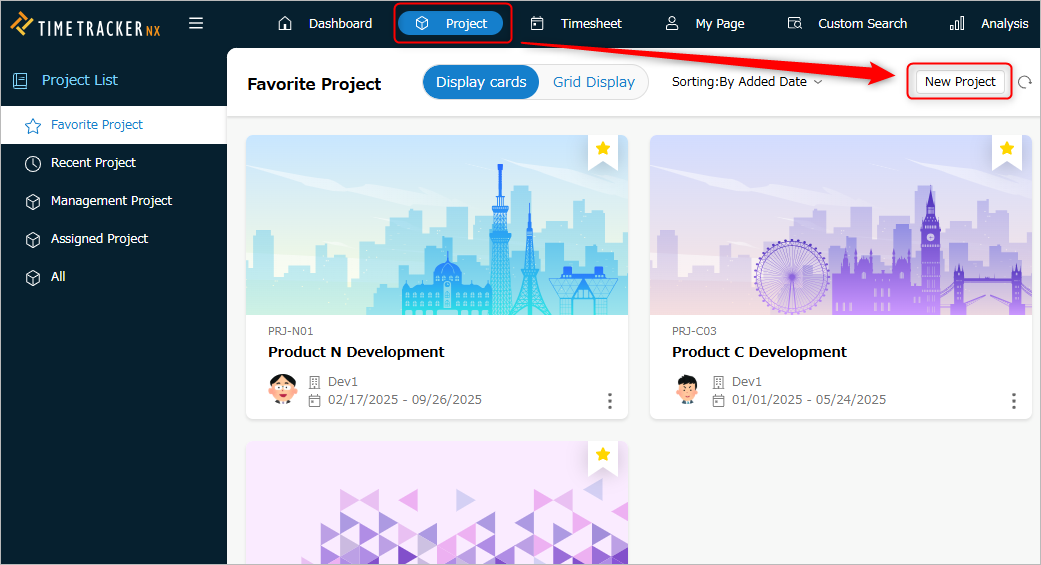
- Click "New Project" at the top of the project list.
-
Enter the following information in the "Create Project - Basic Information" dialog.
No. Item Description 1 Name Enter the project name. 2 Code Enter the project code. 3 Administrator(*1) Select the project administrator.
Note: Specify a user with project management privileges in the system role.
"Permissions set by system role"4 Organization(*1) Select the project organization. 5 Period Enter the project start and end dates. 6 Description Enter a project description. *1 All information will be displayed in the user and organization list when selecting.
It will not be restricted by permissions such as "Project Management". -
Set the project details.
See below for details.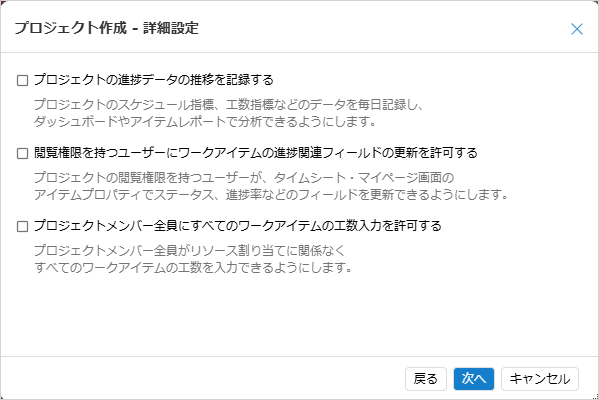
Settings Item Related Function Link Save project transition data Dashboard ■ Allow users with viewing permissions to update work item progress data Project Security ■ Allow all project members to input effort for all work items Effort Input ■ -
Add project members from the "Select Users" dialog.
-
Click the "Value" column of the project category and select an item from the list.
- If the selection list does not appear, enter any string.
- If no valid project categories exist, proceed to step 9.
- If the selection list does not appear, enter any string.
-
Apply the profile to the project using the following steps.
- Select the category containing the profile you want to apply.
- From the list of profiles included in the selected category, select the profile you want to apply.
What is a profile?A profile is a predefined collection of project settings.
By applying a profile to a project, you can apply all the setting information (field definitions, status definitions, etc.) at once,
and eliminate the need to configure settings for individual projects.
For details, please refer to the following link: "Manage Profiles"The profile selected when creating a project cannot be changed later. -
Click the "Finish" button.
You have now created the project.
Next, let's open the project you created.
For details, please refer to the following link. : "Delete Project"
Opening a Project
To change project information, you need to open the target project.
Procedure
-
Click "Projects" in the TimeTracker RX global navigation.
-
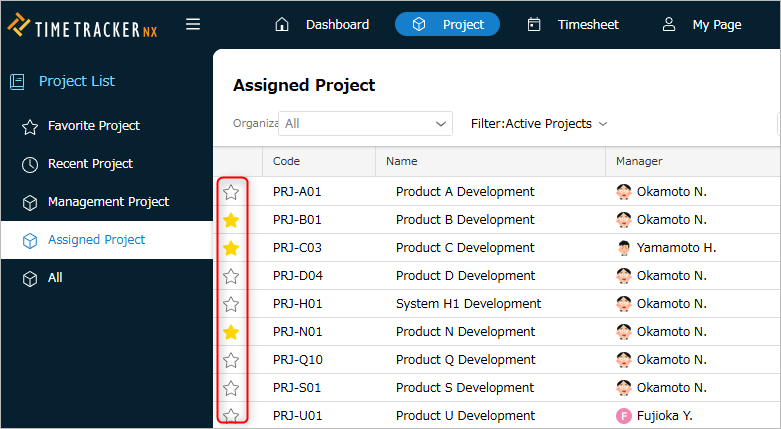
Select the project conditions to display from the menu on the left side of the screen.
The conditions you can select are as follows:No. Item Name Display Target 1 Favorites Projects registered as favorites
See the following link for details:
"Set Favorites" (#favorite)2 Recent Projects Recently opened projects (maximum 30) 3 Managed Projects Projects where the logged-in user is the administrator 4 Assigned Projects Projects to which the logged-in user is assigned 5 All Projects viewable by the logged-in user -
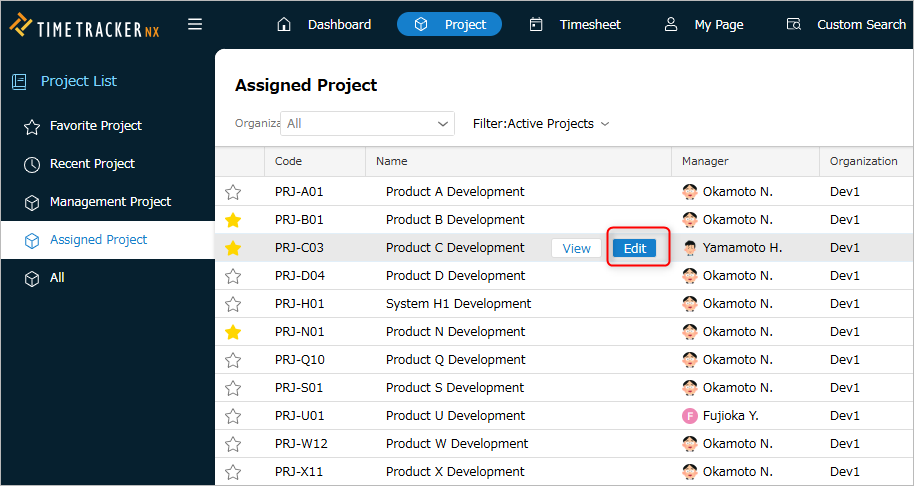
Select the target project in the project list.
-
Click "Edit" displayed in the name column.
Points
-
If you do not need to edit the project, click "View".
You can easily switch between view mode and edit mode even after opening a project.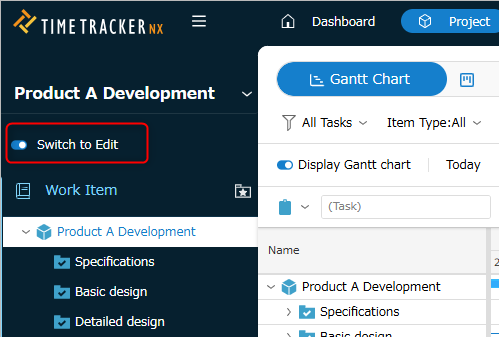
-
Multiple users can edit the project simultaneously.
Saved content is immediately reflected on the project screens of other users.
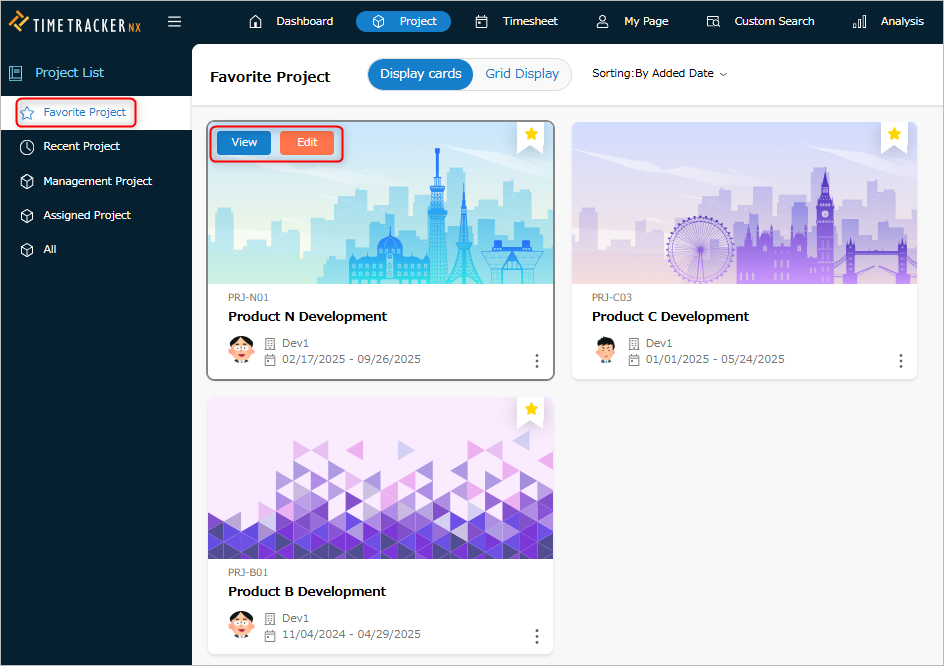
Setting Favorites
When you have many projects, it can be time-consuming to find the project you want to open.
By registering frequently used projects in advance, you can efficiently find the target project.
To register a project as a favorite, click the ☆ icon in the project list and check the box.
To remove from favorites, uncheck the box.
Afterward, you can open the target project by clicking "Edit" or "View" on the project.
You can also change images and colors. The procedure is as follows:
-
Click the "Settings" icon for the project.

-
Select the image or color you want to set.
- To change the image:
Select the image you want to set from "Change Image". - To change the color:
Select the color you want to set from "Change Color".
- To change the image:
Displaying the Project List
When displaying the project list, you can change the displayed columns and sorting order.
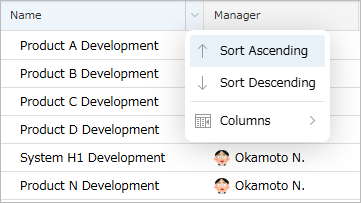
Sorting the List
You can sort and display the project list in ascending or descending order based on the values in each column.
The sorting procedure is as follows:
-
In the header row of the project list, click the rightmost edge of any column.
-
Select "Ascending" or "Descending" from the menu that appears.
Setting Displayed Columns
You can toggle the display/hide state of each column in the project list.
(By default, the project category columns are hidden)
You can show/hide columns using the following method:
-
In the header row of the project list, click the rightmost edge of any column.
-
Select "Columns" from the menu that appears and toggle the display/hide state by checking the column's box.
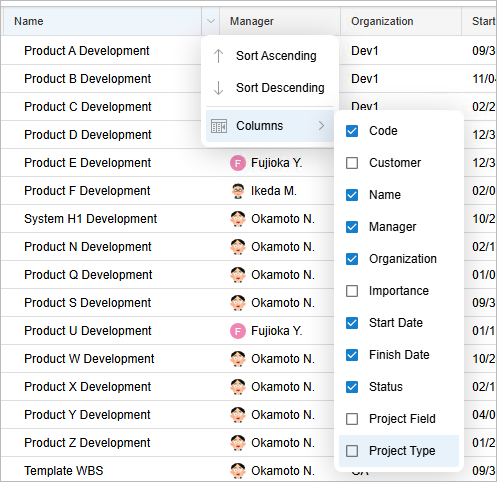 The items below "Customer" are defined in the project category.
Setting Project Information
You can change the basic project information after creating the project.
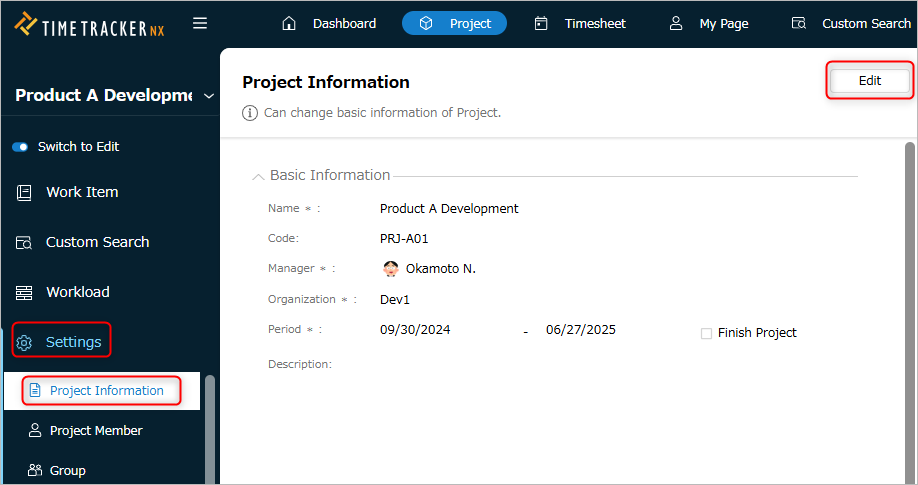
Procedure
- Open the target project.
- Click "Settings" in the project's local navigation.
- Select "Project Information" from the menu on the left side of the screen.
- Click the "Edit" button.
- Set each item in the project information.
- Click the "Save" button.
Advanced Settings
The following settings are available.
Please refer to the linked page for details.
| Settings Item | Related Functions | Links |
|---|---|---|
| Save Project Transition Data | Dashboard | ■ |
| Allow Users with Viewing Permissions to Update Work Item Progress Data | Project Security | ■ |
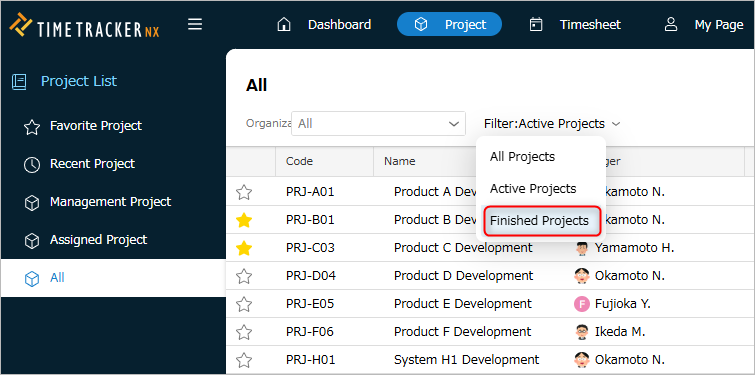
Ending a Project
Checking "End Project" will end the project.
There are mainly the following differences from an active project:
-
You cannot enter actual man-hours.
It disappears from the timesheet list, and actual man-hours cannot be copied. -
It is displayed as "Completed Project" in the project list.
Setting Members
To assign a person to a task, you need to add members to the project.
- Assign users to work items from the added members.
- They will be able to enter actual man-hours for that work item.
- The cost unit price for each user, as defined in the system, is set as the planned cost for each member.
- This can be used for cost calculation during planning.
- This can be used for cost calculation during planning.
- They will be able to enter actual man-hours for that work item.
- You can add or delete members even after creating a project.
Adding and Deleting Members
Adding
To enter actual man-hours, users need to be assigned to work items.
Only project members can be assigned.
- Open the target project.
- Click "Settings" in the project's local navigation.
- Click "Project Members" from the menu on the left side of the screen.
- Click the "Edit" button.
- Click the "+" button.
- In the "Select Users" dialog box, check the target users.
- Click the "OK" button.
- Click the "Save" button.
Deletion
Members who have left the project can be deleted.
When assigning a new work item as a resource, deleted members cannot be selected.
- Follow steps 1-4 of "Adding Members".
- Check the target members.
- Click the "-" button.
- Click the "Save" button.
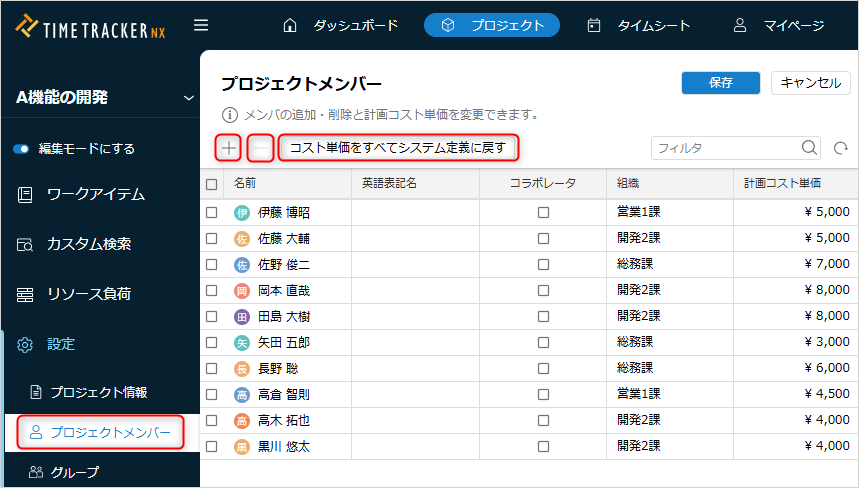
Changing Member Cost Unit Price
If the planned cost unit price for members differs depending on the project, it can be changed on the project side.
Planned costs are calculated from planned man-hours and the planned cost unit price for each user.
- Follow steps 1-4 of "Adding a Member".
- Enter the cost unit price in the "Planned Cost Unit Price" column for the member.
- Click the "Save" button.
The value entered by the system is set. To reflect the cost unit price set by the system, click "Restore all cost unit prices to system definition".
Make a Member a Collaborator
The following two steps are required to enter man-hours in a timesheet:
- Assign the member to the project
- Assign the member to the resource for the item you want to enter man-hours for
Unlike project members who want to manage progress and the status of deliverables,
In projects where all members enter man-hours, or when there are people who review the entire project or collaboratively create work,
assigning resources to each item individually is time-consuming.
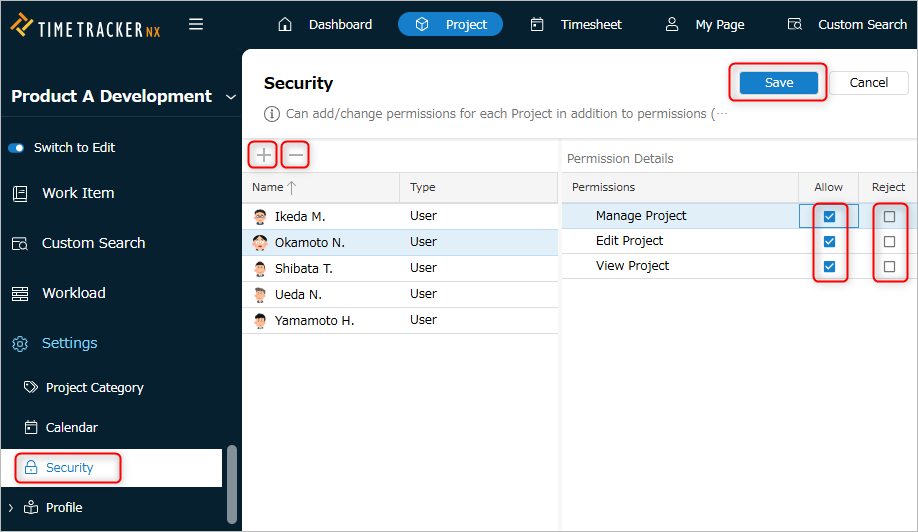
In that case, by designating the above members as "Collaborators," you can input effort without assigning resources. There are two ways to assign collaborators:
-
To assign a specific member: Check the "Collaborator" column in the project member settings.
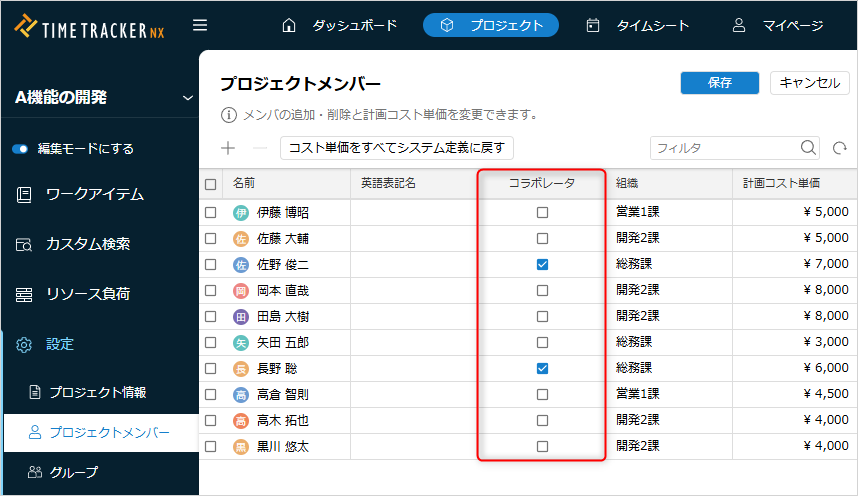
-
To assign all project members: Check the red box in the image below on the project settings screen.
For members assigned as collaborators, please check "Include collaborator items" in each member's timesheet. For details, please refer to "Utilizing Collaborators".
Notes
-
You cannot assign planned effort to collaborators.
If you want to measure the workload during planning, assign the target members to the item's resources.Actual effort can be measured as actual workload. -
Collaborator members will see all items in the target project on the timesheet.
Setting up groups
You can group project members.
By assigning the group defined here to the work item's resource (assignee),
You do not need to change the resources of each work item even if members are added or removed.
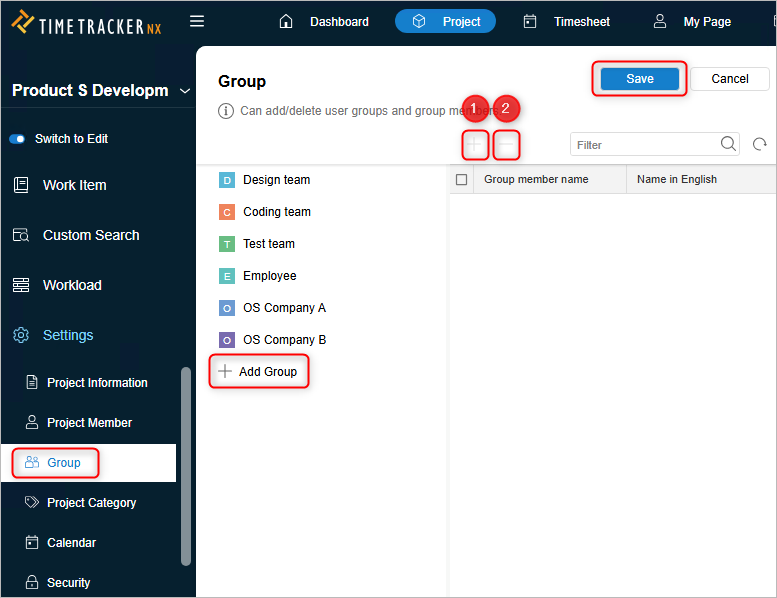
Adding and deleting groups
Adding
- Open the target project.
- Click "Settings" in the project's local navigation.
- Click "Groups" from the menu on the left side of the screen.
- Click the "Edit" button.
- Click "+ Add Group".
- Enter a name for the added group.
- Click the "Save" button.
Deletion
- Follow steps 1-4 of "Adding a Group".
- Right-click the target group.
- Select "Delete".
- Click the "Save" button.
Setting Group Members
- Follow steps 1-4 of "Adding a Group".
- Select the group.
- Add/remove members.
- Add: Click the "Add" icon ① and click the member you want to add from the displayed list.
- Remove: Check the member and click the "Remove" icon ②.
- Click the "Save" button.
Setting Project Categories
Project categories allow you to label projects from any perspective and group them using those labels. Grouping projects makes it easy to achieve the following:
- Displays projects with similar characteristics together.
- Aggregates and analyzes projects with similar trends using pivot analysis, etc.
The procedure for updating project categories is as follows:
For details, please refer to the following link: "Managing Project Categories"
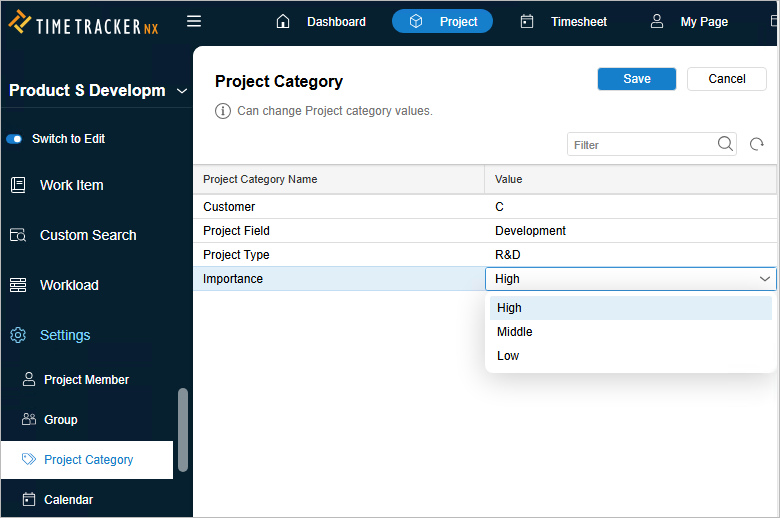
Changing Project Categories
The project category value set for a project can be changed later.
In the aggregation of actual work hours, previously entered actual work hours will also be aggregated using the latest project category value.
Procedure
-
Open the target project.
-
Click "Settings" in the project's local navigation.
-
Click "Project Categories" from the menu on the left side of the screen.
-
Click the "Edit" button.
-
Click the "Value" column of the project category you want to edit.
-
Select an item from the list.
List DisplayThe list will only be displayed if you defined a list when defining project categories in the Admin screen.
If there is no list, you can set any value. -
Click the "Save" button.
Utilizing Project Categories
Project categories can be used in conjunction with the following functions:
-
- Project categories can be used as an aggregation axis for man-hours and cost data.
- Useful when grouping and aggregating projects.
- Project categories can be used as an aggregation axis for man-hours and cost data.
-
- Project categories can also be included in the output data as data associated with actual man-hours.
- Since it is output in Excel or CSV format, it is convenient when you want to analyze the data by importing it into Excel reports or other systems.
- Project categories can also be included in the output data as data associated with actual man-hours.
Setting Project Working Days
By setting project working days, you can plan while considering non-working days (holidays).
When you move the period on the Gantt chart, the period will be automatically adjusted to account for holidays.
- When creating a project, the standard calendar in the system settings is applied as the initial setting.
- After creation, you can set your own working days and holidays for each project.
The procedure for setting project working days is as follows:

Setting by Date
- Open the target project.
- Click "Settings" in the project's local navigation.
- Click "Calendar" from the menu on the left side of the screen.
- Click the "Edit" button.
- Change the settings.
- To set working days: Select the target date in the calendar and click "Change to Working Day".
- To set holidays: Select the target date in the calendar and click "Change to Holiday".
- Click the "Save" button.
To remove the setting of working days or holidays, select the target date in the calendar and click "Remove Setting".
Setting by Day of the Week
- Follow steps 1-4 of "Setting by Date".
- In "Day of the Week Settings," check the days of the week you want to specify as working days. (Uncheck if you want to specify a holiday.)
- Click the "Save" button.
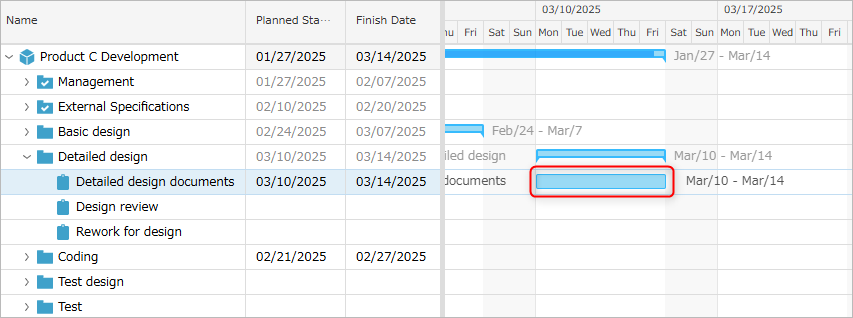
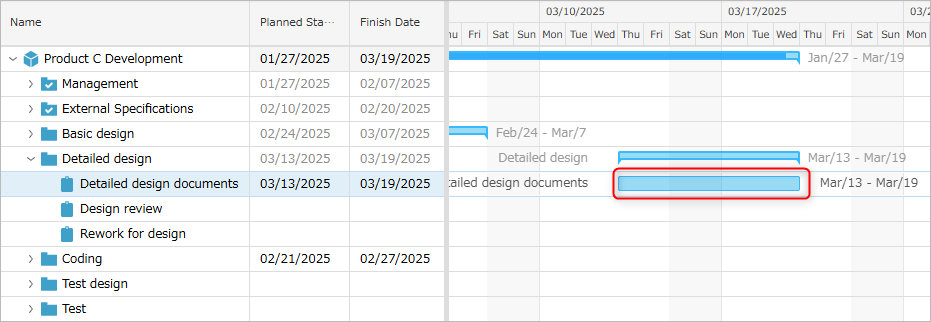
The following is an example of automatically adjusting for holidays when moving the duration of a work item on the Gantt chart.
-
[Before Change] The work item duration is set to 5 days, Monday through Friday.
-
[After Change] The start date is delayed by 3 days, from Monday to Thursday.
-
To account for holidays (Saturday and Sunday), the end date is shifted by 5 days, from Friday to the following Wednesday.
-
The work item duration remains unchanged.
-
Reverting to Standard Calendar Settings
If you want to reflect the changes to the system-defined standard calendar in the project, please click "Revert to System Settings".
For details on the system calendar, please refer to the following link. : "System-defined standard calendar"
Setting Member Permissions
Traditionally, permissions are set using system roles, but you can grant custom permissions on a project basis as follows:
- Grant custom permissions within the project to users who do not have access rights.
- Disable (deny) access for users who have access rights.
See the following link for details: : "Defining Access Ranges"
Setting Member Permissions
-
Open the target project.
-
Click "Settings" in the project's local navigation.
-
Click "Security" from the menu on the left side of the screen.
-
Click the "Edit" button.
-
Click the "+" button.
-
In the "Add" dialog, select the type of item to add from the list in the upper right corner of the screen.
-
Check the name of the item to add from the displayed list.
-
Click the "OK" button.
-
Select the name of the item.
Immediately after adding, both "Allow" and "Deny" are unchecked. -
Check either "Allow" or "Deny" for each permission in "Permission Details".
No. Permission Description 1 Project Management Allows viewing and editing of project settings. 2 Project Editing Allows editing of work items.
Setting it to "Allow" also allows viewing of the project.3 Viewing Projects You can view work items.
If you select "Deny," editing the project will also be "Denyed." -
Click the "Save" button.
Deleting Members with Permissions
- Follow steps 1-4 of "Setting Member Permissions."
- Select the target name.
- Click the "-" button.
- Click the "Save" button.
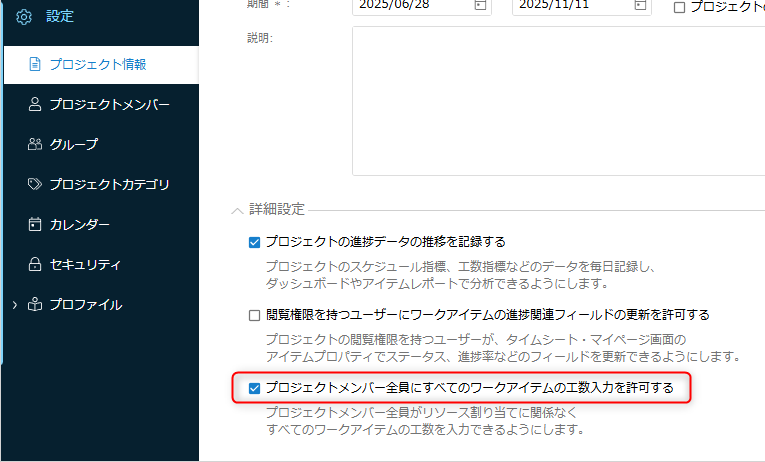
Allowing Users with Viewing Permissions to Update Progress
To update the progress of a work item, you need either editing or managing permission for the target project.
However, some people do not want to grant editing permission to their team members, as it allows them to change the project plan.
In that case, grant viewing permission in addition to permission to edit only the necessary fields.
Check "Allow users with viewing permission to update work item progress data" on the following screen.
- Project Creation: Step 3
- Project Settings Screen: Red frame in the image below
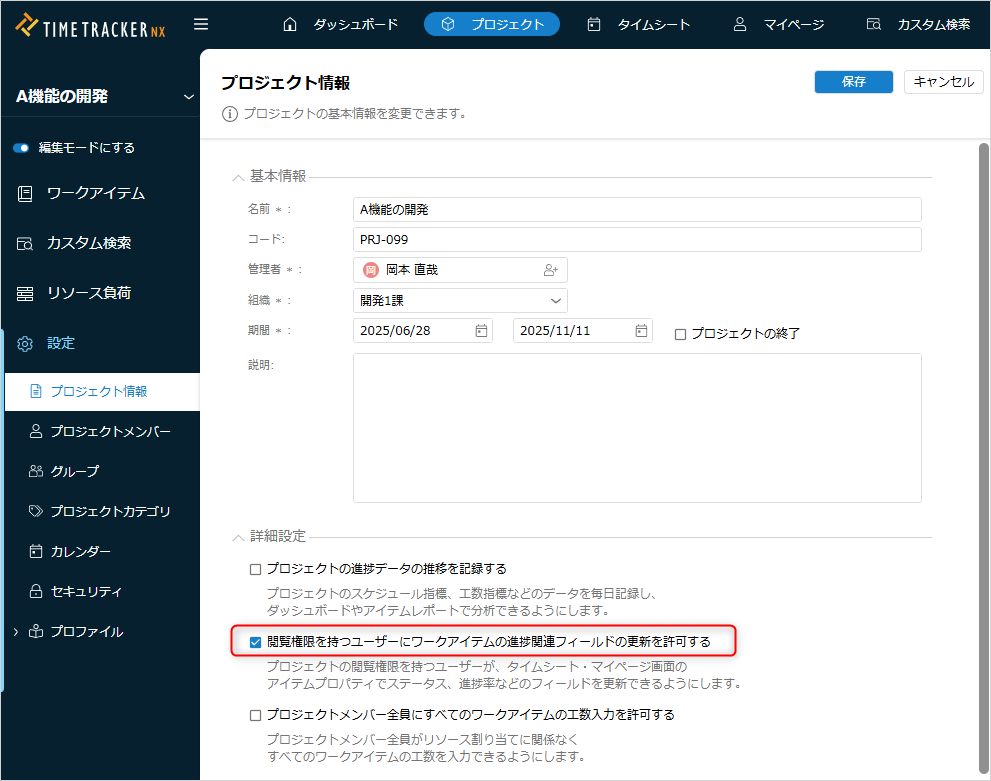
The "Progress Rate," "Status," and "Actual Output" fields will become updatable.