Editing Projects
Overview
TimeTracker RX allows you to easily view a list of projects managed by TimeTracker RX and check actual effort and completion status.
You can also change project settings without opening the project.
This section introduces the functions related to project management.
Common Procedure
As a common prerequisite for managing projects, first perform the following operations:
-
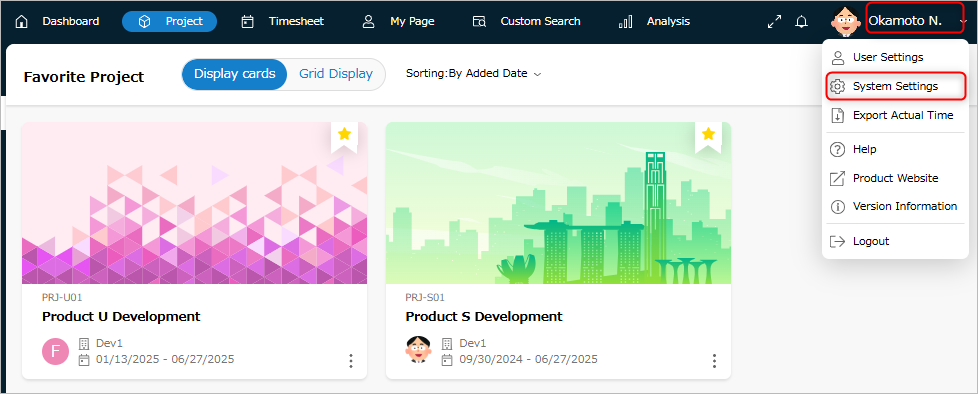
Click your login name in the TimeTracker RX global navigation.
-
Select "System Settings".
-
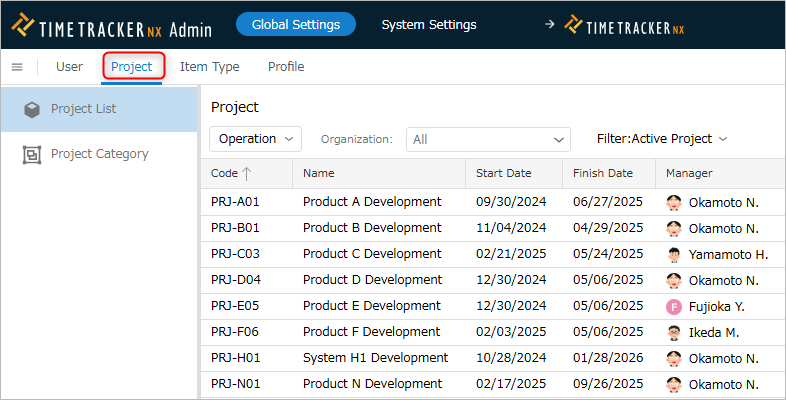
Click "Projects" in the Local Navigation.
Changing the Project Status
Ending a Project
For projects where activities have ended, set the "Ended" flag.
On TimeTracker RX, ended projects are handled as follows:
- The data itself remains. Project plan/actual information can also be viewed.
- The target project will not be displayed in the work item tree of the timesheet.
Procedure
-
Select the target project. To select multiple projects, hold down Shift or Ctrl while selecting projects.
-
Click "Operations" at the top of the project list.
-
Select "End".
Returning a Project to an Active State
You can return a completed project to an active state. Projects returned to an active state will appear in the work item tree of the timesheet, and you will be able to enter actual man-hours again.
Procedure
- Select the target project. To select multiple projects, hold down Shift or Ctrl while selecting the projects.
- Click "Actions" at the top of the project list.
- Select "Make Active".
Unlocking a Project
A locked project means that no one can edit it. You can forcibly unlock a locked project and make it editable.
Procedure
- Select the target project. To select multiple projects, hold down Shift or Ctrl while selecting the projects.
- Click "Actions" at the top of the project list.
- Select "Unlock".
Deleting a Project
You can delete data on a project-by-project basis.
Actual man-hours associated with the project will also be deleted.
When a project is deleted, it will have the following effects:
- It will no longer be displayed on the Projects screen.
- It will no longer be selectable in the Projects selection dialog.
- Deleted projects cannot be recovered.
Please note that deleting projects does not reduce database capacity.
Procedure
- Select the target project.
To select multiple projects, hold down Shift or Ctrl while selecting the projects. - Click "Actions" at the top of the Projects list.
- Select "Delete".
Setting Project Permissions
You can set individual permissions for each project for users who do not have system permissions.
Permissions can be set on the "Projects" screen, a user-facing feature, but they can also be set from the Admin screen. #### Operating Procedure
- Select the target project.
- Click "Operations" at the top of the project list.
- Select "Security Settings".
- Select the target in the "Project Security Settings" dialog.
- Set "Allow" or "Deny" for the project's permissions.
- If the target for setting security is not displayed in the "Project Security Settings" dialog, click "+" and specify the target in the "Add" dialog.
- You can change the target to add by switching the "Type" in the upper right corner of the "Add" dialog.
Updating Profiles
If you want to reflect changes to a system-defined profile in projects later, reflecting them one by one in each project is time-consuming. In such cases, you can update multiple projects at once from the system administration screen.
Operating Procedure
-
Select the target project.
- Projects with updated profiles will show "Updated" in the "Inherited Profile" field.
- To select multiple projects, hold down Shift or Ctrl while selecting the projects.
- Projects with updated profiles will show "Updated" in the "Inherited Profile" field.
-
Click "Operations" at the top of the project list.
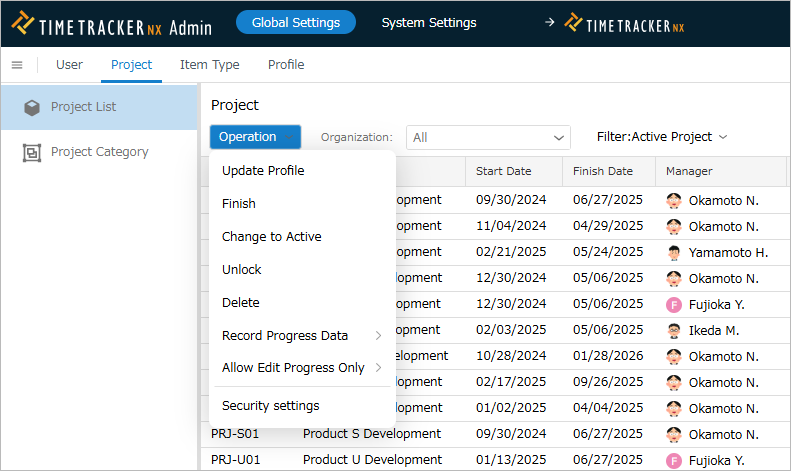
- Select "Update Profile" from the displayed menu.
- Choose one of the following options regarding how to handle the customizations made in the project.

- Migrate previous customizations: Customizations made in the project will be retained.
- Reset everything according to the profile: Customizations made in the project will be discarded.
- Click "OK".
Once the operation is complete, the "Inherited from Profile" field will be updated to "No Updates".