What you can do with the dashboard
Dashboard Overview
The dashboard is a function that allows you to easily monitor project progress, effort input status, etc.
You can visually check the trends in effort across projects and organizations using graphs and tables.
For example, it can be used in the following cases:
- Easily check the effort input status of users in a list.
- Check project progress by displaying the completion status of work items.
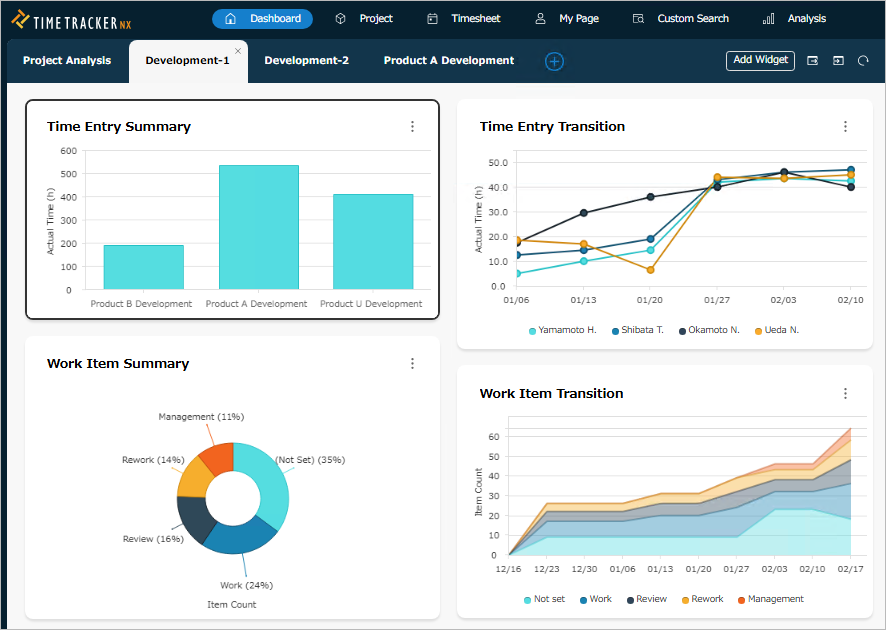
The following widgets can be used on the dashboard.
| No. | Category | Widget Name | Description | Detail Link |
|---|---|---|---|---|
| 1 | Effort Analysis | Effort Input Monitor | Displays actual effort for each user in a list. | ■ |
| 2 | Effort Summary | Displays effort aggregated for a specified period. | ■ | |
| 3 | Effort Trend | Displays aggregated effort in chronological order. | ■ | |
| 4 | Item Analysis | Work Item Summary | Displays the number of work items. | ■ |
| 5 | Work Item Transition | Displays the number of work items in chronological order. | ■ | |
| 6 | Project | Project Monitor | Displays the status of multiple projects in a list. | ■ |
| 7 | Project Progress Transition | Displays the SPI/TPI/CPI of a project in chronological order. | ■ |
How to Use the Dashboard
The dashboard manages the above widgets in units called "pages".
By creating multiple pages, you can manage widgets by theme.
Here, we introduce the basic usage of pages and widgets on the dashboard.
By exporting and importing the settings information of pages and widgets created in the dashboard,
you can share the same view with other members.
Please refer to the following for instructions.
First, the dashboard consists of the following screens.
Next, add pages and widgets using the following method.
-
Create a page.
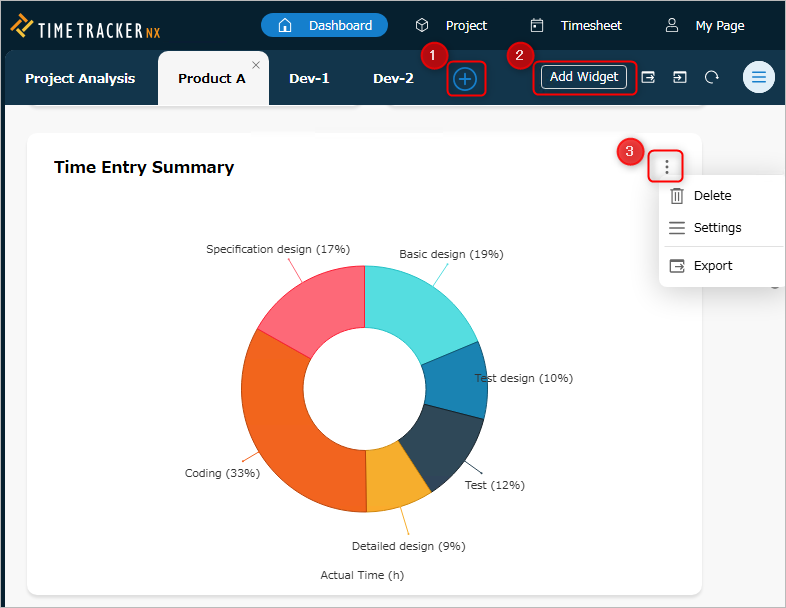
Click the "New Page" icon ① in the local navigation.
A page will be added with the name "New Page".Pages cannot be added in Standard Edition. -
Add widgets to the created page.
- Click "Add Widget" ② in the local navigation.
- Select the widget you want to add in the "Widget Selection" dialog.
For an overview of widgets, please refer to the following link: "Widget List"
-
Click the "OK" button.
Manipulating Pages
Use pages to group dashboards by a theme (organization, project, etc.).
Adding a Page
Click the "New Page" icon ① in the local navigation.
A page will be added with the name "New Page".
Deleting a Page
- Hover your cursor over the name of the target page.
- Click the "×" icon that appears.
Renaming a Page
- Double-click the name of the target page.
- Enter the new name.
Exporting/Importing Page Settings
You can export information about pages to which views have been added.
By importing, other users can share all page information, including the views registered on that page.

Exporting a Page
- Select the target page.
- Click the "Export" icon ④ in the Local Navigation menu.
- In the "Save As" dialog box, specify the folder and file name to save the exported file.
- Click the "Save" button.
A file with the extension "dashboard_page" will be created in the specified save location.
Importing a Page
- Click the "Import" icon ⑤ in the Local Navigation menu.
- In the "Import" dialog box, click "Select File".
- In the "Open" dialog box, select the import file (extension: dashboard_page) and click "Open".
- Click the "OK" button in the "Import" dialog box.
The imported page will be added to the end of the page.
If an error occurs during import, the file may be corrupted.
Please re-export the page settings file.
Manipulating Widgets
Adding Widgets
- Click the "Add Widget" icon in the local navigation.
- Select the widget to add in the "Widget Selection" dialog box.
- Click the "OK" button.
Deleting Widgets
- Select the target widget.
- Click the "Menu" icon ③ in the title bar.
- Select "Delete".
Renaming Widgets
- Select the target widget.
- Click the "Menu" icon ③ in the title bar.
- Select "Settings".
- Enter a name in the "Name" field in the details pane.
- Click the "Save" button.
Changing Widget Size
- To change the height, drag and drop the bottom edge of the target widget.
- To change the width, drag and drop between the widgets arranged horizontally.
Changing Widget Placement
The placement changes made using the following method will only be saved if all rows on the same page are arranged with the same number of columns.
- Select the target widget.
- Drag the title bar and drop it to the desired location.
Exporting/Importing Widgets
You can export the information of the widget you have created.
Other users can view the same widget by importing it.
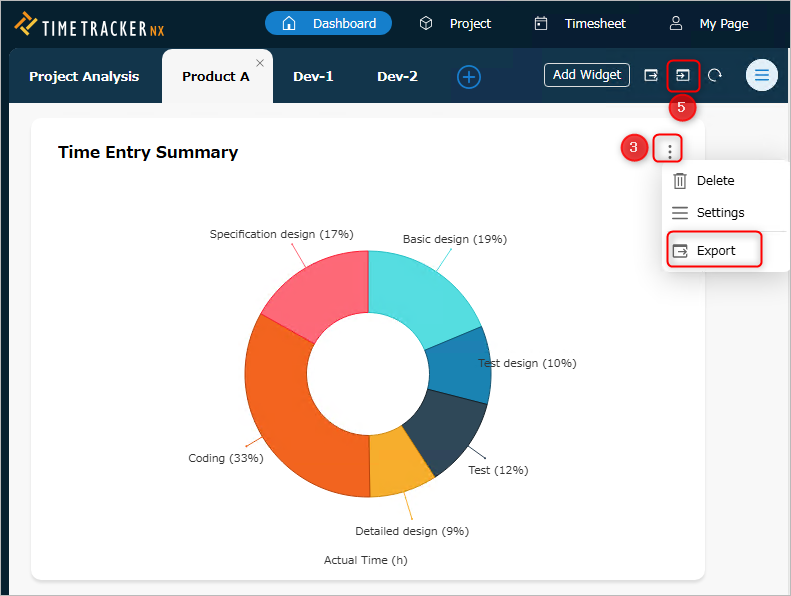
Exporting Widgets
- Select the target widget.
- Click the "Menu" icon ③ in the title bar.
- Select "Export".
- In the "Save As" dialog box, specify the folder and file name to save the exported file.
- Click the "Save" button.
A file with the extension "dashboard_widget" will be created in the specified save location.
Importing Widgets
- Select the page to import the widgets into.
- In the local navigation, click the "Import" icon ⑤.
- In the "Import" dialog box, click "Select File".
- In the "Open" dialog box, select the import file (extension: dashboard_widget) and click "Open".
- Click the "OK" button in the "Import" dialog.
The file may be corrupted. Please re-export the widget settings file.
Setting the Widget Selection Dialog
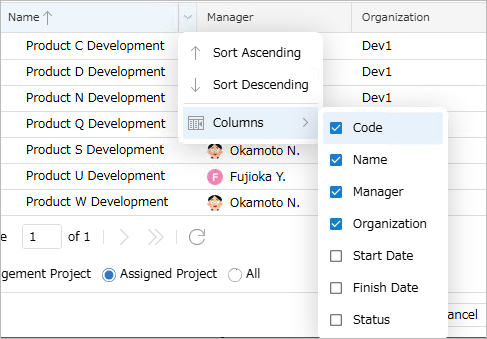
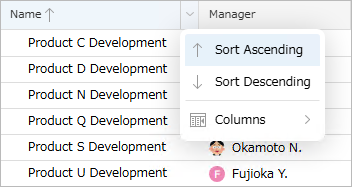
Sorting the Data List
In the dialog for selecting data to display in the widget (such as the project list),
you can sort and display the data in ascending or descending order based on the values in each column.
The sorting procedure is as follows:
-
In the header row of the project list, click the rightmost column of any column.
-
Select "Ascending" or "Descending" from the displayed menu.
Changing Displayed Columns
In the dialog for selecting data to display in a widget (such as the project list),
you can toggle the display of each column.
In the project list, the project category columns are hidden by default.
To display these columns or hide unnecessary columns, follow these steps:
-
In the header row of the project list, click the rightmost edge of the desired column.
-
Select "Columns" from the menu that appears and check the columns you want to display.
Alternatively, uncheck the columns you want to hide.