Create Work Item
Overview
In TimeTracker RX, each task is divided into a "work item" and expressed in a WBS structure.
The created work items play an important role when using TimeTracker RX as follows.
- Project management: Manage plans and results on a work item basis
- Effort management: Enter actual effort on a work item basis
- Analysis: Measure effort and results on a work item basis
We will introduce how to create work items for each usage scenario.
| How to create | Create original | Create easily | Use existing items | Create in bulk | Create from Excel |
|---|---|---|---|---|---|
| Create manually | ○ | ○ | |||
| Copy existing items | ○ | ○ | |||
| Copy WBS template | ○ | ○ | |||
| Paste WBS from Excel | ○ | ○ | ○ | ○ |
The following will introduce the details of how to create work items.
First, create a work item and set the details of the work item from the screen introduced on the following page.
We will also introduce the differences depending on the item type (task/folder) of the work item.
Create manually
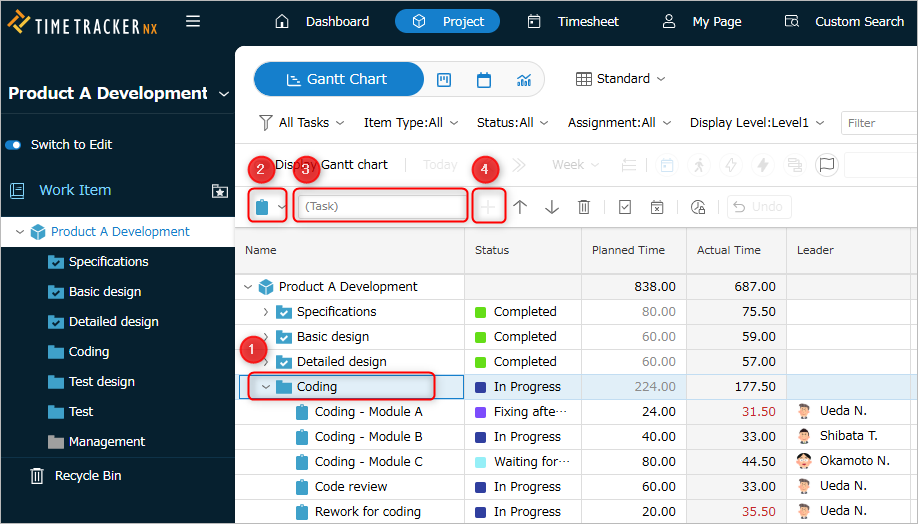
You can create it in the project administration screen (work item screen) by performing the following operations.
-
Select the parent work item ①.
The new work item will be added as a subitem of the selected work item. -
Select the item type ② from the following.
- Tasks/Packages: "Tasks and Packages"
- User-defined work items: "Manage item types"
A work item in which the user defines the fields to be used.
Example: "Requirement", "Defect"
-
Enter the work item name ③.
-
Press Enter. Or click the "+" button ④.
You can also create it as follows.- To add below the selected work item: Ctrl+Enter
- To add above the selected work item: Shift+Enter
- To add below the selected work item: Ctrl+Enter
Copy a work item
You can create a new work item by copying an existing work item.
- This is very useful when creating a work item with the same information as the copied work item, as it saves you time.
- Example: Resources, effort, dates, etc.
- You can also copy multiple work items at once.
- Copying and pasting work items can be performed between other projects and multiple browsers.
- Fields and link information that cannot be entered directly・History information
- User-defined work items
Example of execution
In the figure below, multiple work items are selected and copied.
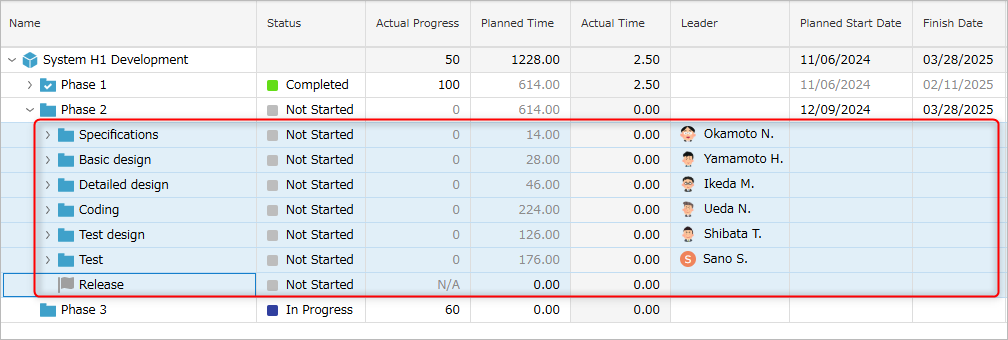
If you paste the copied work items into another selected folder, they will be copied directly under that folder.
Operation procedure
-
Open the target project.
-
Select the target work items or packages.
-
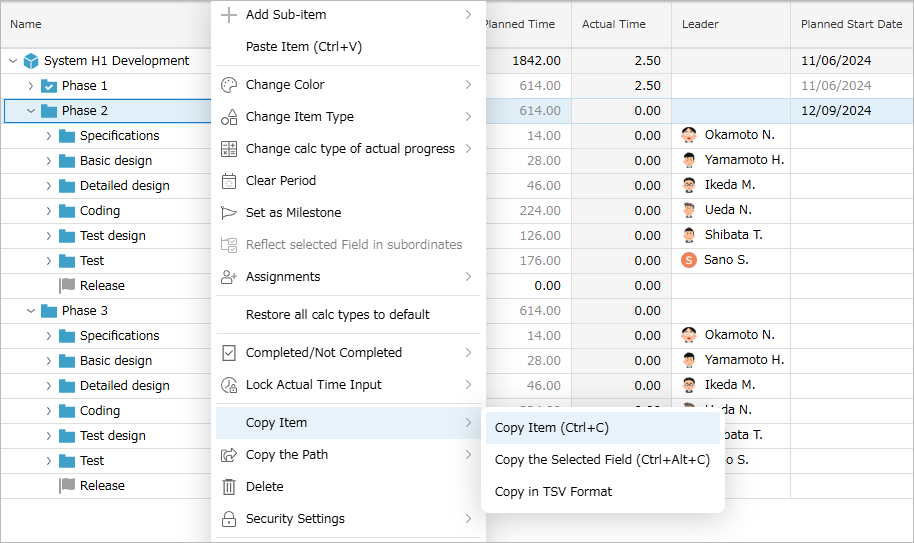
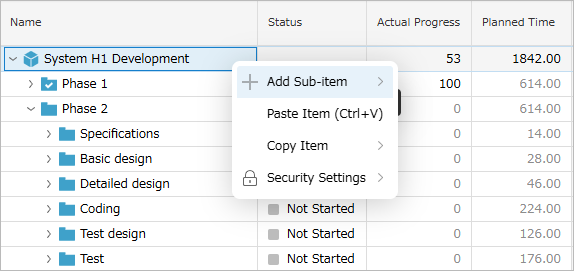
Right-click on the selected work items.
-
From the menu that appears, select "Copy Item" - "Copy Item".
-
Select the work item to which you want to paste the copied item.
You cannot paste if multiple items are selected. -
Right-click on the selected work item. Select "Paste Item" from the menu that appears.
The copied item is pasted as a subitem of the selected work item.
- Copy work item: Ctrl+c
- Paste work item: Ctrl+v
Notes on copying items
- If you paste a "Package" item under a "Task" item, it will automatically become a "Task".
- Information that is not in the destination item will not be carried over.
- For example, project members and custom fields.
Copy WBS from template
You can easily copy WBS from an existing project by dragging and dropping, which makes editing work items more efficient.
- You can create multiple WBSs with the same structure by copying them at once.
- When copying a WBS, you can also copy the values ??of specific fields.
The template function can be used in the following cases.
- When you define a "Standard WBS" project based on your company's standard process in advance.
- When creating a new project, copy the WBS from the template function.
- When creating a new project, copy the WBS from the template function.
- When you define a WBS with the same structure, such as for repetitive development.
- Specify the project you are editing with the template function.
- When using, copy the WBS in the project.
Operation procedure
For how to set the field to copy values, see the following link. "Fields to copy values ??from template" (#action_3)
-
Open the target project.
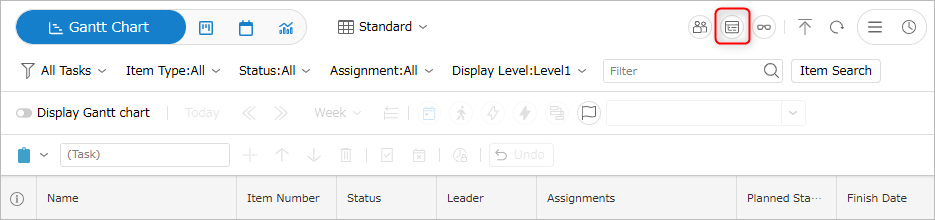
-
Click "WBS template" at the top of the screen.
-
Select the project to be used as a template from the list in the "WBS template" dialog.
If the project you want to use as a template does not appear in the list, select "Select from project".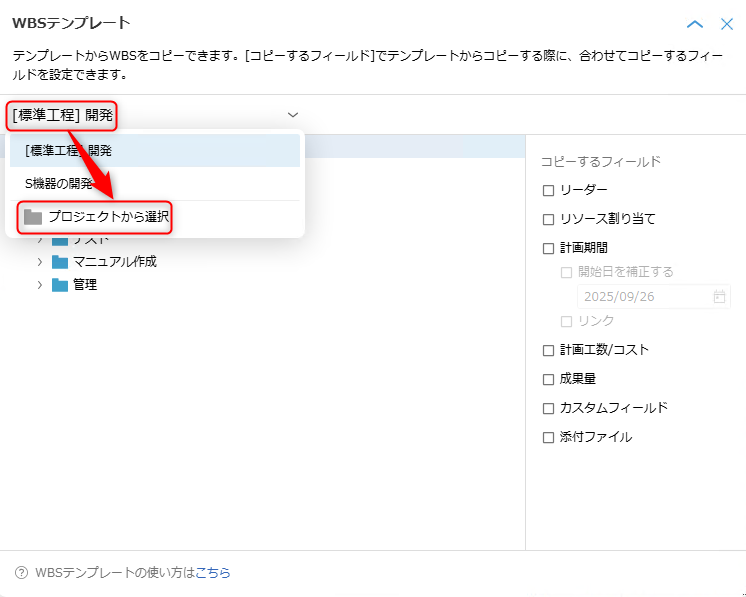
-
From the "Select project" dialog, select the project you want to use as a template.
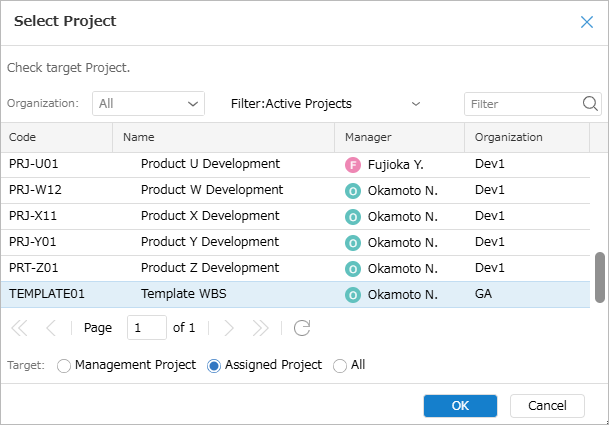
-
Click the "OK" button.
-
Select the fields you want to copy in the "WBS template" dialog.
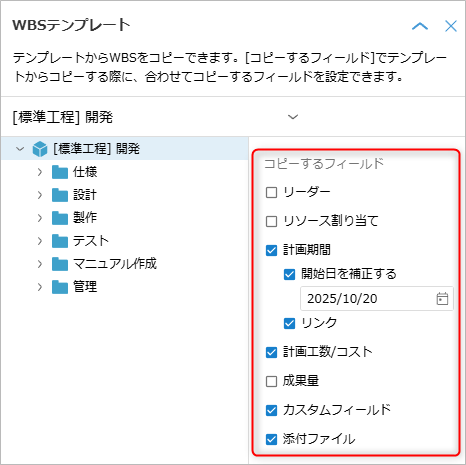
For the fields to copy, see the following link: "Fields to copy values ??from template" (#action_3)"
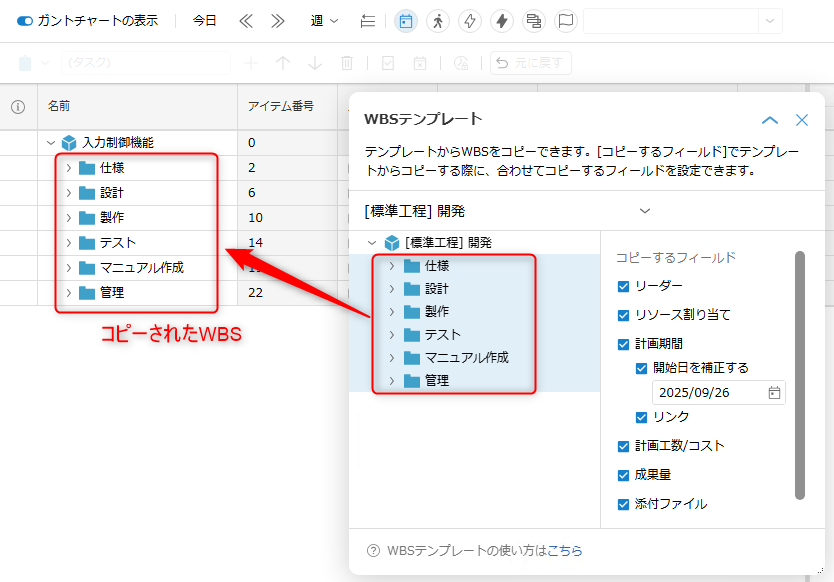
-
Drag and drop the WBS displayed in the "WBS template" dialog to the destination WBS.
Fields whose values ??are copied from the template
When copying a WBS element from a template, you can also copy the values ??of the following fields.
Open the "WBS template" dialog and check the fields you want to copy along with the WBS.
-
Fields that are always copied
- Basic information:
- Name, code, description
- Progress and measurement:
- Process classification, work classification
- Scale unit, deliverable information
- Milestone or not
- Check item (all statuses unchecked)
- Basic information:
-
Selectable fields: See the red frame in the image below.
Notes on copying from a template
Please note the following regarding the items to be copied.
-
Field Values
- For "Process Classification," "Task Classification," and "Custom Fields," the values defined in the source project will also be copied.
- Please note that values not defined in the destination project will also be set, so please verify them in advance.
-
Custom Fields
- Values for custom fields that do not exist in the destination project will not be copied.
- If you wish to copy these values, please define the custom fields in the destination project beforehand.
-
Links
- Please include both the linked item and the linking item in the copy selection.
-
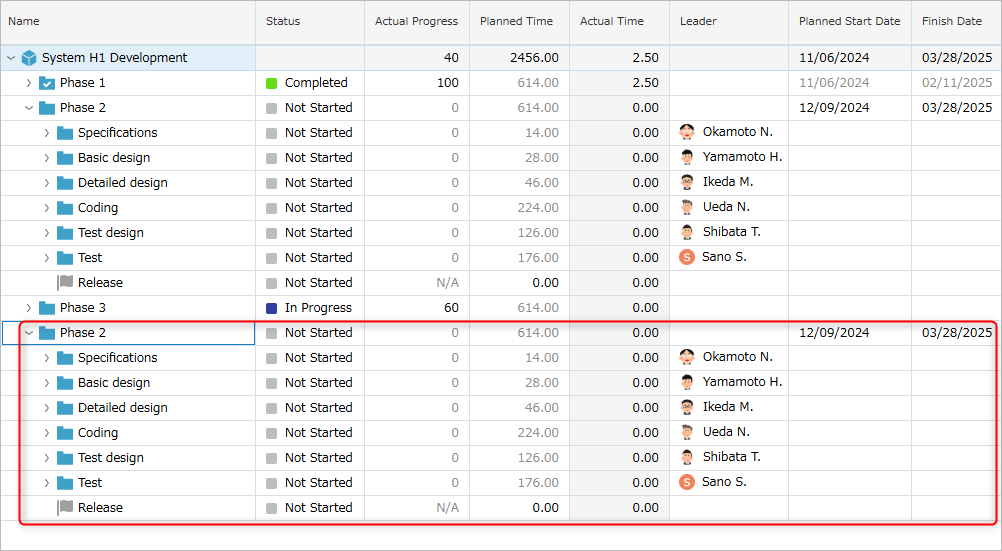
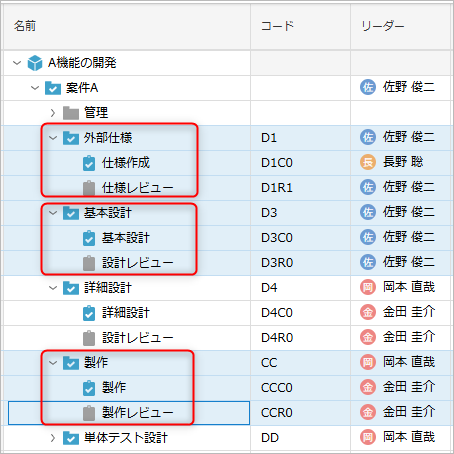
Start Date Adjustment Specify the start date for the copied work items.
- This adjustment applies to the start date of the item with the earliest start date among the items being copied.
- End dates and other item dates will be updated based on the updated start date.
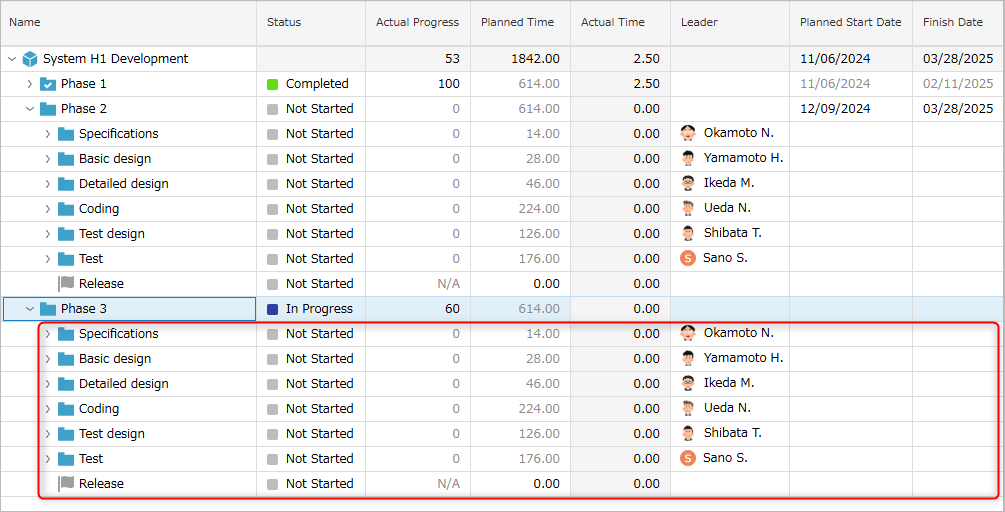
The above processing is performed for each selected range of work items. As shown in the figure below, processing is performed for each WBS unit (units within the red frames).
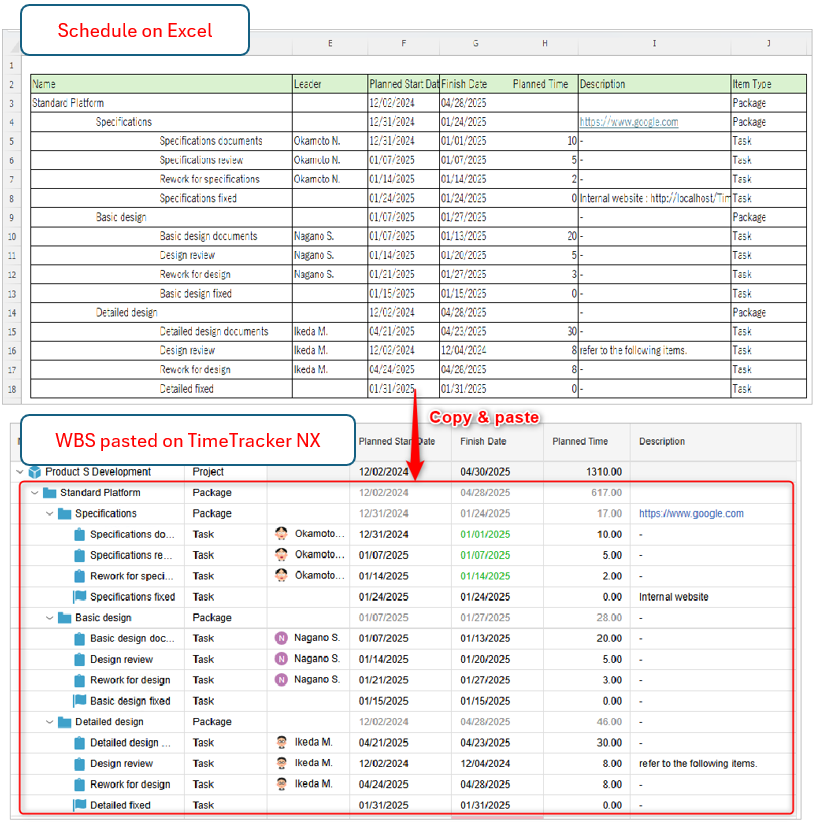
Create WBS from Excel
You can easily copy the WBS created in Excel and paste it into an existing project.
- If you write down the plans for each item in Excel, you can reflect them all at once in the work items of TimeTracker RX.
- Start date/end date, planned times, resources, etc.
- You can continue to use the Excel forms you have been using.
This allows you to easily migrate to TimeTracker RX management while still utilizing your existing assets. - It can also be used to create WBS in bulk as follows.
- Transfer data to other projects
- Create a new project
Please refer to the following link for how to use it. : What you can do with the Excel integration add-in
Operation procedure
-
Copy the WBS you want to paste from Excel.
Copy the table headers as well.If you do not copy, you will need to match the field headers one by one when pasting.
-
Open the target project.
-
Select the project or item to which you want to add the copied WBS, and paste it using the following operations.
- Right-click on the work item to paste and select "Paste Item".
- Press the shortcut key (Ctrl+v).
-
Associate the fields in Excel and the project.
The following dialog will be displayed when pasting.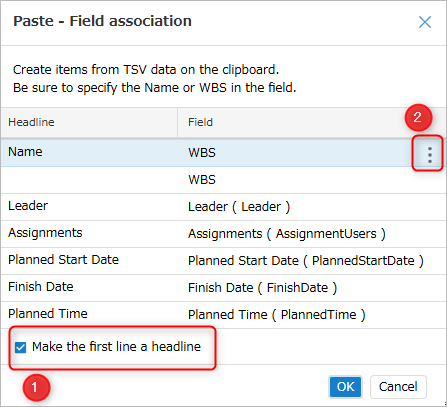
Set the field association information using the following operations.
-
Set whether or not to use the first row as a column header in ①.
It will behave as follows, so we recommend checking it.- If checked: The field name will be automatically determined from the column header name.
- If unchecked: Manually associate each column in Excel. See the next step for the procedure.
-
Check the relationship between "Header" and "Field".
-
If there is no problem, click the "OK" button.
-
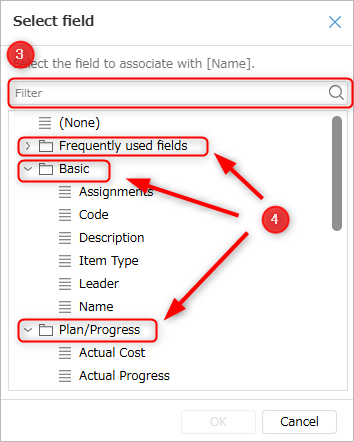
To correct the association, click ② of each item to select the field to associate.
-
③: You can search for the corresponding field by name.
-
④: Fields that are often used for association are grouped, making it easy to select a field.
To create items with multiple levels in the WBS column, set "WBS" to the field.
Note that you cannot set "Name" and "WBS" to the field at the same time.
Information associated with fields is saved for each project.- From the second time onwards, the information associated last time will be displayed.
- The association can be changed later.
-
-
-
The processing completion dialog will be displayed.
If there are no problems, pasting is complete.
If there is data that cannot be reflected, Number of items created, corrected fields, conversion result will be displayed in the dialog.

please correct it on TimeTracker RX.
Notes
- Depending on the value pasted, [Error] or [Warning] will be displayed as follows.
Fields that cannot be reflected in the work item, such as incorrect formatting or non-existent values, will be skipped.- Error: Not added as a whole row (could not be added as an item, for example, because there is no item name)
- Warning: Rows were added, but the values ??of certain fields were replaced/skipped
- If you cannot copy the WBS, please refer to the following link. : Cannot copy and paste WBS created in Excel
- For precautions when copying WBS from Excel, please refer to the following link. : Paste WBS from Excel
Tasks and packages
TimeTracker RX provides "packages" and "tasks" as item types that make up WBS.
The main uses are as follows.
- Task: Used as a unit for entering actual results.
- Package: Used to organize work items into a tree structure or as a unit for various calculations.
It is possible to create tasks under tasks, so it has a high degree of freedom in how it can be used.
Here, we will introduce the difference between tasks and packages and recommended ways to use them.
Please refer to the third video. : "Link to video"
Differences between packages and tasks?
The following differences exist.
| Function | Package | Task |
|---|---|---|
| Enter actual results | × | ○[^1] |
| Create child items | ○ | ○[^2] |
| Folder tree display (narrow down the WBS to be displayed) | ○ | × |
-
[^1] Only end items can be entered. To summarize, it is as follows.
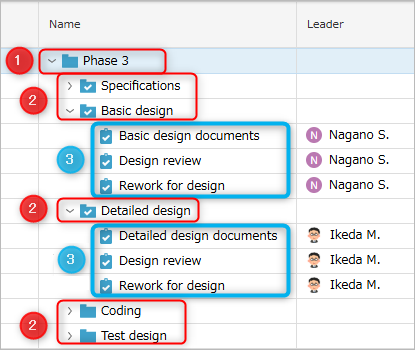
- ①: Not possible because it is a package
- ②: Not possible because it is not an end item (it has child items)
- ③: Possible because it is an end item
-
[^2] "Packages" cannot be created for child items of "Tasks".
Recommended usage
By using packages and tasks appropriately, you can simplify the display content of the work item screen.
For details, see the following link: "Utilizing the folder tree"
Notes on packages
When using the filter function of the Gantt table, you must first expand all items below the package.
For details, see the following link. : "Gantt Table Filter Function"
- Items that are not expanded will not be filtered.
- If you reload the screen after expanding, you will need to expand again.
If it is troublesome to manually expand each package one by one,
click the button to display child items (red frame ">" in the figure below) while holding down the Ctrl key
to expand all items to the end.
TimeTracker RX retrieves information to be displayed on the screen from the server,
buttons that are retrieved can put a strain on the server.
If you do this for a project with a large number of items (※),
TimeTracker RX server processing will slow down, and in the worst case, it may stop.
※ Depends on the server specifications (CPU, memory load) and server configuration.