Changing Profile
Overview
A profile is a set of settings defined for a project.
-
Applying a profile during project creation allows you to reflect all project settings at once.
-
The contents of a profile applied to a project can be changed later.
The method for updating a profile is shown in the following video.
Basically, the following are set per item type (task, package, etc.):
- Process Classification/Work Classification
- Field Configuration
- Screen Layout
- Status
Opening the Profile Settings Screen
To configure a profile, open the settings screen using the following steps:
-
Open the target project.
-
Click "Settings" in the local navigation.
-
Expand the profile menu from the left-hand side menu.

The following explains the procedure for each setting item.
Changing Process Classification and Work Classification
You can set process classification and work classification for actual man-hours.
Process classification and work classification are subdivisions of the following information:
- Process Classification: Process
- Work Classification: Work content such as reviews and rework
Since actual man-hours can be aggregated in a finer unit than work items, by using this effectively,
you can avoid unnecessarily increasing the number of work items.
If you want to aggregate the item "Design" by Work/Review/Rework, you can do the following:
- Create items for Work/Review/Rework under "Design".
- Set the work classification as Work/Review/Rework in "Design".
In case 1, a total of 4 items are required. On the other hand, in case 2, only 1 item is needed.
The entire system defines process classifications and work classifications used by all projects.
Of these, define and utilize only the items necessary for the target project.

Operating Procedure
- Select the target item type ① from the left-hand side menu.
- Click the "Edit" button.
- To add a process classification, click the "+" button in "Configurable Process Classifications" to display the "Select Process Classification to Add" dialog.
To delete, select the target process classification and click the "-" button.
* The same applies to work classifications. - Select the process classification to add from the list of process classifications.
- Click the "→" button to move to "Add to" section.
- Click the "OK" button.
- Click the "Save" button.
Making Process Classification and Work Classification Required
When entering actual man-hours, you can make the input of process classification and work classification required.
This prevents omissions in setting process classification/work classification and allows for accurate analysis of actual man-hours.

The setting method is shown below.
By making this setting, a dialog box for entering process classification/work classification will appear when entering actual man-hours in the timesheet.

Points for Use
When making the input of process classification and work classification required, set the default values for each item in advance.
- Default values can be set on the work item screen.
- Default values are automatically set when entering man-hours on the timesheet screen.
- Setting frequently selected items as default values allows you to omit entering process classification and work classification.

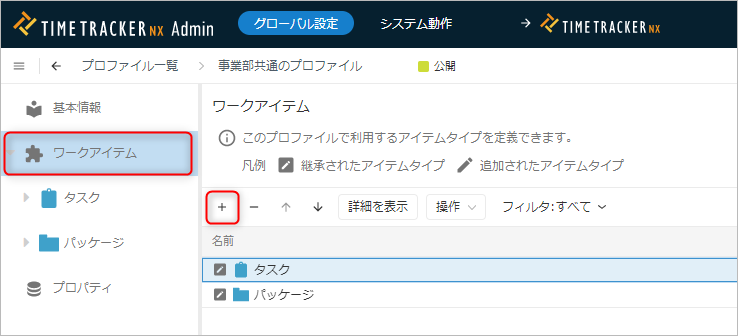
Adding Item Types
You can use item types prepared by the system administrator on the project side.

For details on item types, please refer to the following link: "Managing Item Types"
Operating Procedure
-
Select "Profile" - "Work Items" from the left-hand side menu.
-
Click the "+" button to display the "Select Item Type to Add" dialog.
-
Select the item type to add and click the "→" button to move it to "Add Target".
-
Click the "OK" button.
If the item type to be added is not displayed in step 3, please contact your system administrator.
Changing Field Configuration
You can set the fields used in the project.
- Specify the fields to be used in the project from the fields defined in the profile.
- Specify the following for each item type in the fields:
- System Fields
- Custom Fields

-
From the left-hand side menu, select "Fields" for the target item type.
-
To add a field, click the "+" button to display the "Select Field Type to Add" dialog.
To delete a field, select the target field and click the "-" button. -
Select the field to add from the list of field types.
-
Click the "→" button to move it to "Target for Addition".
-
Click the "OK" button.
Field Settings Usage Cases
There are functions such as "Define field options" and "Change the initial value for how values are determined,"
and by utilizing them, you can manage efficiently.
Select "Fields" for the target item type and refer to "Field Settings Usage Examples".
Changing the Screen Layout
You can rearrange the settings for the fields displayed in the item properties of a work item.
- You can freely select the fields to display.
- You can change the order of fields and group them.
- You can customize the display content to suit your operations, such as displaying frequently checked fields at the top.
For example, by arranging the fields to be entered at the "Planning," "Work," and "Approval" stages, you can achieve the following effects:
- It becomes easier to enter necessary information at the necessary times.
- It becomes easier for others to see the progress of the item properties screen.

Operating Procedure
-
Open the "Screen Layout Settings" dialog.
There are two methods:-
Changing from the Project Management Screen
Select the target item type from the left-hand side menu and click the red box in the image below.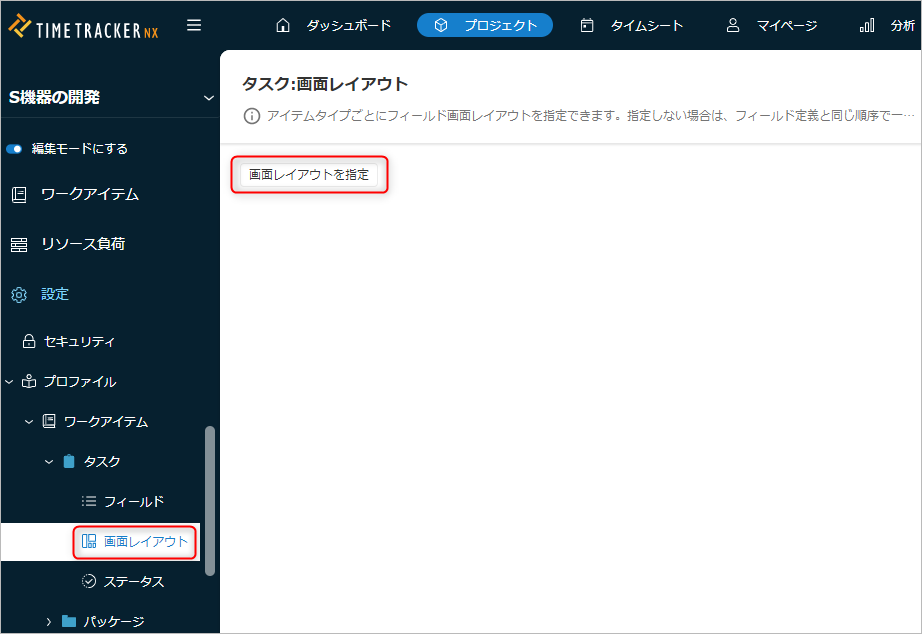
-
Changing from the Gantt Table
Click the three-dot icon ① in the upper right corner of the item properties and select "Screen Layout Settings".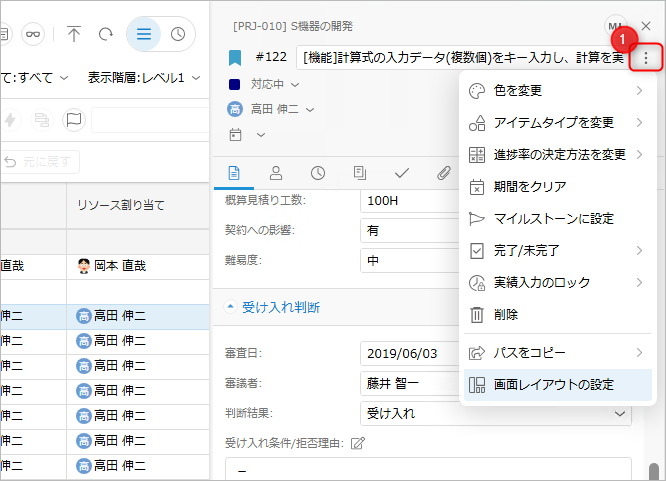 You can change the layout on the spot without navigating to the Project Management Screen.
-
-
Customize the fields to display from the "Screen Layout Settings" dialog as follows.
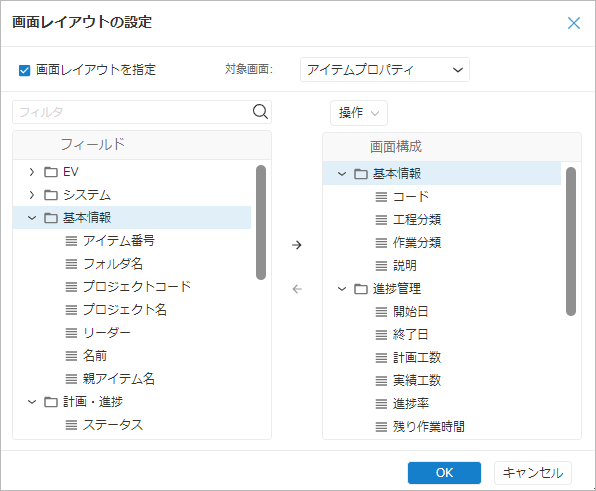
No. Editing Content Operation 1 Add to Display Target Select the target field from "Fields" and click "→". 2 Remove from Display Target Select the target field from "Screen Configuration" and click "←". 3 Create Group Select "Operation" - "Add Group". 4 Change Order Drag and drop the fields to move them. -
Click the "OK" button.
Changing Status
The progress of work items can be managed not only by the progress rate value, but also by the status.
By associating the status with the progress rate value, it becomes possible to represent the progress status uniquely in the project.
If you link each status with the progress rate as shown below,
Changing the status of a work item will automatically change the progress rate of the work item.
| Status | Not Started | In Progress | Awaiting Review | Addressing Issues | Awaiting Correction Confirmation | Completed |
|---|---|---|---|---|---|---|
| Progress Rate | 0% | 50% | 70% | 80% | 90% | 100% |
Operating Procedure
When setting the status of a work item, specify the items that can be selected from the statuses defined in the profile.

- Select the "Status" of the target item type from the left-hand side menu.
- To add a status, click the "+" button to display the "Select Status Type to Add" dialog box. To delete a status, select the target status and click the "-" button.
- Select the status to add from the list of statuses.
- Click the "→" button to move it to "Target to Add".
- Click the "OK" button.
- Enter the progress percentage value corresponding to the status in the "Progress Percentage" column.
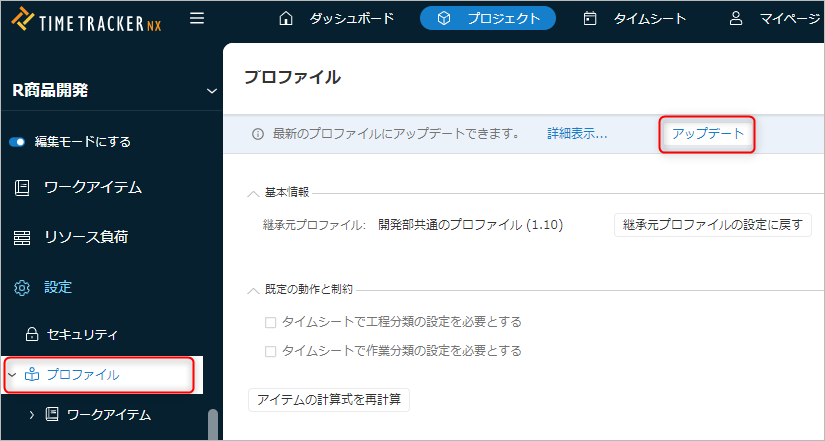
Reflecting Changes to the Base Profile
Reflecting Updates
The profile specified when creating a project has an inheritance relationship with the system-managed profile.
If the system-managed profile is revised, you can reflect the changes in the project settings with a single button click.
To update the profile applied to the project, perform the following steps:
-
Select "Profile" from the left-hand side menu.
-
Click the "Update" button.
-
Choose one of the following options regarding how to handle customizations made in the project:
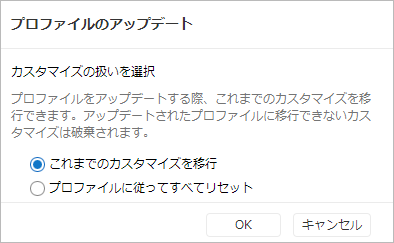
Both options reflect changes to the system settings profile, but
Project-specific customizations will be handled differently as follows:- Migrate previous customizations: They will remain after the changes are applied.
- Reset everything according to the profile: Everything will be discarded and nothing will remain.
-
Click the "OK" button in the "Update Profile" dialog.
Notes
- The "Apply Latest Version" button will not be displayed in the following cases:
- The latest profile has already been applied.
- The project is open in read mode.
- If you click the "Edit" button after step 1 to enter edit mode, the "Apply Latest Version" button will be disabled.
In this case, please press the "Cancel" or "Save" button to exit edit mode.
You can view this from "Show Details..." next to the "Update" button.
Please check the changes and decide whether or not to reflect them in the project.
Reverting Profile Changes
If you want to revert a profile that you have modified specifically for this project, you can reset it to the settings of the inherited profile.
This is useful when you want to undo changes or reset settings to their initial state.
This procedure can be used when you want to reset the settings of the entire profile at once.
If you want to reset only the settings of a specific item type, please refer to the following link: "Reset Item Type Settings"
Operating Procedure
-
Select "Profile" from the left-hand side menu.
-
Select "Revert to Inherited Profile Settings" in "Basic Information".
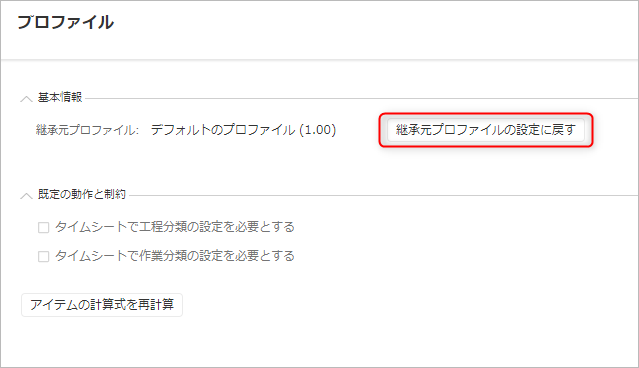
-
Check the contents of the dialog and click the "Yes" button.
Resetting Item Type Settings
If you want to revert to the original settings after changing the item type, you can reset the item type settings.
This is useful when you want to undo changes or revert to a previous state.
This is useful when you want to keep the settings for the entire profile but revert only individual item types to their original settings.
Procedure
-
Select "Profile" - "Work Items" from the left-hand side menu.
-
Select the target item type (multiple selections are possible) and click "Actions" at the top of the project list.
-
Select "Revert to Inherited Profile Settings" from the displayed menu.
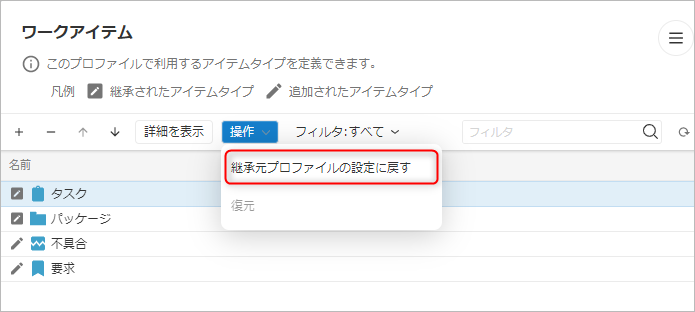
-
Review the contents of the dialog and click the "OK" button.