Editing the Gantt Table
Overview
Work items are work items (tasks) within a project.
You can add work items to a project on the Gantt table screen and perform the following actions:
- Plan by setting the planning period and planned effort.
- Assign resources (assignees) to work items, allowing assignees to input effort for the work item.
- Aggregate actual effort by project, user, organization, etc.
- Manage progress by updating the progress rate and status of work items.
Please refer to the second video.
"Link to video"
Opening the Gantt Table
First, open the target project using the following method.
- Open from Global Navigation
- This method opens from the project list screen.
- For details, please refer to the following link:
"Open Project"
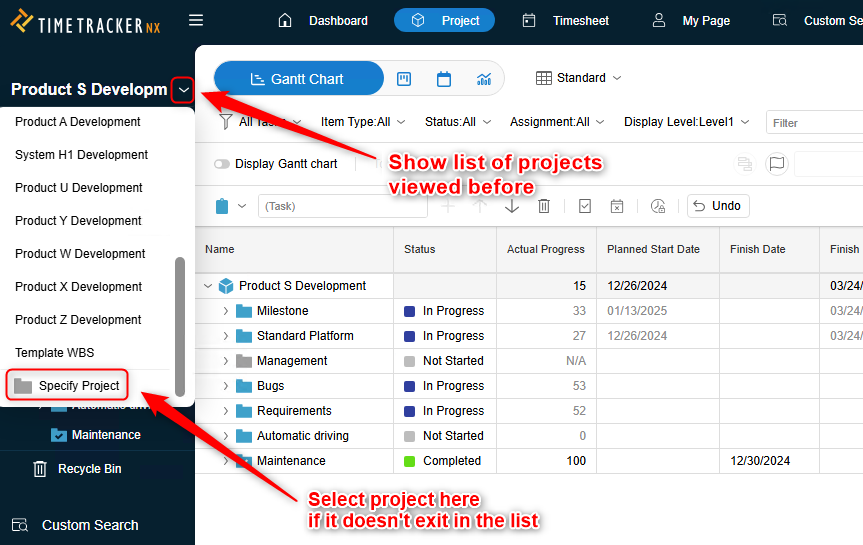
- Open from Local Navigation
- This method opens another project when a project is already open.
- Select the target project from the list of project names displayed in the project's local navigation.
- This is useful when you are editing one project and want to open another.
The screen displayed after opening a project is called the "Work Item Screen".
You plan the project by entering work item information (such as duration and planned effort).
Work item information is displayed in the following two formats:
- Gantt Table (Table)
- Gantt Chart (Line Chart)
- The planned period is displayed as a line (Gantt bar), allowing for visual confirmation.
- For details on Gantt charts, please refer to the following link.
"Editing the Gantt Chart"
- The planned period is displayed as a line (Gantt bar), allowing for visual confirmation.
Manipulating the Gantt Table
The first thing displayed when you open a project is the "Gantt Table".
You can change the configuration of fields (columns) displayed in the project to suit the situation of progress management and status checking.
- A defined field configuration is called a "table".
- You can define multiple tables according to your purpose and switch between table displays as needed.
- For example, a progress management table, a cost management table, etc.
There are many fields available in TimeTracker RX, but you can use different fields depending on the theme.
The Gantt table screen and its structure are as follows:
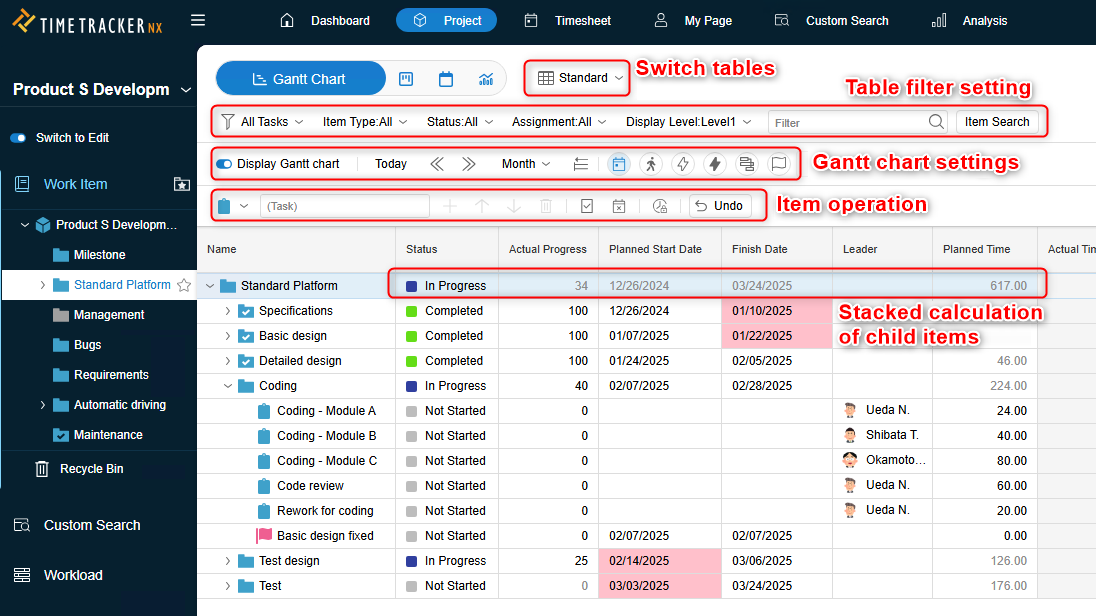
Edit/Switch Table Display
- Switch Table
- Filter Table Settings
- Gantt Chart Display Settings
- Item Operations within the Table
- You can perform operations such as adding, rearranging, and deleting items.
Table Items
A hierarchical structure of items (WBS) is implemented. The following operations can be performed on each item:
- Set field values
- Double-click the column of the target field and enter the content
- There are also fields that can be selected and entered from a list, such as "Status".
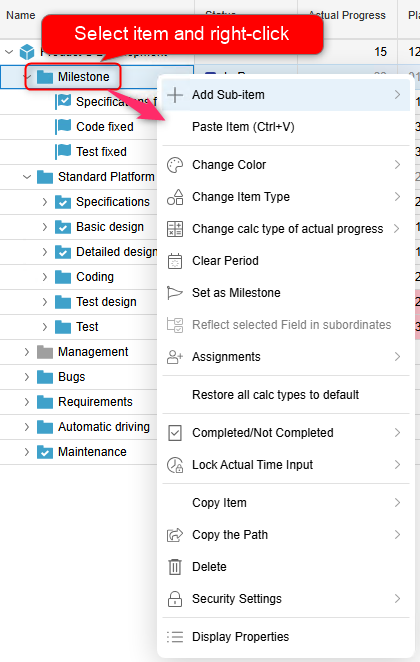
- Operate the target item by right-clicking.
- The operations that can be performed on the target item are displayed.
- The operations that can be performed on the target item are displayed.
For detailed instructions, please refer to the following:
| Menu | Detailed Processing |
|---|---|
| Copy/Paste Item | "Copy/Paste Item" |
| Change Item Type | "Change Item Type" |
| Change Progress Rate Determination Method | You can change the method for determining the progress rate. |
| Clear Period | Sets the start date/end date to unset. |
| Set as Milestone | "What is a Milestone?" |
| Resource Allocation | "Assign Resources to Work Items" |
| Determination Method | "Automatically Set Field Values" |
| Lock Actual Input | Locking prevents the input of actual results. Please lock if you will not be entering any more man-hours, such as for completed tasks. |
| Copy Path | "Utilize the URL of Each Item" |
| Security Settings | "Set Security per Item" |
Other
The following can be achieved; please utilize them.
Creating/Modifying Tables
Manage your data by switching tables based on the perspective you want to manage (e.g., "Progress Management," "Deliverables," "Cost," etc.).
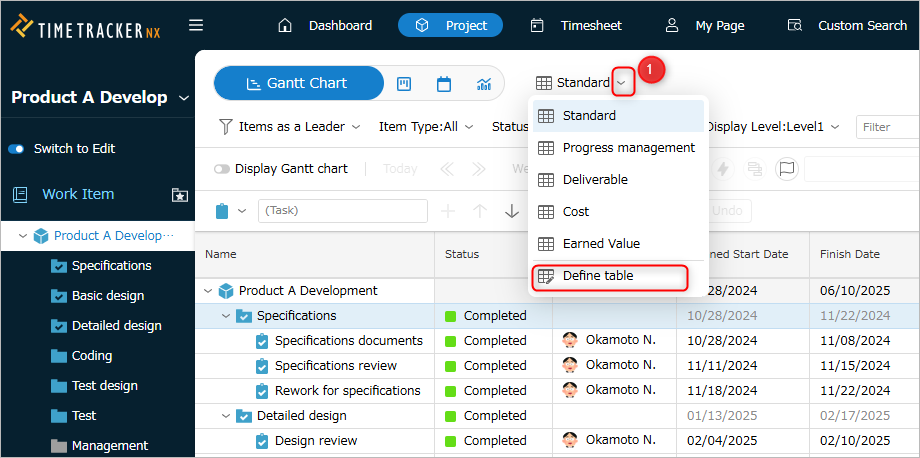
First, click ① below and select the target table.
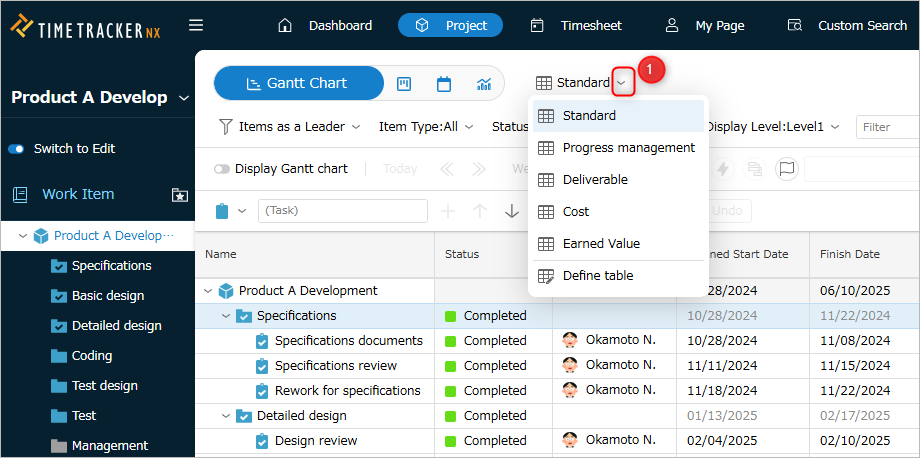
In addition to pre-prepared tables, you can also create the following:
- Create a new table
- Modify the contents of an already created table
Furthermore, by setting custom fields in your profile, you can also represent your own defined fields in tables.
For details, please refer to the following link: "Changing Field Configuration"
Creating a New Table
There are two ways to create a new table:
- Import table settings created in another project.
For details, see "Sharing Table Settings". - Define the table.
The following describes the procedure for "defining a table".
-
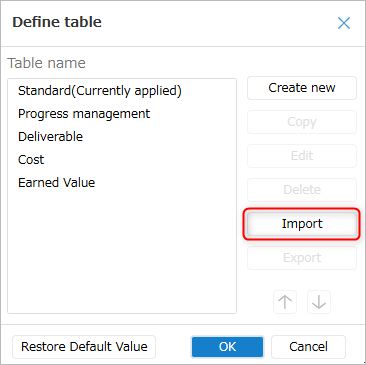
Click the icon ① at the far right of the displayed table name and select "Define Table".
-
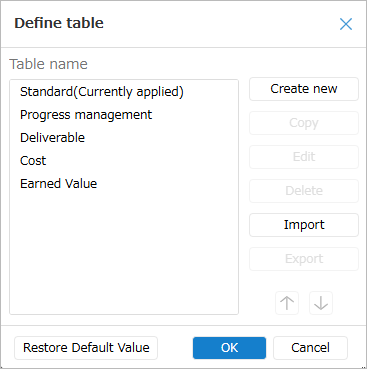
In the "Define Table" dialog, click "Create New".
-
Enter the table name.
-
Select the fields you want to display from the "Field List" and add them to "Displayed Fields".
-
Click the "OK" button.
Modifying the contents of an existing table
There are two methods:
-
Select the existing table in the "Table Definition" dialog and click "Edit".
-
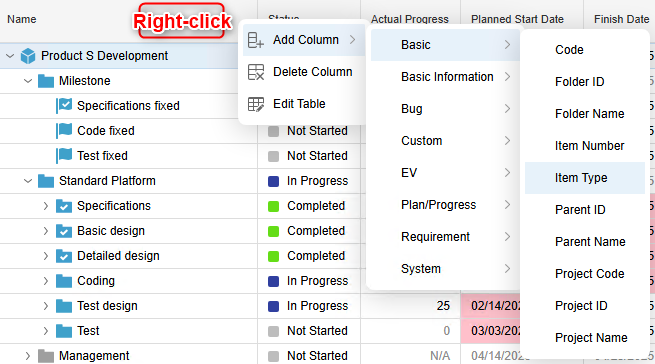
Select the Gantt table and add/delete fields by right-clicking.
Sharing table settings
By importing table settings from other projects, you can save the effort of defining them.
This is useful when you want to manage similar tasks or other projects using the same table.
There are two ways to share:
-
Import settings directly from the project.
-
Import settings via a configuration file.
- Tables saved as personal use
- Tables in projects for which you do not have viewing permissions
In this case, please export the table settings you wish to share beforehand using the "Export Table Settings" method.
Notes
Before importing table settings, please ensure that the custom fields applied to the project are the same as those in the source project.
- Custom fields that do not exist in the project will be excluded from the table settings.
- For custom field settings, please refer to "Changing Field Configuration".
Setup Procedure
Sharing table settings will be done from "Table Definition" in the following steps.
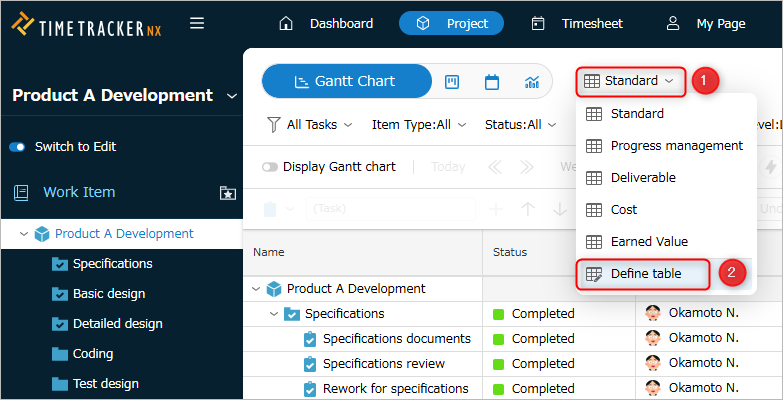
From step ② above, display the "Table Definition" dialog and click "Import".
-
Importing settings directly from a project
- Click "Import from another project" in the submenu.
- In the "Select Table Definition" dialog, select the project containing the table settings to import.
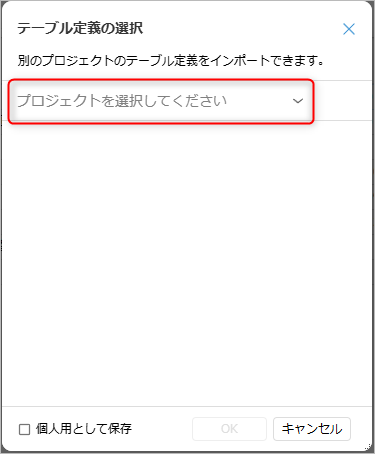
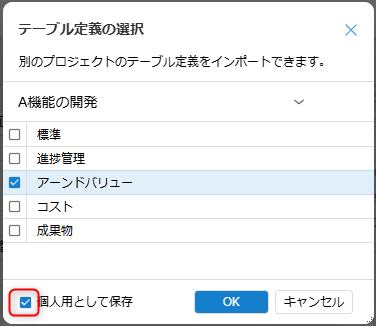
- From the list of tables defined in the selected project, check the tables to import and click "OK".
Multiple selections are possible.
-
Importing settings via a settings file
- Click "Import from file" in the submenu.
- In the "Import" dialog, click "Select file".
- In the "Open" dialog box, select the previously created file (#export-table-setting) (extension: gantt_tabledef) and click "Open".
- Click "OK" in the "Import" dialog box.
If an error occurs during import, the file may be corrupted.Please export the table settings file again.
Then, click "OK" in the "Table Definition" dialog box.
The imported table will be added to the end of the table list.
Check "Save as personal." Even if other members refer to the same project, they will not be able to select the target table.

Exporting Table Settings
When sharing table settings using a settings file, please export the table settings beforehand using the following steps:
-
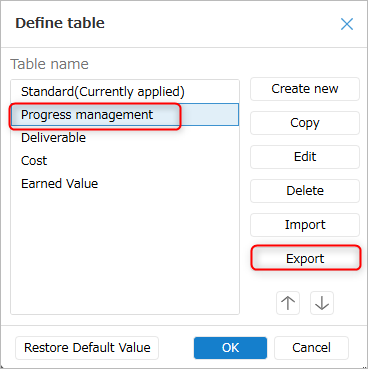
Click ② below to display the "Table Definition" dialog box.
-
Select the table to export and click "Export".
-
In the "Save As" dialog box, specify the folder and file name to save the exported file.
-
Click the "Save" button.
A file with the extension "gantt_tabledef" will be created in the specified save location.
Please import it using the procedure for "Importing settings via a settings file" in "Setup Procedure".
Table Filter Settings
You can narrow down the displayed items in the Gantt table to suit your purpose using the following methods.
- Filtering by specifying conditions
- Displaying work items by specifying hierarchy
If you have enabled "Treat as a folder" in the item type settings,
To display items using the filter item in the red box in the figure below, you need to expand the items under the target folder beforehand.

You can filter other items without expanding them, so please use them according to your needs.
The following explains the detailed procedure for filtering.
Filtering by Condition
You can narrow down (filter) work items on the WBS by specifying conditions.
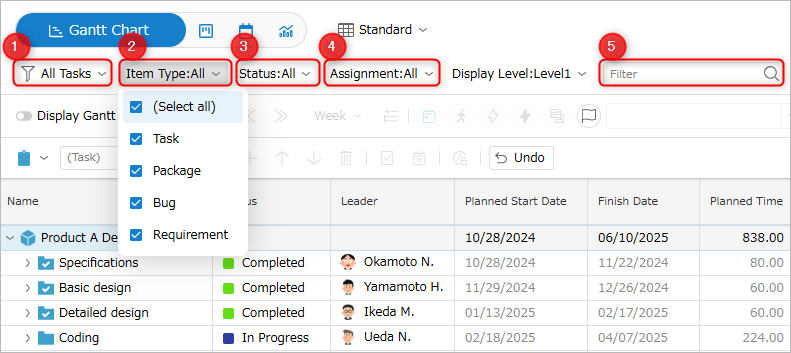
Only items that meet the conditions specified below will be displayed.
| Number | Specify Format | Example |
|---|---|---|
| ① | Built-in Filter | Frequently used filter items are pre-configured. Example: Selecting "Assigned by Me" will display only items to which resources have been assigned. |
| ② | Item Type | Specifying "Package" will display only packages. Multiple item types can be specified for filtering. |
| ③ | Status | Specifying "Incomplete" will display only incomplete items. Multiple statuses can be specified for filtering. |
| ④ | Assignment | Displays only items to which the selected user/user group has been assigned. (Multiple selections possible) Checking "Filter only for leaders" will display only items where the selected user is the leader. 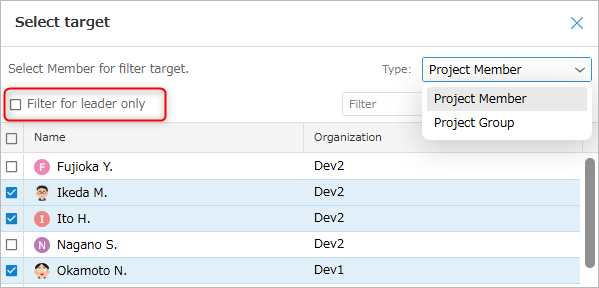 |
| ⑤ | Keywords | Displays only items containing specific keywords. (Specify multiple keywords with a blank space (AND condition)) |
Displaying Work Items by Specifying Hierarchy
Each user likely defines the WBS structure (hierarchy) according to their business needs.
Using this function, you can align the display of work items to the range you want to see, making it easier to get an overview.

Click the button on the screen above to select the hierarchy to display.
Expanding Child Items
The work item screen has a button (red box ">" in the image below) for displaying child items.
Clicking this button opens the child item directly below it.
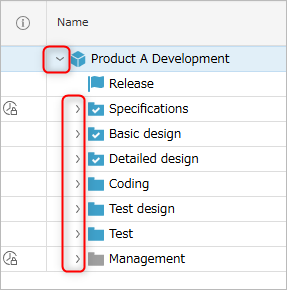
Holding down the Ctrl key and clicking the ">" button expands all items, down to the last item.
Use this depending on your needs.
The specific number depends on the server's specifications (CPU, memory load) and server configuration.
Please decide whether to operate or not based on the load on the server PC.
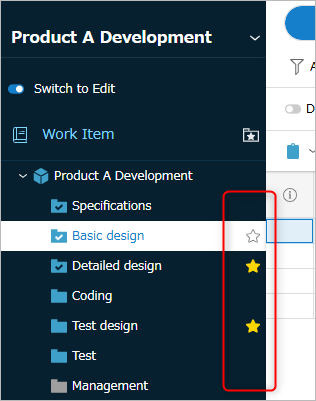
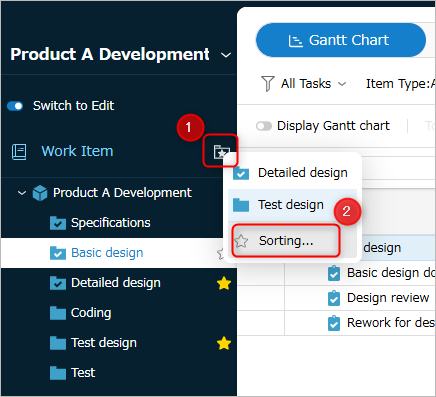
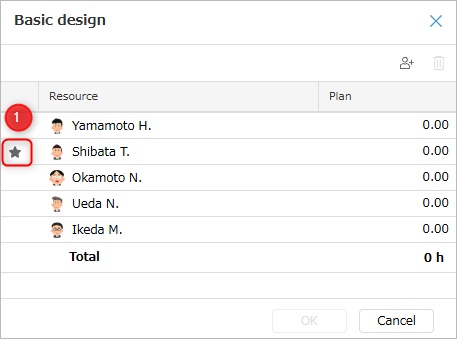
Registering Favorite Folders
If you have many folders, it's difficult to find and open the target folder every time.
In such cases, register folders as favorites in advance.
- Click on the ☆ in the left diagram. It will turn yellow when it's OK.
- Right diagram: After registration, you can open the target immediately by selecting it from ①.
- You can also sort from ②.
Copying/Pasting Items
You can copy/paste work items using the following method.
- Select the target item, right-click, and select from the menu that appears.
- Click "Ctrl+c" or "Ctrl+v" on your keyboard.
TimeTracker RX also provides the following copy operations:
This saves you the trouble of manually entering information for items, allowing you to efficiently create and edit project plans. Please use these features.
- Copy field values
- Reflect values in child items
Copying Field Values
You can copy the field values of an existing work item and paste them into the same field in another work item using the following method.
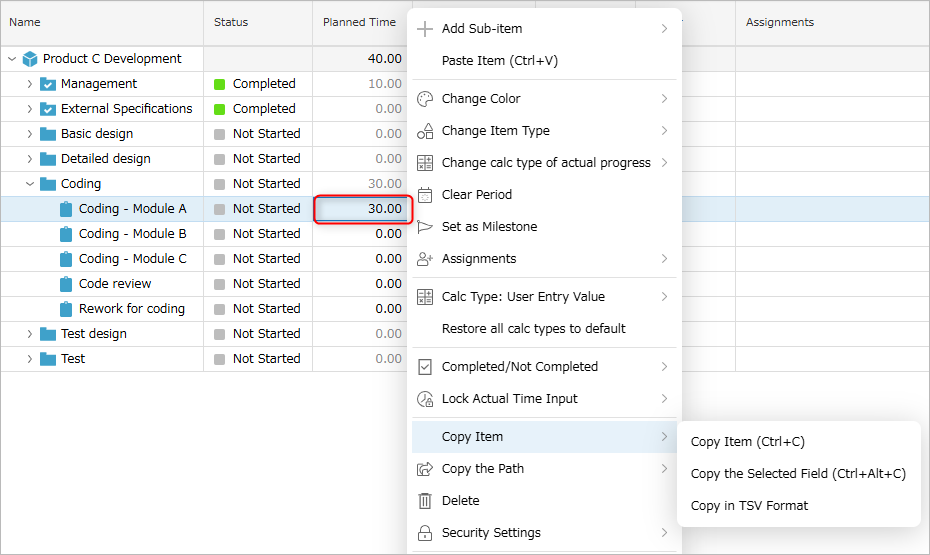
Copy
Right-click the target item and select "Copy Item" - "Copy Selected Field".
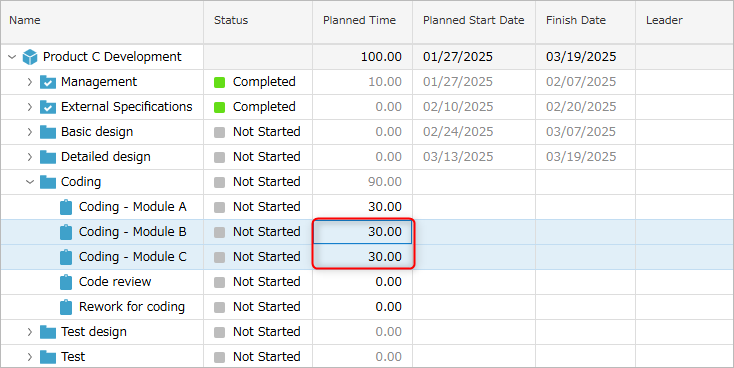
In the image below, "Planned Effort" is selected and copied.
Pasting
Right-click on the item and select "Paste XXX". (XXX: Name of the field from which the value was copied)
In the image below, "Planned Effort" is pasted after selecting multiple work items and copying them.
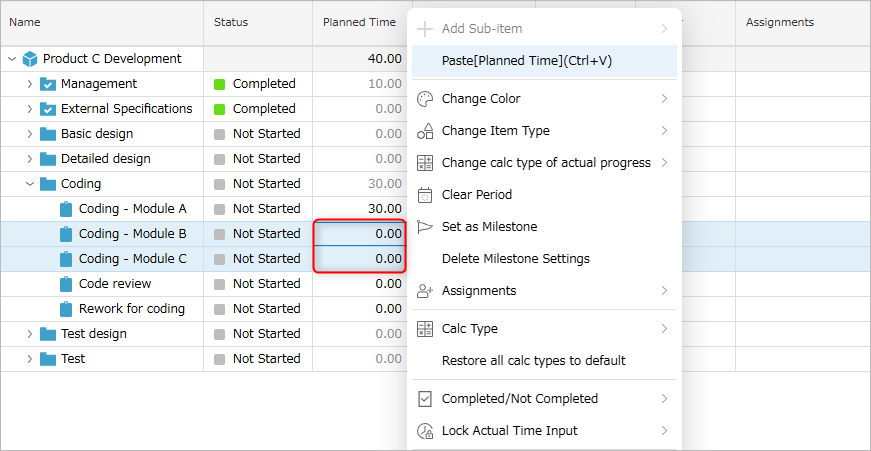
After pasting, the values were set as follows:
Reflecting Field Values to Child Items
You can reflect the field values of a selected item to all items under that item.
This makes it easy to set the same value for subordinate items, such as defining process classifications or work classifications together.
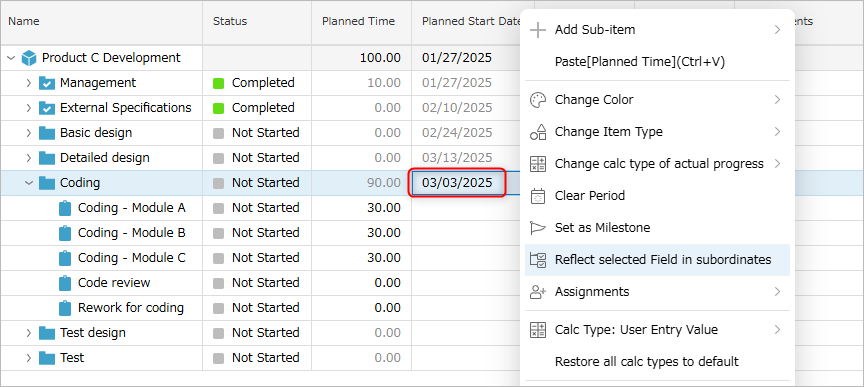
Right-click the item's field and select "Apply Selected Fields to Children."
As an example, we will apply "Start Date" to the child work items.
| Before Application | After Application |
|---|---|
 | 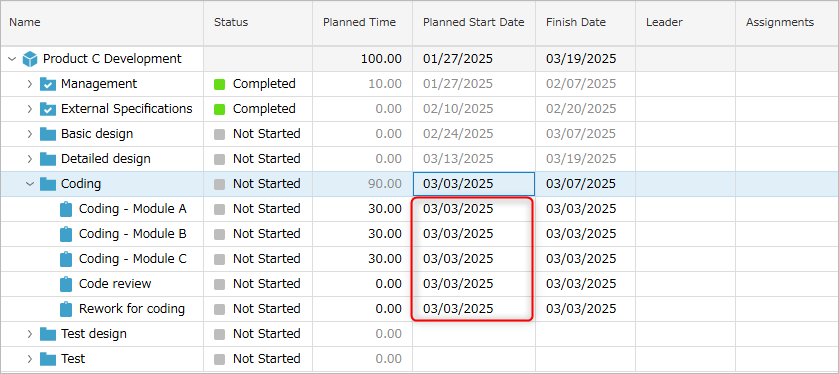 |
Notes
- The number of work items to which values can be applied is limited to 1000.
If the number of target items exceeds 1000, an error will occur and the values will not be applied. - The behavior when multiple items are selected is as follows.
- For items with a parent-child relationship: The same behavior occurs as when selecting the top-level item.
- For items without a parent-child relationship: The field values of individual items are reflected in the lower-level items.
Assigning Resources to Items
By assigning resources (assignees) to work items, assignees can enter man-hours on the timesheet screen.
The following describes how to assign resources.
Here, we will introduce the following:
- Assign a resource
- Assign to an account
- Assign to a group
- Set a leader for an item
- Copy a resource assignment
- Assign the same resource to a child item
- Copy a resource assignment to another item
If you are still in the early stages of planning and cannot define detailed items, you can operate as follows.
| Timing | Settings | Achievable |
|---|---|---|
| Planning Phase | -Assign resources to task packages - Set planned effort for each resource | Enables rough cost and effort estimation |
| After Project Start | Assign resources to detailed items | Enables measurement of actual effort on an item-by-item basis |
Detailed setting methods are explained below.
Assigning Resources/Groups
Resources can be assigned to each item.
-
Open the resource selection dialog using one of the following methods.
- Double-click the "Resource Assignment" column of the target item.
- Right-click the target work item and select "Assign Resource".
- Double-click the "Resource Assignment" column of the target item.
-
In the displayed dialog, click the "Add" icon①.

-
Select the target member from the displayed list.
-
Click the "Save" button.
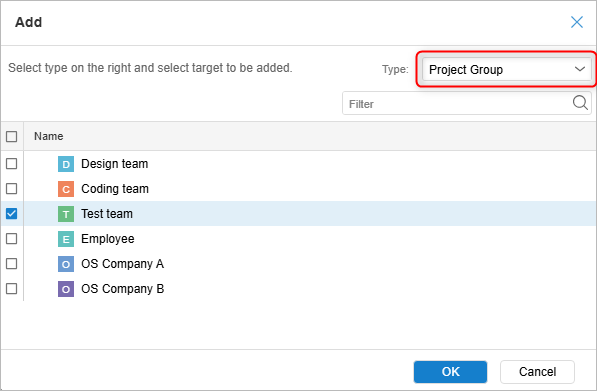
Assigning Groups
You can also assign "Groups" to the resources of work items.
A "Group" is a unit for grouping members.
- You can classify members according to their roles within the project, such as a "Test Team."
- You can assign a team to the resource of an item and then change the assignment of assignees all at once later.
Assigning groups to the resources of each item is useful in the following cases:
- When adding/deleting resource assignments occurs frequently.
- When specific assignees have not been decided, such as during the initial planning stage.
You can assign groups by selecting the following from the resource assignment dialog.
Assigning Leaders
You can assign "Leaders" to work items.
-
A leader refers to the person responsible for the assigned item.
-
Assign from the resources.
Specifically, in the "Resource Assignment" dialog, click ① to the left of the target resource.
Users set as leaders will be able to do the following:
- My Page screen
- Manage the work items you are in charge of.
- Project screen
- Updates to the progress of the work items you are in charge of will be notified on the project screen.
- Updates to the progress of the work items you are in charge of will be notified on the project screen.
Reflecting resource assignments to other items
Resource assignments for one item can be easily reflected to other items using the following method:
| Operation | Purpose | Benefits |
|---|---|---|
| Reflect to child items | Reflect resource assignments to child items | One-click operation. Leaders can also be set. |
| Copy & Paste to Other Items | Apply resource assignments to non-child items | Can be applied to other projects |
Apply to Child Items
Resources assigned to a parent work item can be assigned to child work items all at once.
This is very convenient when assigning the same person to child work items, as it saves the effort of setting each work item individually.
Select the parent item, right-click, and select "Apply Resource Assignments to Children".
Set the following for the child items.
- Resource Assignment
- Leader

Copy & Paste to Other Items
You can copy resource assignments set for an item to other items.
You can copy not only to items in different parent packages, but also to items in other projects, saving you the trouble of setting them up again.
Select the item whose resource assignment you want to copy, and perform the following operations from the right-click menu:
- "Copy Resource Assignment"
- "Paste Resource Assignment"
Changing the Date of an Item
The date of a work item can be changed using the following method:
- Set the date in the Gantt chart.
For details, please refer to the linked page: "Basic Gantt Chart Operations" - Changing the Start/End Date Fields in the Gantt Table.
Here, we will explain method 2.
First, clicking either the Start/End Date field will display a dedicated calendar.
Perform the following operations according to the settings you wish to configure.
-
To set new dates: Click the dates in the order of Start Date → End Date.

-
To change the set dates:
The following actions will occur depending on the field being changed.
- Start Date: The end date will be changed to maintain the pre-set period (10 working days in the diagram above).
- End Date: The start date remains the same, but the period is shortened. (In the diagram above, it changes from 10 to 5 working days)
If the end date is set before the start date, the start date will also become the specified date.
- Working Days: The start date remains the same, but the end date changes.
Automatically setting field values
Fields such as progress rate and planned effort can be set to update their values according to the WBS structure.
Right-click the column of the target field on the Gantt table and select from the "Decision Method" list.
- For field determination methods, please refer to the following.
- For the determination methods that can be set for each field, please refer to the following.
Examples of Using Determination Methods
The following are examples of how to use field determination methods.
| Example | Setting the "Decision Method" | What can be achieved |
|---|---|---|
| Accumulate planned effort | Total value of child | Automatically set the total planned effort of child items to the planned effort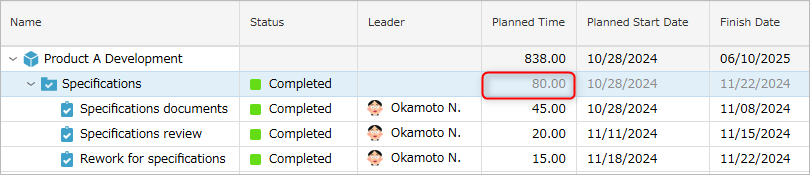 |
| Adjust the planning period to the child item | Maximum value of child | Reflect the end date of the child item to the end date of the parent item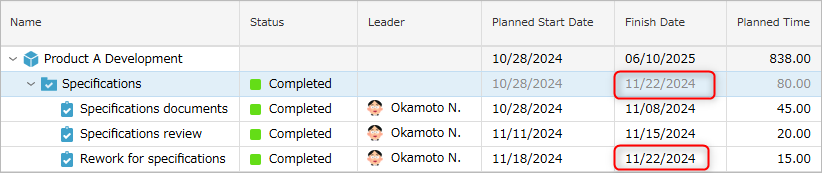 |
| Reflect the progress rate of child items | Parent item: Weighted average Child item: Scale progress | Automatically updates when the actual scale of the child item is entered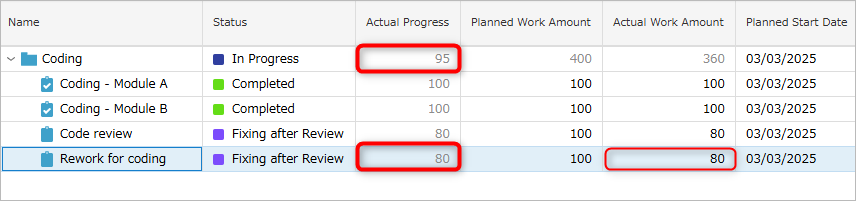 |
Receive item change notifications
When a work item is changed, you can receive a notification on the project screen as follows:
| Notification Recipient | Notification Trigger | Effect |
|---|---|---|
| Work Item Leader | -Set as the leader of a work item - The work item that the leader is responsible for has been completed | Detects changes in the status of the work item that the leader is responsible for |
| Members Assigned to a Resource | A comment has been added "Details of the Comment Function" | Members can check the updated content |
You can check the notification in the following ways:
-
A notification will appear on the "bell" icon in the upper right corner of the screen.

-
Clicking the icon will display the notification content.
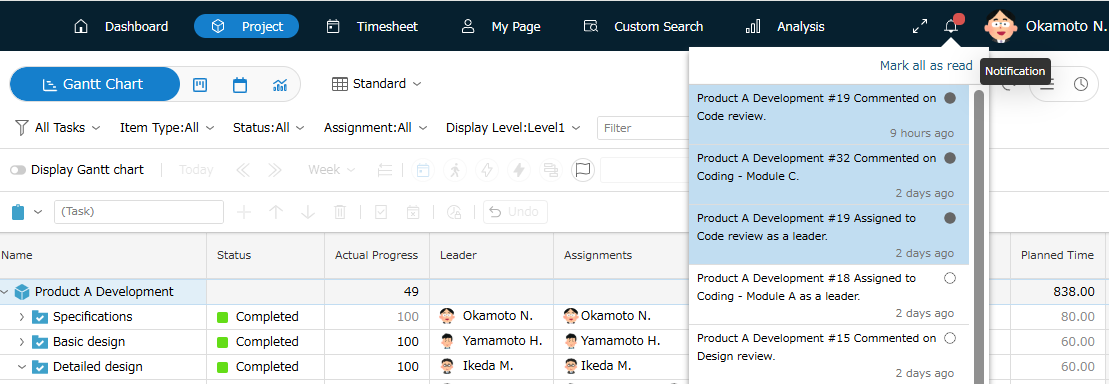
-
Clicking on the target notification will take you to the target work item.
If comments have been added, they will be displayed.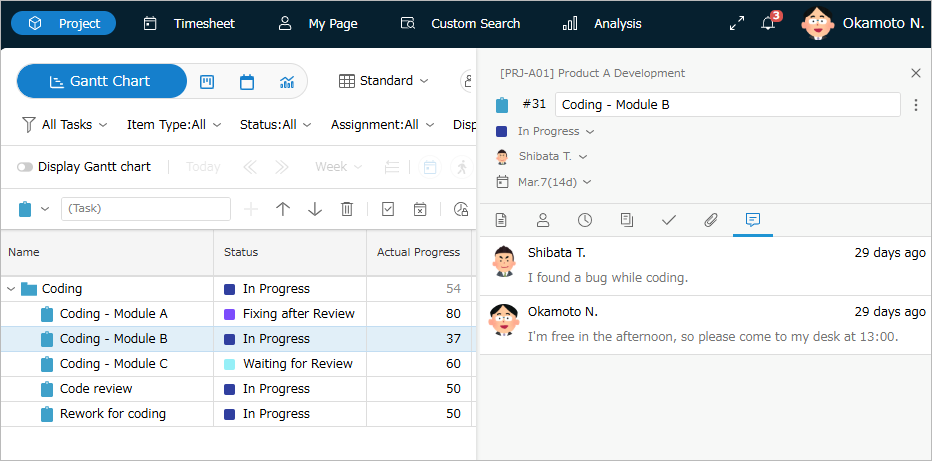
Undo
If you make a mistake, you can revert to the previous state using the following methods:
- Ctrl + z
- Click the Undo button.

The following operations can be undone:
- Input into the Gantt table
- Changing the date in the Gantt chart
However, the following operations cannot be undone:
- Changing "Resource Allocation"
- Changes made by selecting an item and right-clicking
However, you cannot revert to the state before the following operations:
- Reloading the screen (this includes pressing F5 or reloading the browser)
- The "operations that cannot be undone" mentioned above
Example: If you perform ① "Change Item Name" → ② "Change Resource Allocation" → ③ "Change Date" → ④ "Change Status," repeatedly using Undo will revert to state ②.
Obtaining Item Information
TimeTracker RX not only handles data on the screen, but also provides a function to obtain item information for use in other tools such as Excel.
Specifically, this includes:
- Utilizing the URL of each item
- Copying data in tab-separated format
Details are explained below.
Utilizing Item URLs
TimeTracker RX allows you to specify screens and identify items by specifying a URL (path) in your browser.
You can copy this path and use it in various functions.
The copied path can be used in the following situations:
-
Importing Schedules
Paste the copied URL into the body of the meeting invitation.
When importing schedules, it becomes possible to automatically assign actual work hours to these schedules, allowing you to input actual work hours with a single button click.
See below for details. -
Excel Integration
If there are multiple work items to import, you can specify the target.
See below for details.
You can obtain the path using the following methods. Please select the menu according to your needs.
-
Project screen
Select the target work item and right-click.
-
Timesheet
Select the target work item in the work item tree and right-click.
| No. | Menu | Purpose |
|---|---|---|
| 1 | Path to Timesheet | Opens the timesheet with the target work item selected in the work item tree |
| 2 | Path to Project | Opens the project with the target work item selected in the Gantt table |
Copying Data in Tab-Delimited Format
You can copy the Gantt table information displayed on the project screen in tab-delimited format (TSV format).
The operation is simple: select the target item, right-click, and select "Copy Item" - "Copy in TSV Format".
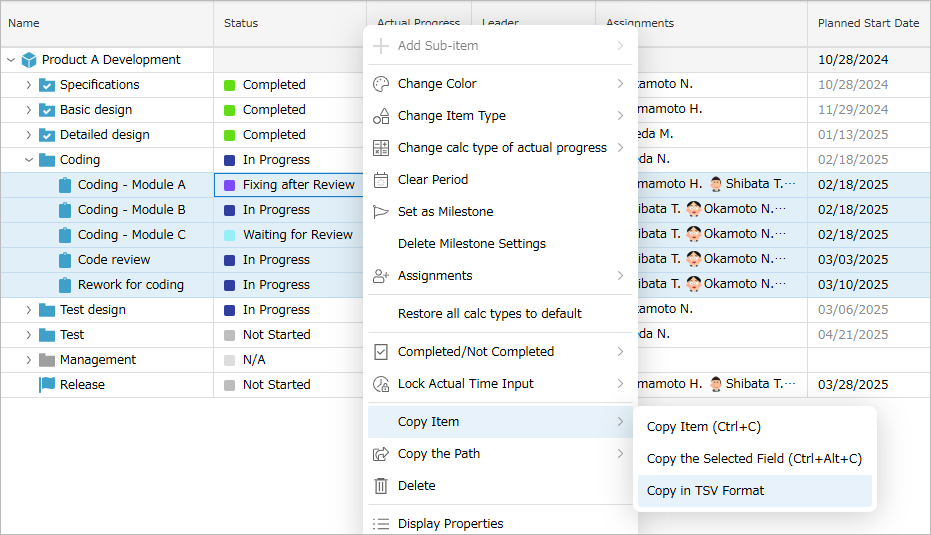
This allows for the following uses:
-
Paste project progress information managed in TimeTracker RX into reports such as Excel.
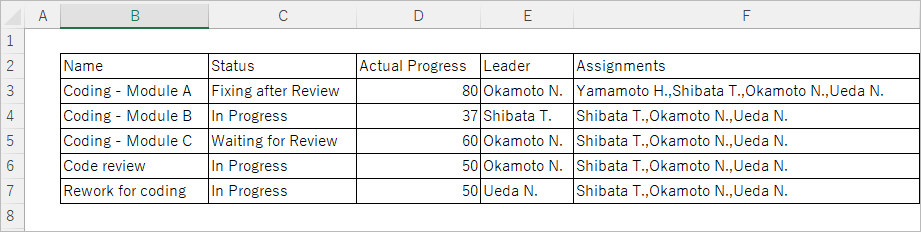
-
Use as input information for project data used in other systems.
You can also copy data from multiple work items.