Reflect in Excel
Overview
By using the Excel integration add-in, you can reflect data on TimeTracker RX in Excel.
The following two functions can be achieved by simply clicking the buttons on the Excel ribbon.
- "Import" function to create new data in Excel
- "Get latest data" function to update imported table-format data to the latest information

Import data into Excel
Copy the work items of the TimeTracker RX project and import them into Excel as table-format data.
-
The following can be achieved by importing data from TimeTracker RX into a pre-prepared Excel table.
- Simply copy the data of TimeTracker RX work items into Excel to create a new table
- Reflect the data of TimeTracker RX work items into an empty Excel table with only the headers defined in advance.
- Simply copy the data of TimeTracker RX work items into Excel to create a new table
-
Once you execute "Import", you can update the data to the latest information by "Get latest data", or, conversely, you can reflect the data in Excel in the TimeTracker RX work items by "Reflect data".
We will explain each of the above two uses.
Create a new table
First, let's simply copy the data from TimeTracker RX into Excel.
-
In the Excel file, select the cell into which you want to import the project information.
-
Click the "Import" button on the "TimeTracker RX" tab.
If the setting information input dialog box is displayedFollow the procedure in Setting connection information.
-
In the Import - Select Project dialog that appears, select the project from which you want to import data.

- You can narrow down the projects displayed in the Project List by entering the following.
- Enter a keyword in the Filter area.
- Select the project to display in the Target field.
- Enter a keyword in the Filter area.
- You can also specify the import target easily by using the TimeTracker RX URL.
For details, see the following link.
"Specify TimeTracker RX work items directly from the URL"
Finished projects will not be displayed in the list.If you want to import, specify the URL of the work item of the finished project using the method described below in "Specify TimeTracker RX work items directly from the URL".
- You can narrow down the projects displayed in the Project List by entering the following.
-
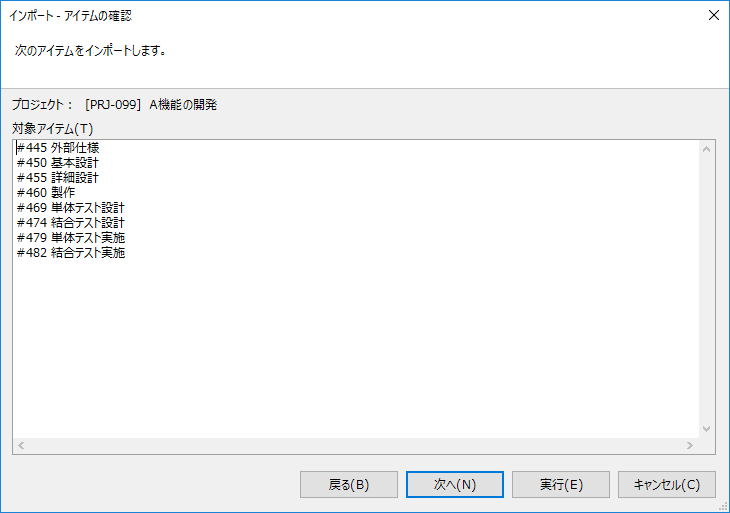
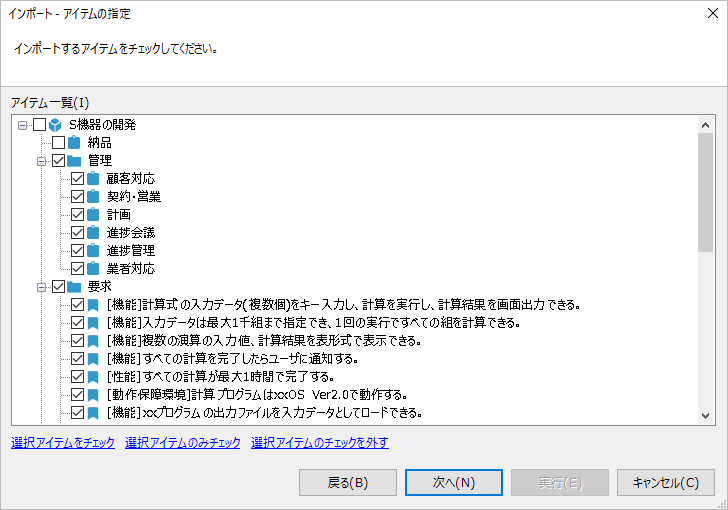
The screen will switch to the "Item List", so check the work items you want to import and click "Next".
- Check parent item: All child items under it will be checked.
- Uncheck parent item: All child items will also be unchecked.
If you want to check only the parent item, select the target parent item and click "Check selected items only".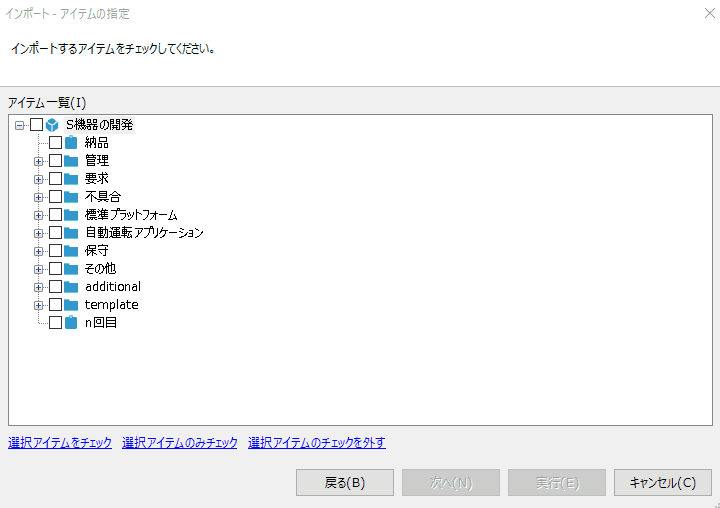
- Check parent item: All child items under it will be checked.
-
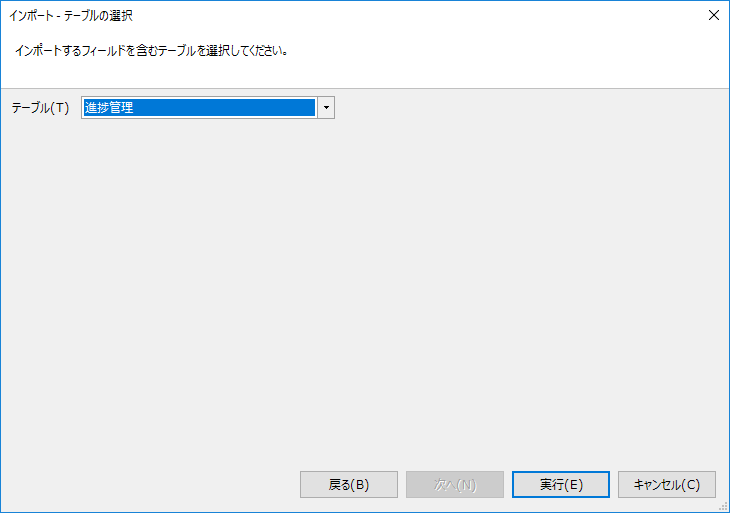
In the "Import - Select Table" dialog, specify the table that contains the fields you want to import and click "Execute".
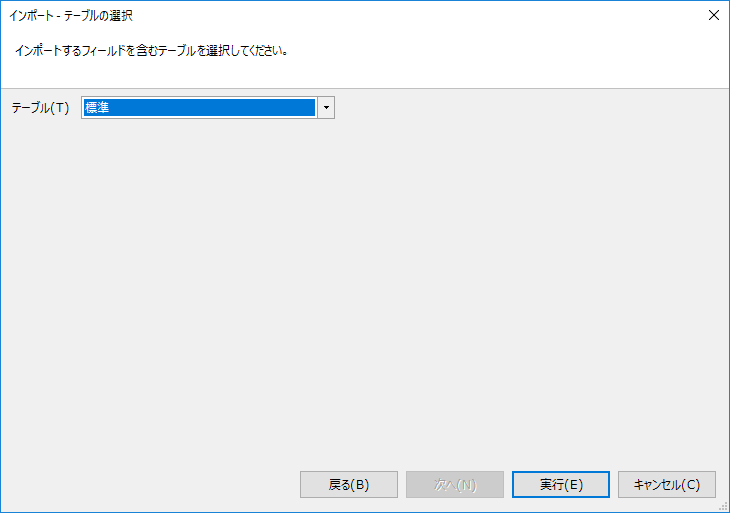 Selectable tables
Tables defined in the selected project are eligible.
If the table does not exist, define it using the method in the following link: "Create a new table" -
Click "OK" in the "Execution Result" dialog that appears to complete the import.
If an error occurs, expand the "Result Details" item to check the details.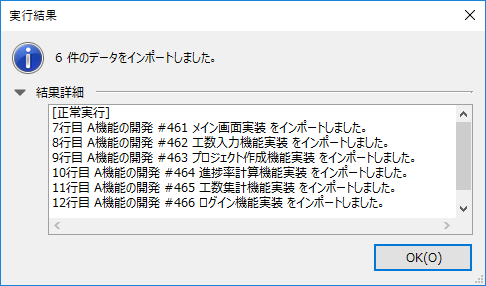
Specify the TimeTracker RX work item directly from the URL
You can specify the target project and work item using the URL copied with "Copy Path".
You can set the table information as well, so you can import easily.
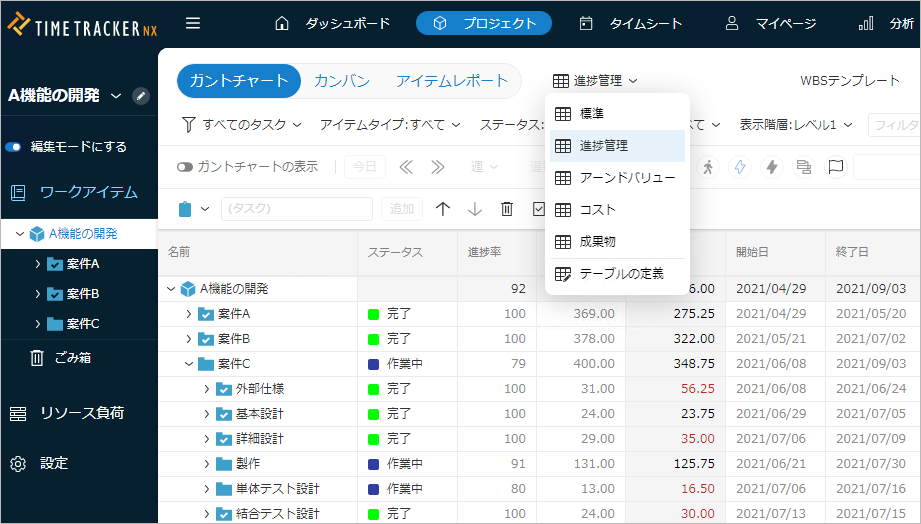
The following procedure imports the display data of the Gantt table used for progress management in TimeTracker RX
into Excel to create a progress report.
-
Display the Gantt table for progress management on the TimeTracker RX project screen.
-
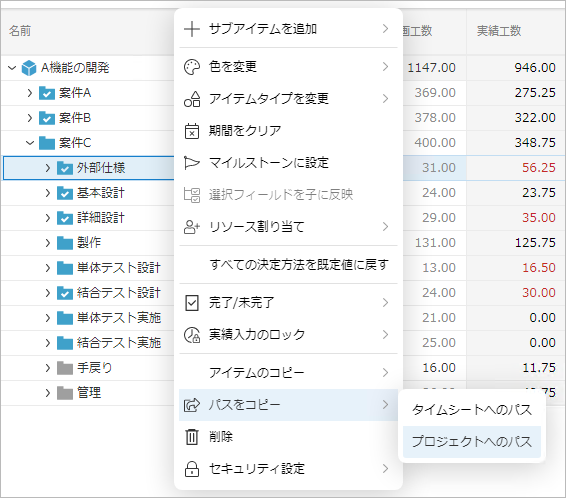
Select the work items to be reported in the progress report.
-
Right-click to display "Copy Path" and select "Path to Project".
-
In the Excel file, select the cell into which you want to import the project information.
-
Click the "Import" button on the "TimeTracker RX" tab.
-
In the "Import - Select Project" dialog that appears,
Click "Paste the TimeTracker RX URL from the web browser".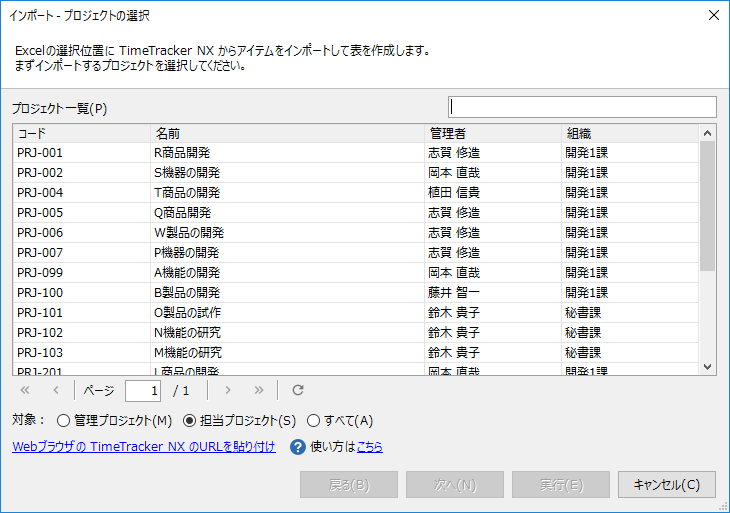
-
In the "Import - Confirm Items" dialog, check the work items to be imported and click "Next".
-
In the "Import - Select Tables" dialog, select the table to output and click "Execute".
-
Click "OK" in the "Execution Result" dialog that appears to complete the import.
Import data into an existing table
You can import TimeTracker RX data into a table.
This is useful when you want to format a report in advance, such as a project report.
-
From the table in the Excel file, select the cell into which you want to import project information.
-
For tables with only headers:
A cell in the header or in the row immediately below the header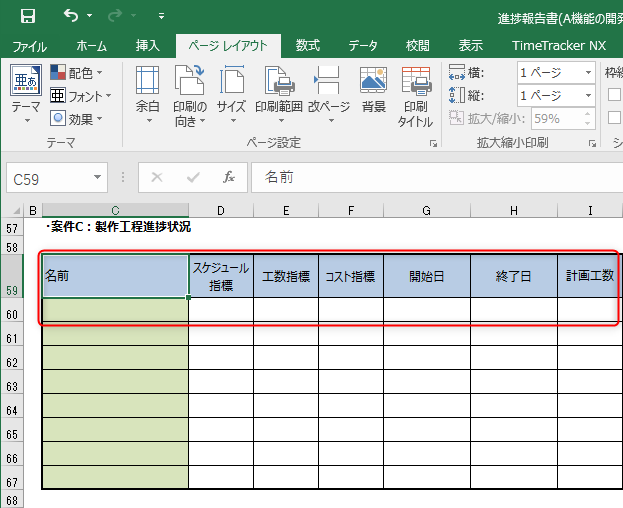
-
To add a new row of data to an existing table:
"Header" or "A cell in a column where data exists continuously from just above the selected cell to the header"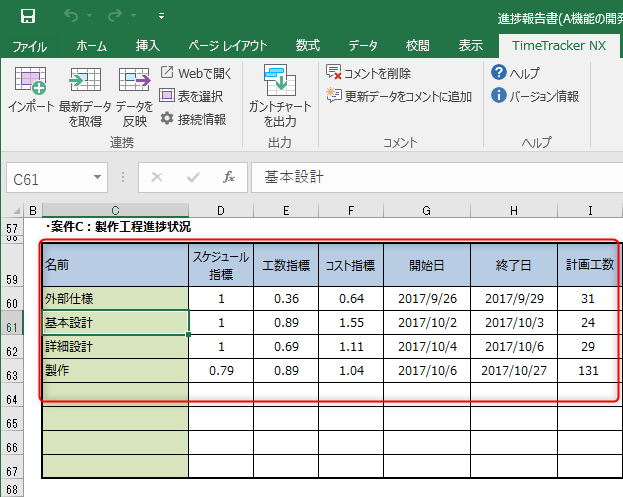
-
-
Click the "Import" button on the "TimeTracker RX" tab.
If the setting information input dialog is displayedFollow the procedure in Set connection information.
-
In the "Import - Select project" dialog that appears, select the project to import data into.
You can narrow down the projects displayed in the "Project List" by the following methods.- Enter a keyword in the area.
- Select the projects to display in the target field.

You can also easily specify the import target by using the TimeTracker RX URL.For details, see the following link: "Specify TimeTracker RX work items directly from the URL"
- Enter a keyword in the area.
-
Check the work items to be imported in the "Item List" and click "Next".
If the target table already contains registered items, those items will be checked and cannot be selected.
-
In the "Import - Match columns and fields" dialog that appears,
select the TimeTracker RX fields that correspond to the Excel columns and click "Execute".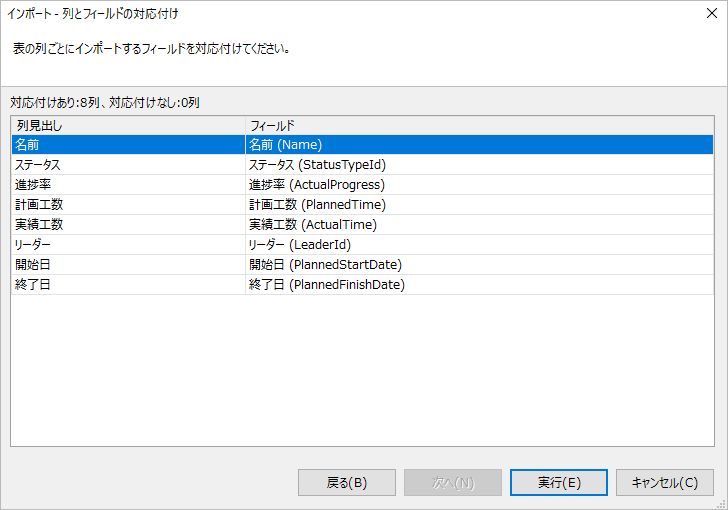
To change the corresponding fields, click "..." on the far right.
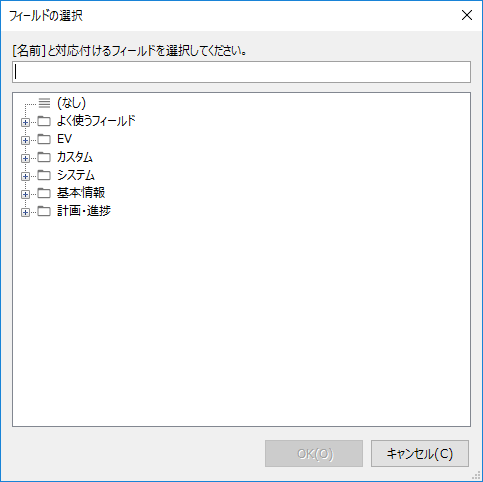
You can select fields efficiently using the following methods.
- Specify the corresponding field in the "Select Field" dialog that appears.
- Enter a keyword in the text area to extract fields that contain the keyword.
- Search for a field from "Frequently used fields" which lists fields that are often used for data integration.
Mapping of column header names and TimeTracker RX field namesIf they are the same, the fields will be mapped in advance, so you can save the trouble of setting them up.
It is saved for each project, so if you set it up at the beginning, other members can update the data as it is. - Specify the corresponding field in the "Select Field" dialog that appears.
-
Click "OK" in the "Execution Result" dialog that appears after the update is complete to close the dialog.
If the update fails, click "Result Details" to check the details.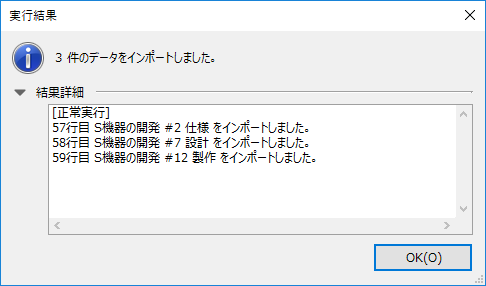
Important Notes on Importing Data into Excel
-
All imported items will be displayed at the same level.
For instructions on how to align with TimeTracker’s WBS, see “Reproducing the WBS with the Excel Integration Add-in”. -
By default, the “Resource Assignment” column displays a maximum of 10 users.
If more than 10 resources are assigned, the number of unlisted resources will be displayed as “+XX”.You can change the display limit by following the steps in “Resource Assignment Settings”.Importing a large number of resources may take a long time. Please limit the import to the number of resources you need to manage.
Update Excel data to the latest information
Data imported by "Import" can be updated to the latest information in Excel at any time.
The procedure for doing so is as follows.
Data cannot be updated because there is no association between Excel and TimeTracker RX work items.
In that case, please follow the following link: "Import data into Excel"
-
Select the area to be updated to the latest data in TimeTracker RX.
- If the selected range is part of a table, only the rows in the selected range will be updated to the latest data.
- Clicking "Select table" on the "TimeTracker RX" tab will select the entire table including the selected range.
- If the selected range is part of a table, only the rows in the selected range will be updated to the latest data.
-
Click "Get Latest Data" on the "TimeTracker RX" tab.
-
In the "Get Latest Data - Match Columns and Fields" dialog,
Select the TimeTracker RX field that corresponds to the Excel column and click "Execute".
For details, see the following link: "Step 6 of Importing Data to an Existing Table" -
Click "OK" in the "Execution Result" dialog that appears after the update is complete to close the dialog.
If the update fails, click "Result Details" to check the details.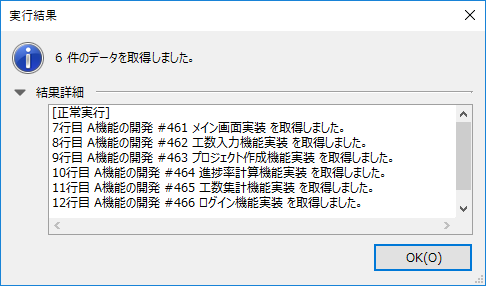
This will update the Excel data to the latest data in TimeTracker RX.
Record data changes
You can record data updates as comments in Excel cells.
To do this, click "Add updated data to comment" and select it, then execute "Get latest data".
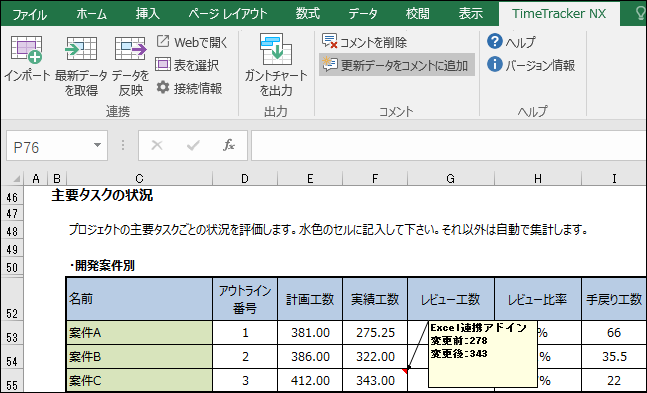
- If you no longer need the changes, click "Delete comment" in the "TimeTracker RX" tab to delete the comments in the currently selected range.
- If there is something about the data in the table that concerns you, select the relevant part and click "Open in Web" in the "TimeTracker RX" tab to display the relevant part in TimeTracker RX.