Edit Gantt Chart
Overview
TimeTracker RX visually displays the item information entered in the Gantt table in a Gantt chart.
For more information on the Gantt chart, please see below.
- "Gantt Table" .
You can mainly check the following.
- Item duration
- Dependencies between items
- Understanding the project status from a broader perspective
Basic operation of Gantt chart
First, open the project management screen and turn on "Display Gantt chart".

Lines (Gantt bars) and the following are displayed for each item.
-
Item name, leader name, start date/end date
-
Gantt chart colors are displayed according to the same rules as Gantt tables.
Example: Completed items are green, etc. -
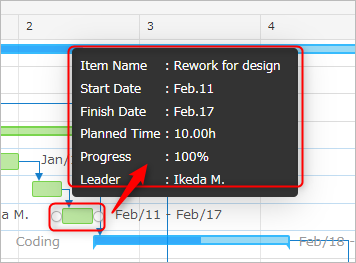
Clicking on a Gantt bar will display detailed information about the item.
 If the Gantt bars are not displayed on the Gantt chart
Please make sure that you have entered the correct planned start and end dates for the target item.
The following operations can be performed on the Gantt chart.
-
Set the planning period on the Gantt chart
- Drag the start date to the end date of the target item on the Gantt chart.
-
Change the planning period on the Gantt chart
- Change the start date: Drag the left edge of the Gantt bar.
- Change the end date: Drag the right edge of the Gantt bar.
- Move the period: Drag and drop the Gantt bar.
- Change the start date: Drag the left edge of the Gantt bar.
-
Select a Gantt bar and right-click to perform various operations.
The following functions are explained in detail at the links.
Expressing Milestones
Every project has turning points in the process.
(e.g. Plan Fix, Specification Fix, Evaluation Event, Delivery, etc.)
Setting these as "milestones" can prevent omissions and oversights when planning the project.
Right-click the target item and select "Set as Milestone".
It will be displayed as follows on the Gantt chart.

Make a rough plan according to the milestones you have set.
Creating Links (Dependencies) Between Work Items
To clearly show dependencies between work items, set links.
The following are the benefits of using links.
- Expresses the dependency of work items on the Gantt chart.
- The order in which items are handled becomes clear.
- Visualizes waiting states between items (one item cannot start until the other is finished).
- Maintains the link order and interval.
- If the planned period of an item is changed, the period of the subsequent item will also follow.
- There is no need to be aware of margins even if plans change.

There are the following types of links.
| No. | Link type | Meaning |
|---|---|---|
| 1 | Finish - Start | The subsequent work item starts after the preceding work item is finished. |
| 2 | Start - Start | The linked work items start at the same time. |
| 3 | End - End | When a subsequent work item ends, the preceding work item also ends. |
| 4 | Start - End | When a subsequent work item starts, the preceding work item ends. |
Set links using the Gantt chart. Specific operations are explained below.
- Creating/Deleting Links
- Setting Link Interval
Link Color
The link color indicates the link settings and schedule consistency.
| Color | Schedule Inconsistency | Whether or Not to Check "Fix Link Interval" |
|---|---|---|
| Blue | None | None |
| Green | None | Yes |
| Red | Yes | - |
Example) The end date of the link source is later than the start date of the link destination, etc.
Creating/Deleting Links
You can create links on the Gantt chart by dragging from the source item to the destination item.
-
Left-click the edge (right/left edge) of the item with the mouse and an arrow will appear.
While still holding the left mouse button, drag the mouse to the destination item. -
The drag source/destination for the link you create will be as follows.
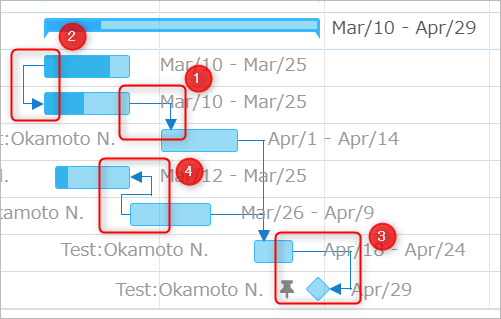
No. Link type Link creation procedure
Drag source
Drag destination① End - Start Right end of predecessor item Left end of successor item ② Start - Start Left end of predecessor item Left end of successor item ③ End - End Right end of predecessor item Right end of successor item ④ Start - End Left end of successor item Right end of predecessor item With the above settings, the Gantt chart will be displayed as follows.
The following operations can be performed on the created items.
-
Change the link type.
-
Select the item with the link, right-click, and select the target work item from "Set Link".
-
Select "Link Type" from the link setting dialog.

-
-
Delete a link
- Select the item you want to delete, right-click, and select "Delete Link".
- Delete "all" links set for the target item.
Set link interval
There are mainly the following ways to make plans, and links can be used in each case.
- Planning forward (forward)
- Planning backward (backward)
First, let's look at the case where you draw a rough period based on the delivery date.
Planning forward (forward)
The following is an example of planning forward, such as the development process.
- Set a link between the end of "Test Design" and the start of "Test Implementation".
- Set a link interval of one day between "Test Design" and "Test".
- Even if the test design is shifted back by two days, a one-day interval is maintained.

Planning by working backwards (backward)
The following is an example of planning by working backwards according to the client's schedule.
- Set a link between the start of "Client" and the end of "Our Company".
- Set a link interval of one day between "Test Design" and "Test".
- Even if the test design is shifted back by two days, a one-day interval is maintained.

Tips for using this function
By setting the interval between the linked item and the linked item,
you can add a margin to your plan.
To set the link interval, right-click on the target item and select "Set Link".

- Set the number of days between the intervals in "Link Interval".
- If you want to fix the period, check "Fix Link Interval".
For details, see the following link: "Notes on Setting Link Intervals"
Notes on Setting Link Intervals
Please note the following.
- If you move the linked work item, the interval between the items will not be maintained.
- If you move the linked item, the behavior will change as follows:
- If the period is moved back: The period of the linked item will be adjusted as above.
- If the period is moved forward: The interval between items will be increased.
If you want to fix the interval even in case 2, check "Fix link interval".
Examples of using links
Links can also be set between folders.
It is often necessary to follow changes made in the previous process to the next process, and by setting up a link, you can quickly deal with this.
