Editing Work Items
Overview
The Item Properties section of the Project screen allows you to view and update detailed information about work items.
The following functions related to managing detailed information about work items are explained below:
- Update field values
- Change item type
- Assign resources
- Update information within an item
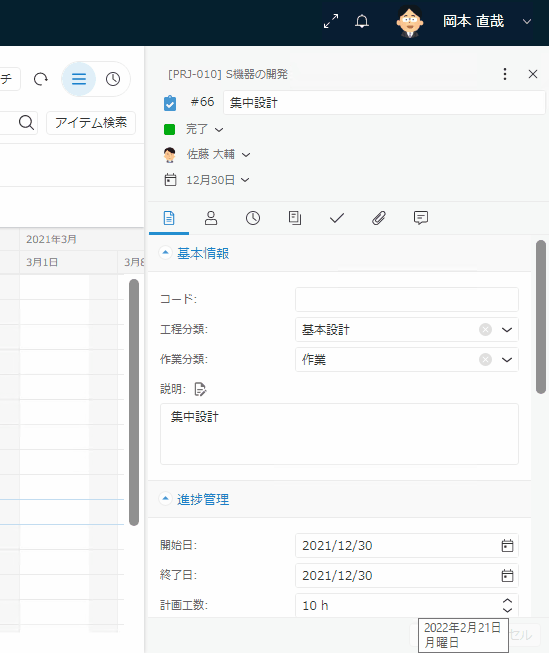
First, select the target work item and click the "Item Properties" icon ① in the Local Navigation.
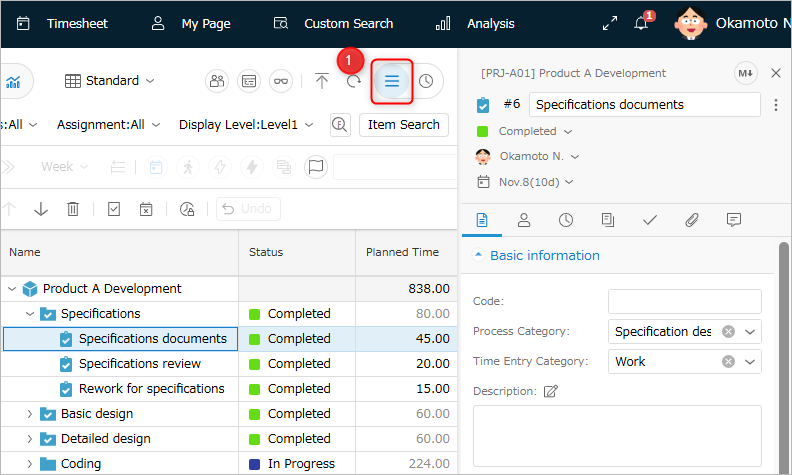
Afterward, set each item according to the procedure described in the table of contents on the right.
Once the settings are complete, edit the data from the Gantt table and create a project plan.
For details, please refer to the following link: "Editing the Gantt Table"
For details, please refer to "Changing the Screen Layout".
Updating Field Values
In addition to directly changing the work item fields from the Gantt table, you can also update the values using the following methods.
For work items with children, you cannot change fields other than "Name," "Code," and "Description."
Editing from Item Properties
Click the "Fields" tab① in Item Properties and edit the values of each field.

-
After editing, click the "Save" button.
If you move to another item without saving, it will be saved automatically. -
You can also select multiple items and update the field values at once.
Select the field you want to edit from the "Select Display Fields" icon②.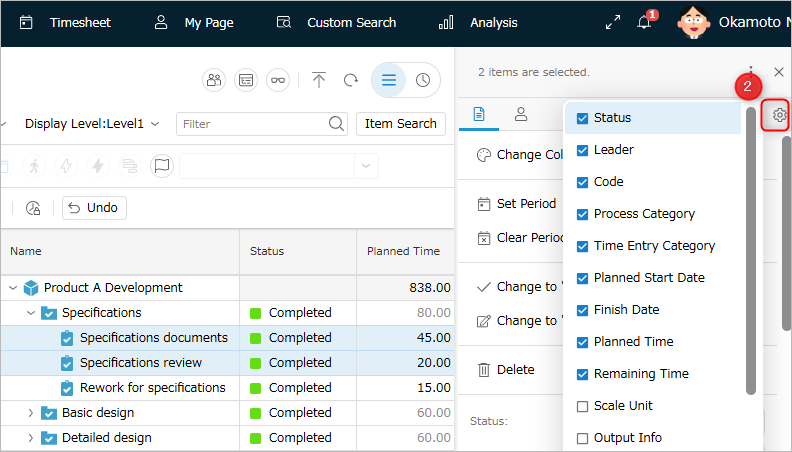
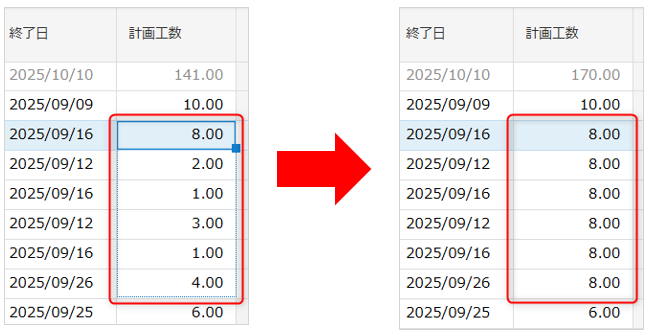
Updating with Drag Fill
Like in Excel, you can copy field values by dragging cells.
Select the field of the cell you want to copy, and drag it downwards while clicking the "■" that appears in the lower right corner of the cell.
The cell value will be copied.
Notes on Copying Field Values
-
The method for determining the updated field value will be "User Input Value".
To copy the method for determining the field value, select the field of the cell you want to copy and
While holding down the Ctrl key, drag the "■".
Example) To reflect the method for determining the calculation formula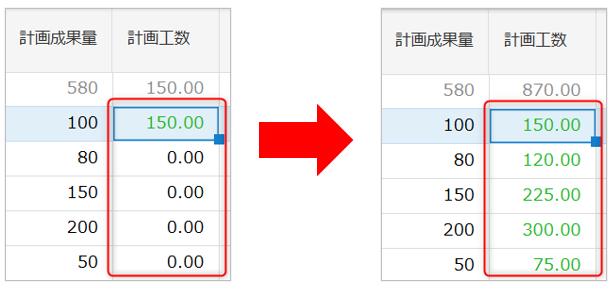
-
The following fields cannot be dragged and filled:
- Fields that cannot be edited (actual work hours, or fields for which you do not have editing privileges)
- Fields with different input value options (when different options are defined depending on the item type)
-
In Standard Edition, the following fields can be updated by dragging and filling:
- Status, Start Date, End Date
Changing Item Type
You can change the item type of a work item to a different type.
The following item types are available:
For details on item types, please refer to the following link: "Managing Item Types"
| No. | Item Type | Description |
|---|---|---|
| 1 | Package | An item used to group multiple tasks. For example, grouping by process unit makes it easier to display tasks of the same process side by side, and makes planning easier. (Design, Development, Testing, etc.) |
| 2 | Task | The basic unit of work that makes up a project. Tasks are used as the unit for entering actual results. |
| 3 | User-Defined Work Item | A work item in which the user has uniquely defined fields to use, etc. Example: "Request," "Defect" |
Click the item type icon in the header of the item properties and select the target.
Each field will be displayed according to the screen layout of the selected item type.
- In the following diagram, the layout changes when the item type changes from "Task" to "Defect."
Assigning Resources
You can add or remove resources (assignees) to work items.
-
By assigning resources, the assigned members can input actual man-hours for the work item.
-
You can set a leader from among the assigned resources.
When set as a leader, the leader can manage the work items they are in charge of on their My Page.For details, please refer to the following link. : "What you can do on My Page"
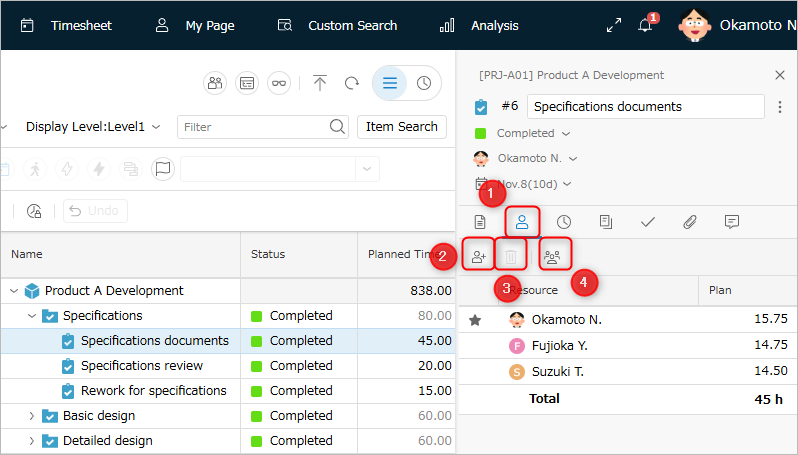
First, click the "Resource Assignment" tab (①) in the item properties.
- You can add members from the "Add" icon (②) in Resource Assignment.
You can delete members by selecting them and clicking ③. - If you want to evenly distribute the planned effort among members, click ④.
Click "Select from List" displayed at the bottom of the list, and add the target group in the "Add" dialog.
Setting a Leader
The leader is set from the resources set in the work item.
When set as a leader, the leader can do the following:
- Manage the work items they are in charge of on My Page.
- On the project screen, you can filter and display only the work items you are in charge of.
- When you update the progress of a work item you are responsible for, you will be notified on the project screen.
- You can quickly detect and check the update details.
Operation Procedure
- Click the "Resource Assignment" tab① in the item properties.
- Click the column to the left of the target resource name to display the star icon.
- Click the "Save" button.
Editing the Planned Effort of a Resource
- Click the "Resource Assignment" tab① in the item properties.
- Click the "Planned Effort" column for the target resource.
- Enter the planned effort in units of "Planned Effort Input Granularity".
- Click the "Save" button.
Checking the Actual Effort of a Resource
By displaying the actual effort for work items for each resource, you can check the breakdown of actual effort.
This function can be used in the following situations:
- Compare planned and actual effort for each resource to see who is deviating from the plan and to what extent.
- For users whose actual effort exceeds the planned effort and results in a deficit, open the timesheet to check the details.
- If the planned effort is 0 hours, there will be no deficit even if the actual effort exceeds the planned effort.
To display the actual effort for a resource, click the "Actual Effort" tab in the item properties.
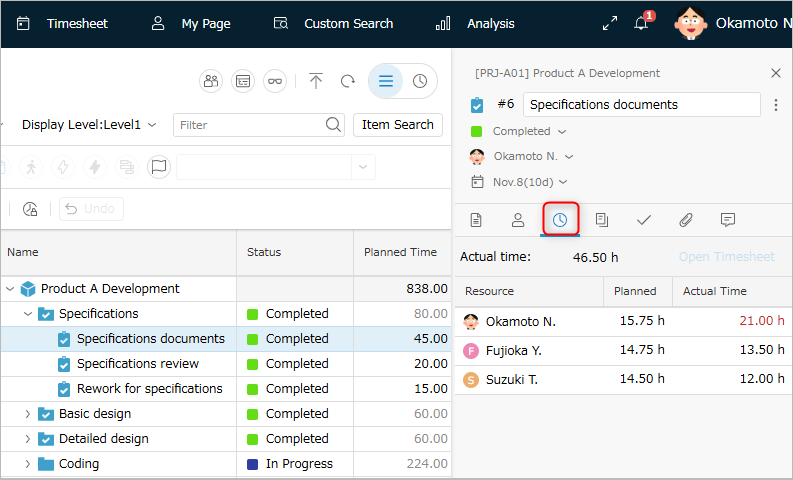
If you select a work item that has child work items, the resource will not be displayed.
If you select multiple work items, the "Actual Effort" tab will not be displayed.
Managing Sub-Items
Sub-items refer to child items of a work item.
- Sub-items can also be used as work items.
- You can perform the following actions on the selected work item in the item properties:
- Add or delete sub-items
- Change the status of sub-items, etc.
Adding a Sub-item
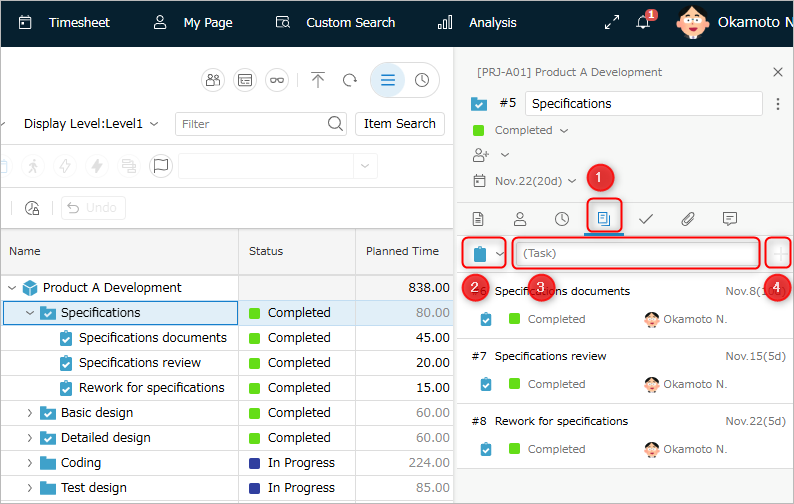
- Click the "Sub-items" tab① in the item properties.
- Select the type of sub-item to add②.
- Enter the name of the sub-item③.
- Click Enter or the "+" button④.
Deleting a Sub-item
- Click the "Sub-items" tab① in the item properties.
- Right-click the sub-item in the item properties.
- Select "Delete".
Editing a Sub-item
-
Click the "Sub-items" tab① in the item properties.
-
Edit the following items in the sub-item.
| No. | Item to Change | Operation |
|---|---|---|
| 1 | Status | Select from the list. |
| 2 | Period | Enter the start and end dates. |
| 3 | Leader | Select from the list. |
Managing Check Items
You can register check items for each item.
- Can be used as a checklist or to-do list for items.
- Items that are too detailed to manage as individual items are convenient to manage as check items.
- When a check item is marked as complete, it is automatically reflected in the progress percentage, which can be used for progress management.
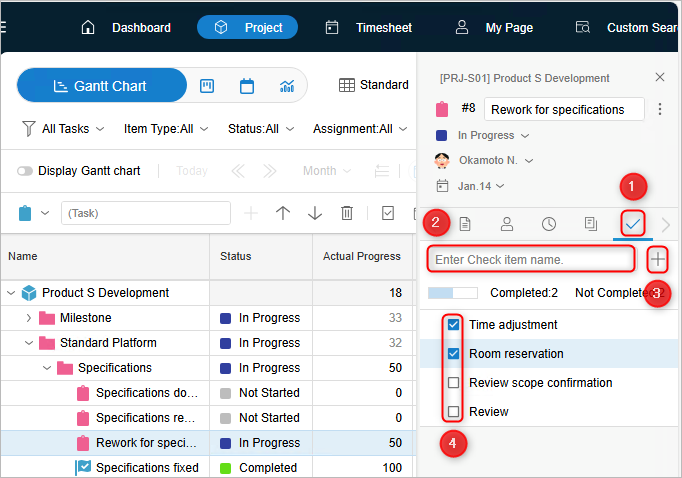
Adding a Check Item
- Click the "Check Item" tab① in the item properties.
- Enter the name of the check item②.
- Click Enter or the "+" button③.
- Click the "Save" button.
Deleting a Check Item
- Click the "Check Item" tab① in the item properties.
- Right-click the check item in the item properties.
- Select "Delete".
- Click the "Save" button.
Marking a Check Item as Completed
- Follow steps 1-2 of "Adding a Check Item".
- To mark as complete, check "Completed"④.
To mark as incomplete, uncheck "Completed". - Click the "Save" button.
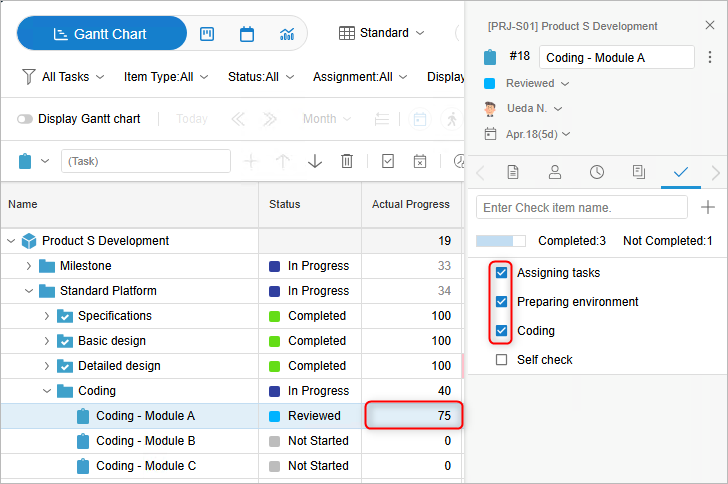
Managing Progress with Check Items
By marking a check item as complete, the progress rate will automatically increase according to the number of completed items.
The following is an example for a total of 4 check items.
-
One check item is complete. (Progress: 25%)

-
When 3 out of 4 items are complete, the progress will automatically update to 75%.
Managing Attachments
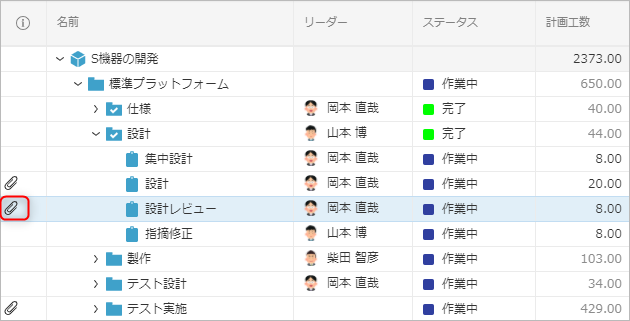
You can attach files directly to work items.
You can attach deliverables and related documents to work items and manage them all together on TimeTracker RX.

- The default file size for attachments is 10 MByte.
- System administrators can disable this function.
If you are unable to attach files, please contact your system administrator.
Attaching Files
-
Click the "Register Attachment" tab① in the item properties.
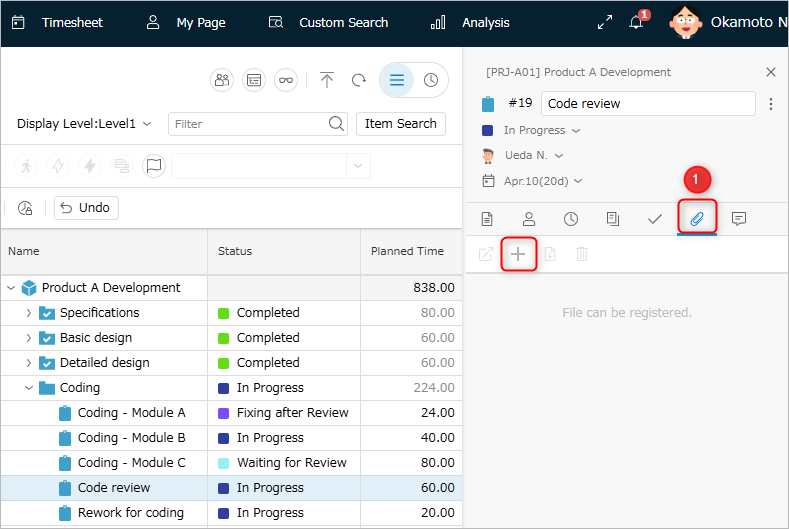
-
Select the attachment file using one of the following methods.
- Click "Add" and select the file to add from "Select File".
- Drag and drop the file onto the screen and click "OK".
- Click "Add" and select the file to add from "Select File".
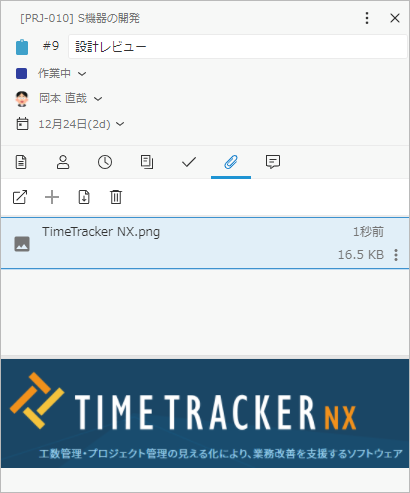
Displaying Attachment Previews
-
Click the "Register Attachment" tab in the item properties.
-
Select the file to display from the list.
Downloading Attachments
- Click the "Register Attachments" tab in Item Properties.
- Select the file to download from the list.
- Click "Download".
- Specify the download location and click "OK".
Deleting Attachments
- Click the "Register Attachments" tab in Item Properties.
- Select the file to delete from the list.
- Click "Delete".
- A deletion confirmation screen will appear; click "OK".
Displaying Information in Various Formats
You can display detailed item information using URL links, tables, paragraphs, and other formats.
By using a variety of notations beyond just text information, you can improve not only the appearance but also resolve communication shortcomings.
This is written using the Markdown notation.
Setting Links from Work Items
Enter the URL you want to link in the multi-line text field.
Once editing is complete, it will be displayed as a link, so click the URL.
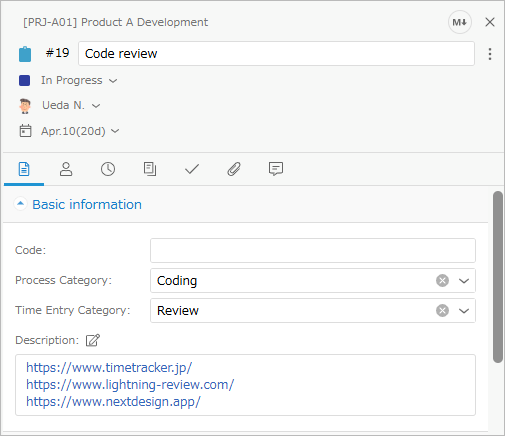
The format that can be entered here is format starting with "http(s)://~".
Even if you enter multiple URLs, each one will be linked.
Editing with the Markdown Editor
-
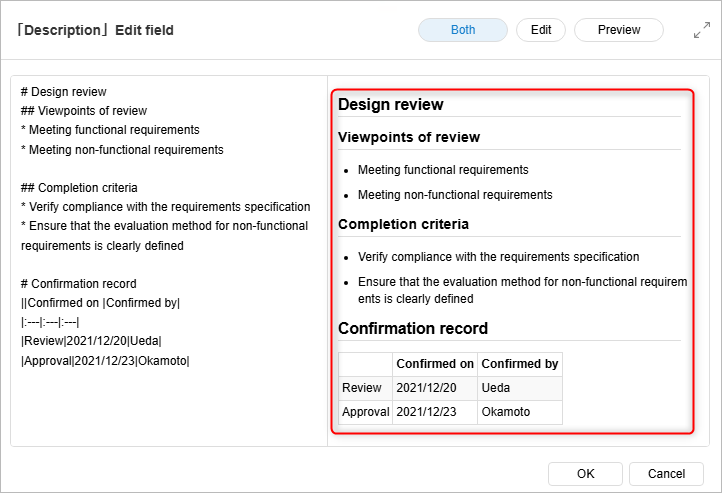
Click the edit button (see diagram ① below) to display the Markdown editor screen.

-
Create your document on the input screen.
-
The left side is the input screen, and the right side is the preview screen, allowing you to create your document while checking the content.
-
If you don't need the preview, click the "Edit" button.
You can switch screens by clicking the button in the upper right corner of the editor.
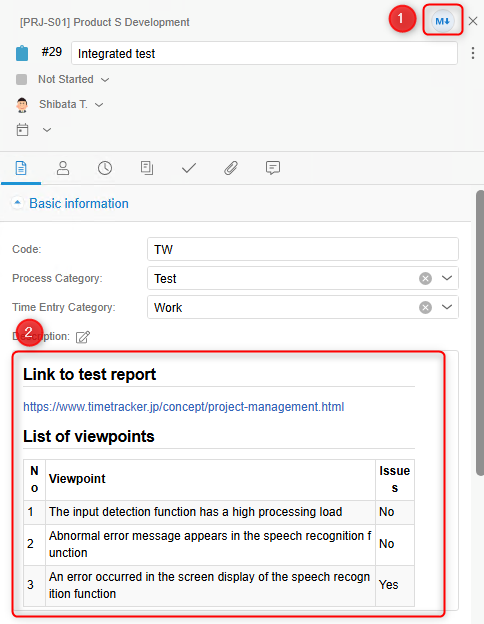
Clicking ① below will display chapters, figures, and tables on the item details screen (②).
This display may vary depending on the user. (Clicking ① will not change the display for other users.)
- Click the "OK" button to apply the changes.
Managing Comments from Members
You can register progress reports and other information for items as comments.
- Registered comments are reflected in the project in real time.
- You can display them chronologically and share the report content.
Comment operations are performed in the "Comments" tab① of "Item Properties".
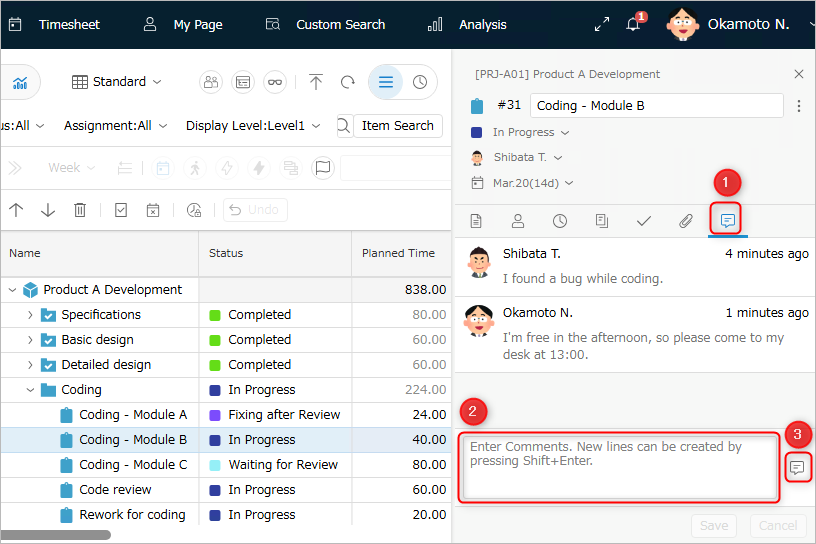
Adding a Comment
- Click the "Comments" tab① in Item Properties.
- Enter your comment in the "Please enter your comment" area②.
- Press Enter or click the "Comment" icon③.
Deleting a Comment
- Follow steps 1-2 of "Adding a Check Item".
- Right-click the comment in the item properties.
- Select "Delete".
Editing a Comment
- Follow steps 1-2 of "Adding a Check Item".
- Right-click the comment in the item properties.
- Select "Edit".
- Modify the comment.