Enter from the event area
Overview
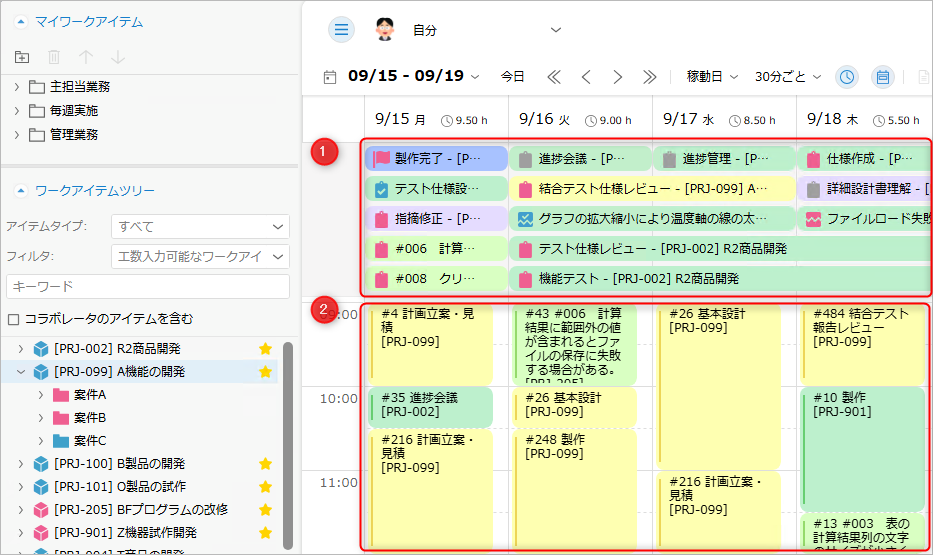
The "Event Area" on the timesheet displays work items planned for the displayed period.
- This is convenient for checking the tasks that need to be performed on that day.
You can work with a focus on the plan, not just the actual work performed. - Of course, you can also input actual work by dragging and dropping.

This section explains how to input actual work hours using the Event Area.
Preparation
Before inputting work hours from the Event Area, display the Event Area on the timesheet.
Displaying the Event Area
Toggle the display/hide in "Event Area" ①.

The following items are displayed:
- Resources are assigned.
- Start date/end date is entered.
Narrowing the Items Displayed
The number of items displayed in the event area is limited to a maximum of 5 per day.
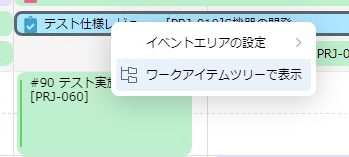
You can narrow down the items displayed from "Event Area Settings".
Right-click the event area and select one of the following:

- Show only favorite projects
Displays only items from favorite projects (yellow ★) in the workspace folder.

- Do not display items not subject to progress management
Displays only items subject to progress management.
The event area displays items in the work item tree.
Therefore, you can also narrow down the displayed content using the following methods.
- Lock actual work hours input
- Hide project
Entering Actual Work Hours
Work items displayed in the event area can be entered as actual work hours using the following steps:
- Select an item in the "Event Area"①.
- Drag and drop the selected item into the corresponding time slot in the "Work Hours Input Pane"②.
Operations on Items in the Event Area
The following operations can be performed on items displayed in the event area:
- Display the location of the item in the "Work Item Tree".
Perform one of the following actions:
- Double-click the item in the event area.
- Select "Display in Work Item Tree" in "Event Area Settings".
- Edit item details. Select the item in the event area and click "Item Properties". For instructions, please refer to the following link: "Enter detailed item information"