Set data source
Introduction
TimeTracker Analytics analyzes data stored in the TimeTracker RX database.
Enter the information required to access the TimeTracker RX database and save it as a "data source".
This section explains how to create and operate a data source.
Creating a Data Source
Create a new data source in the following two steps.
- Create a server configuration file.
To create a server configuration file, you will need information to access the TimeTracker RX database.
Therefore, the TimeTracker RX administrator should create it and then distribute it to those who will actually use TimeTracker Analytics. - Create a data source.
Create a data source using the server setting file.
1. Create a server setting file
To create a server setting file, you will need a username and password to access the TimeTracker RX database.
Create it using the following procedure.
-
Click "Set up a new data source" and in the dialog that appears, click
"Create a server configuration file".
-
Set the URL to connect to and the connection method.

- ① Web API URL: Enter the TimeTracker RX URL (※).
※This is the TimeTracker RX login URL minus "login". - ② Select the connection method. The advantages and disadvantages of each method are as follows.
If you can connect directly from the client machine to the server machine that stores the database, we recommend "Connect directly to the database".Connection method Advantages Disadvantages Connect directly to the database High-speed aggregation is possible without putting a strain on the server machine. The "SQL Server" port must be opened on the TimeTracker RX server machine. Connect via Web API There is no need to change the settings on the TimeTracker RX server machine. If there is a large amount of data to analyze, the server may be overloaded. - ① Web API URL: Enter the TimeTracker RX URL (※).
-
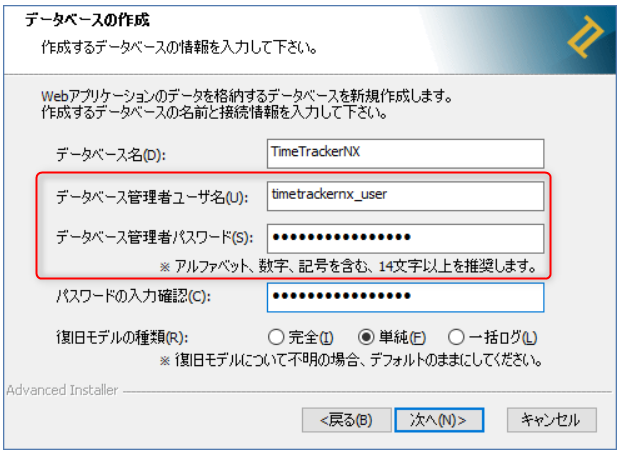
Enter the database information.
The settings vary depending on the "Connection method".-
In the case of "Connect directly to the database"
Make sure that SQL communication is possible on the TimeTracker RX server machine in advance.This is a method that generally allows communication on the target port on the server machine.For the port number to be set, see the following link. : "SQL Server port settings"
After that, set the information in the red box in the dialog below.

Security should be set by those who wish to encrypt SQL communications.Required items (a and b below) must be set.
-
Server name, database name Start SQL Server Management Studio and
Enter the red box ① in "Server name" and ② in "Database name".
-
Login name, password
Enter the information you set on the following screen when installing TimeTracker RX.
-
Security settings
Check "Protocol encryption" if you are using an environment where SQL communication is encrypted.If you check "Trust server certificate", the server certificate will not be verified.
-
-
For "Connect via Web API"
You must set the "SQL API key".
Search for "SqlApiKey" in the TimeTracker RX configuration file (appsetting.json) and set the value (the value enclosed in double quotation marks in the red frame in the image below).

SqlApiKey can be changed to any value.There is no character limit or prohibited words.
You can also change it later if you want to prohibit access via WebAPI.The configuration file is located directly under the installation folder.Please refer to the following link for the location of the installation folder. : "How to check the installation folder""
-
-
Click the "Connection Test" button, and if there are no problems, click "Create" and specify the file name.
The server settings file has now been created.
A file called "[Entered file name].serversettings" will be created, so distribute it to those who will actually use it.
It is convenient to store it on the network and deploy the path to users, so they can use it just by entering the path.
The contents of the file are encrypted, so security is also safe.
Notes
All data can be viewed in TimeTracker Analytics, except for cost-related fields.
- Only users who have been granted cost permissions in their system roles can view cost-related fields.
- TimeTracker RX allows you to view data that cannot be viewed due to security settings.
If you do not want other projects to be viewed, do not deploy the server setting file,
Consider using the pivot analysis function of TimeTracker RX.
For details, see the following link: "TimeTracker RX Pivot Analysis Function"
2. Create a data source
Receive the server setting file (extension: serversettings) from the TimeTracker RX administrator.
-
Click "Set up a new data source" to open the data source creation screen.
-
Specify the data source name (①) and the storage location of the server setting file (②).

After specifying the server configuration file, the URL of the TimeTracker RX to be connected to will be displayed in ③.
Please confirm that it is the intended URL. -
Select the authentication method from "Password authentication" and "API key authentication".

- For "Password authentication": Enter the login name and password used to log in to the target TimeTracker RX
- For "API key authentication": Obtain and set the API key from the linked page. "Generate API key"
-
Click "Connection test" and if there are no problems, click "OK".
You can now connect to the TimeTracker RX database.
Next, let's actually create a pivot analysis report.
For detailed instructions, please refer to the following link: "Pivot Analysis Report"
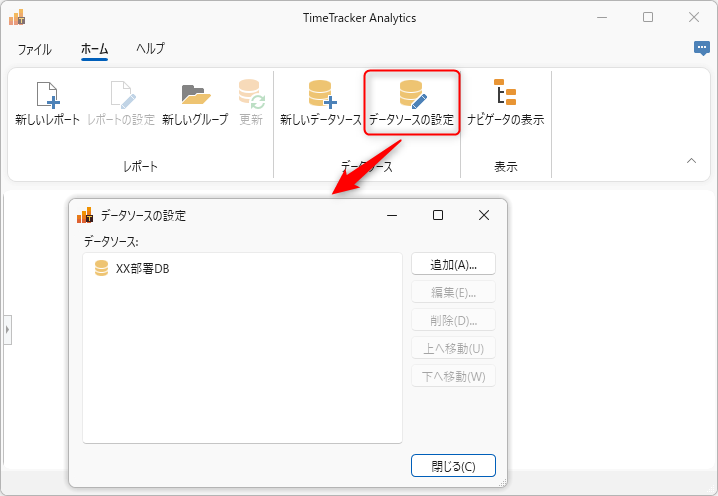
Data Source Settings
You can check the registered data sources from "Data Source Settings".
Use this if you want to change the settings or delete a data source.