Using Formulas
Overview
You can set formulas to determine the fields of work items.
By using formulas, you can plan projects using indicators such as project productivity and development scale.
For example, you can use it as follows.
- Calculate planned times from standard document creation productivity (time per page) x amount of results (pages)
- Display review rate and rework rate in custom fields
- Automatically calculate start date and end date using daily work hours and planned times
This chapter introduces how to use formulas.
Defining a formula
Formulas are defined on a field-by-field basis and set in a dedicated formula editor.
The defined formulas can be used in work items.
Example) To create a formula that automatically calculates the "end date" from the "start date" and "planned times" of an item, use the following:
Operation procedure
-
Open the "Work Items" - "Specific Item Type" - "Fields" screen in the profile.
 You can also define it in the project settings screen ("Project" - "Settings").
For details, please refer to the following link: Change Field Configuration"
-
Click the "+" button next to "Determination Method" in the item properties of the field for which you want to define a formula.

If you want to change an existing formula, right-click the formula and select "Edit Formula".
 The maximum number of formulas that can be defined per field is 10.
 -
Launch the formula editor and enter the required information.
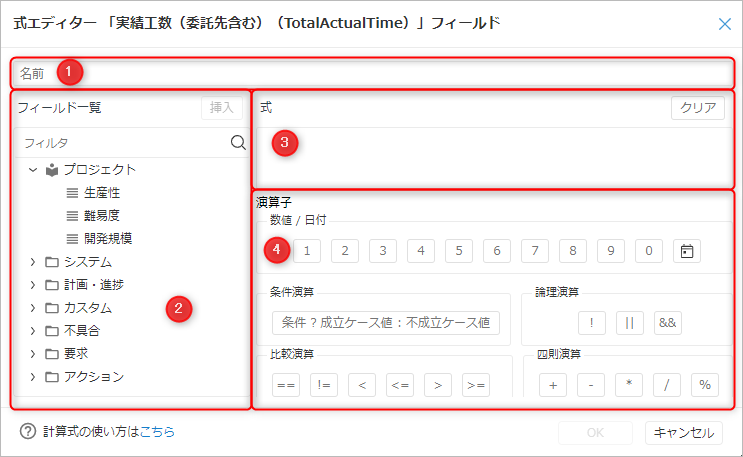
Formula Editor Structure
-
① Name field
This is the name of the decision method to be displayed in the work item.
Please set it to be unique per field. -
② Field list
Displays the following fields that can be referenced in the formula.Field Grouping Details Properties Project For details on properties, please see below.
"Define variables that can be referenced throughout the project"System fields
For custom fields"Group name" "Grouping name", please see below and contact your system administrator.
Define the fields used in the project-
The following field types can be referenced.
Real number type, integer type, logical value type, progress rate type, labor hours type, cost type,
Process classification type, work classification type, date type, outcome amount type-
Select the target field and double-click or click the "Insert" button to display the system name in the formula input field.
-
Enter the "system name" or "name" to search for in the filter to display fields that contain the entered string.
When you place the cursor over the field, the system name is displayed. -
-
-
③ Formula input field
- In addition to reflecting from the field list and input buttons, you can also enter formulas directly.
- Click the clear button to delete the formula you created.
- If you want to enter values directly, please refer to the following link: "Formula Editor Input Rules"
-
④ Input field
- You can set various values to be used in the formula.
- There is no button to enter functions, so please enter functions directly.
For details on function arguments, return values, etc., please refer to the following link: "List of available functions"
you must recalculate the data in the work item.
For details, please refer to the following link: "Recalculate"
If a cost value is incorporated into a formula, it may be possible to identify the cost value from the calculation result.
Please be careful when using costs in formulas.
Applying a formula
Here, we will explain how to apply a defined formula to a work item.
Example) Actually apply the formula created to the end date.
How to select a formula
Select the target field in the work item and select "Determination method" from the context menu (right-click).
The following fields can be selected.
- System fields
Progress rate, planned times, remaining work hours, planned cost, actual cost, planned outcome amount, actual outcome amount, start date, end date - Custom fields
Integer, real number, and date type fields
Displaying calculation results
Notes on displaying calculation results are listed below.
-
If the calculation result and the minimum unit of labor input are different, the value will be rounded down to the minimum unit.
Example) When the minimum unit of labor input is "15 minutes (0.25h)"Calculation result (h) Display time (h) 0.20 0 15.11 15 -
Although the progress rate is displayed as "%" in the field, the % value is treated as a number.
Therefore, the calculation result will be as shown in the example below.Overall progress rate = Progress rate (80%) + Contractor progress rate (Custom field: 10)= 90 <br/>
Field color coding
The value of each field will be displayed in the following colors according to the determination method you set.
| Field | Color |
|---|---|
| Fields updated directly by the user | Black |
| Fields automatically calculated by a formula | Green |
| Fields automatically calculated by the system | Gray |
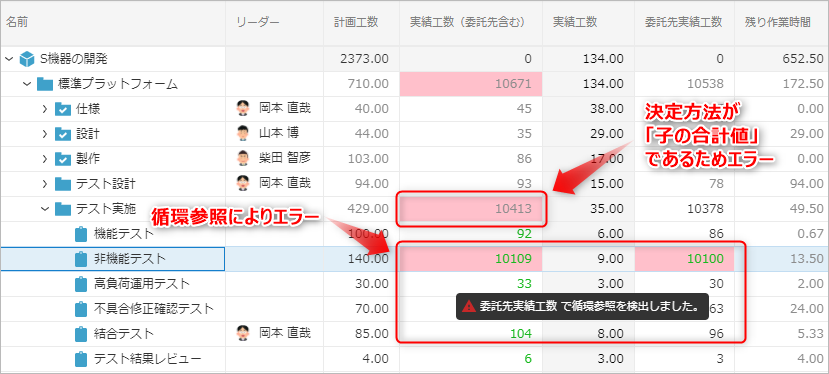
Display when an error occurs
If the calculation result is an error, it will be as follows.
-
Calculation result
Displays the last value determined to be normal.
For items set as "child total", the result of the calculation based on the "last calculated normal value" is displayed. -
Error message
A message will be displayed in Tips according to the type of error that occurred. -
Display on the Gantt table
Highlighted in pink cells.
Even if the error is not detected directly, the affected items will also be highlighted.
Example) Items that use "total value of children" as the determination method.
Recalculate
To apply changes to formulas to the entire project, you must perform a recalculation process.
The following processes require recalculation.
- When formulas are updated
- When formulas are updated due to profile updates
The following update patterns apply:- When updated from the system administration screen
- When updated from the project administration screen
- When reverted to the settings of the profile from which the formulas were inherited
Operation procedure
-
Go to the project profile settings screen (Project - Settings - Profile).
-
Click the "Recalculate item formulas" button.

- The value before the change will be displayed until the recalculation is complete.
The required time is not unique as it depends on the number of work items in the project, but the user who performed the recalculation will receive a notification message when the recalculation is complete. - Other processes can be performed while the recalculation is in progress.