Setting system operation
Overview
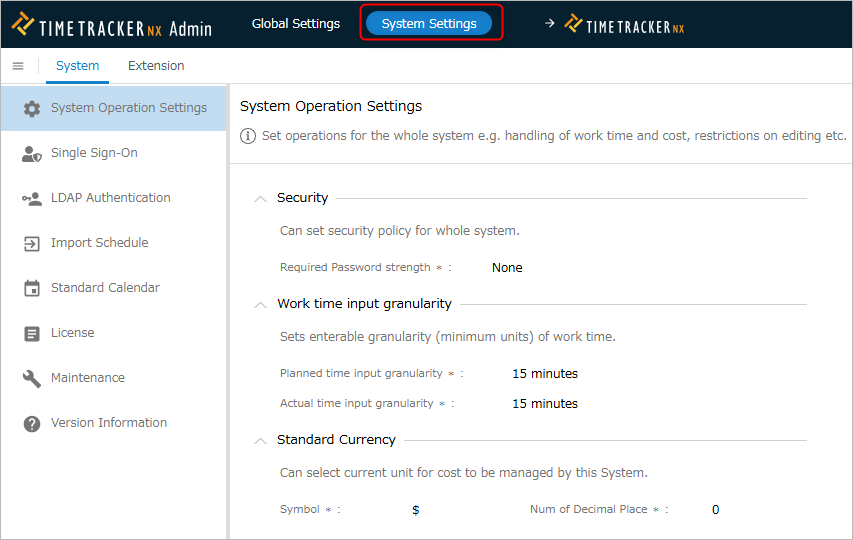
The Admin system operation screen allows you to check and change settings related to the entire system.
We will introduce each setting procedure.
Common Procedures
When setting up system operations, first perform the following common prerequisite operations.
-
Click your login name in the TimeTracker RX global navigation.

-
Select "System Settings".
-
Click "System Operation" in the global navigation.
-
Select "System Operation Settings" from the menu on the left.
-
Click the "Edit" button.
Setting Security
Set the required password strength for users.
-
Select "Required Password Strength". The options are as follows:
No. Item Explanation 1 Strong The number of characters is 14 or more, and three or more character types are used. 2 Slightly strong The number of characters is 8-13, and three or more character types are used. 3 Normal It is one of the following.
- The number of characters is 8-13, and two character types are used.
- The number of characters is 14 or more, and fewer than three character types are used.4 Slightly weak The number of characters is 8-13, and one character type is used. 5 Weak It is one of the following.
- The number of characters is eight or less.
- It is only numbers.
- It contains words of a specific string. (※2)6 None No conditions - ※1 There are four types of characters.
- Lowercase letters, uppercase letters, numbers, symbols
- Lowercase letters, uppercase letters, numbers, symbols
- ※2 Specific string words are as follows.
- password, qwerty, abc, admin, root, 123
- password, qwerty, abc, admin, root, 123
- ※1 There are four types of characters.
-
Click the "Save" button.
Set labor input granularity
Separately set the minimum unit when entering planned ltimes and actual times.
Set the appropriate unit based on the granularity of the labor hour data you require.
-
Select "Input granularity of planned ltimes" or "Input granularity of actual times" from the options.
The options are as follows.Item Settable granularity Planned labor input granularity 6 minutes, 15 minutes, 60 minutes Actual labor input granularity 5 minutes, 6 minutes, 10 minutes, 15 minutes -
Click the "Save" button.
Set the standard currency
The standard currency is the currency unit for costs managed by TimeTracker RX.
-
Select the "Currency symbol" from the list. The options are as follows.
No. Item Description 1 ¥ Japanese Yen 2 $ US Dollar 3 ? Euro -
Enter the "Number of decimal places" between 0 and 9.
-
Click the "Save" button.
Set the standard cost unit price
When creating a new project, set it as the project standard cost unit price.
- By default, the cost is calculated from the man-hours and the user's cost unit price.
- If there is no resource assignment, the "user cost unit price" cannot be determined, so
it is calculated based on the project standard cost unit price.
- Enter the "standard cost unit price".
- Click the "Save" button.
Set project editing constraints
Set the default profile
Set the default profile to be set for the project.
It is convenient to set a profile that is often used when creating a new project.
- Click the "Change" button.
- In the "Select Profile" dialog, select the target profile and version.
- Click the "OK" button.
- Click the "Save" button.
Maintaining uniqueness of project codes
The "Project Code" is specified when creating a project and can be used as a key when searching for projects.
However, if there are duplicate codes, they cannot be searched.
Therefore, by setting it so that duplicate project codes are not allowed, you can eliminate duplicate keys.
- Check "The system will check to ensure that project codes are unique."
- If the project code entered when creating a project already exists,
a warning will be displayed, prompting you to specify a different project code.
Controlling the displayed information
"Resource Load Analysis" has the following two functions.
① Resource load for projects
② Resource load across projects
The scope of analysis above is defined by "System Roles", but the views are different because the permissions applied to ① and ② are different.
For details, please refer to the following link: "System Roles"
By enabling the setting, you can make the permissions for ① and ② the same (apply resource load permissions to projects).
Check "Apply resource load permissions to projects" as necessary.
Setting analysis function limits
When analyzing a large number of projects with "Pivot Analysis", the server PC may be overloaded, resulting in the following situation.
- TimeTracker RX may run slowly
- TimeTracker RX may stop
For details on pivot analysis, please refer to the following link: "Pivot Analysis Function"
To avoid the above, you can reduce the load on the server PC by setting an upper limit on the number of projects to be analyzed for the table in question.
- Enter the "Maximum number of projects that can be aggregated for all items".
- Click the "Save" button.
Please set the value according to the specifications of your server PC.
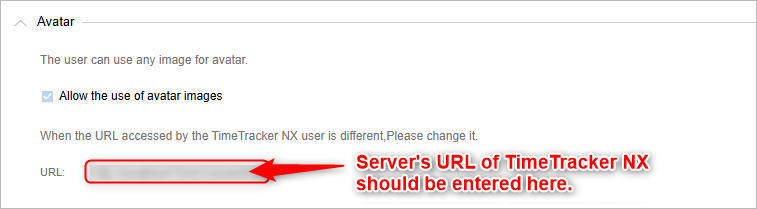
Allow avatar images
Allow users to use any image for the avatar.
If you allow this, you must set a server to reflect the avatar image.
-
Check "Allow avatar images".
-
Enter the TimeTrcker RX server URL in "URL".
- If you do not know the server URL, please refer to the following link: "How to check the URL" (https://dcinchelp.zendesk.com/hc/ja/articles/360039687274)"
- The avatar image will be reflected on the server set here.
-
Click "Connection test" to check if the URL is correct.
Confirm that "Connection successful" is displayed. -
Check the connection and click the "Save" button.
The avatar image set by the user will be stored in the database.
If you change server PCs with avatars already set, after carrying out the above steps,
enable avatar display by following the steps in the following link: "Settings required after server migration"
Set the default display language
When adding a new user, specify the display language and time zone to be set as the initial values.
The system default settings are as follows, so select the item you want to change from the list.
| Setting item | Initial value |
|---|---|
| Default display language | Same language as installer language Example) For Japanese version installer, it will be "Japanese (Japan)". |
| Default time zone | (UTC+9:00) Tokyo The same initial value for both Japanese and English versions. |
Reduce communication volume between server and client
TimeTracker RX runs on IIS (Internet Information System) provided by Windows Server OS.
When many users access one server PC, IIS is overloaded.
Problems caused by increased IIS load
If the number of messages received within a certain period of time exceeds the specified value, IIS will determine it as an error.
- An error will be recorded in the IIS log, but the messages will be rejected. (This is the same phenomenon as when a DoS attack occurs.)
- There is no response from the TimeTracker RX server because there is no request.
As a result, the process fails because there is no response from the server.
This is a timing issue, so if you access again, the process will be normal.
This occurs when there are many users accessing at once.
There have been cases where this occurred with a user with 600 licenses, but it depends on how often the Web API is used, etc.
There is a way to distribute the access load by dividing it into multiple DBs, but
This requires adding a server PC, so some people find this difficult.
In that case, you can resolve this problem by reducing communication from the client.
Change procedure
Change the TimeTracker RX configuration file (appsettin.json) using the following procedure.
-
Search for "EnableSignalR" in appsettin.json.
-
Change the value of the relevant section (① in the figure below) to "false". (The default value is "true")

See the following link: "Community site: How to change the TimeTracker RX configuration file"
Impact of the change
TimeTracker RX has a function that automatically reflects the changes made by other users even if multiple users edit a single work item screen.
This setting will disable this function.
If you want to reflect other people's changes, please reload the screen manually.
(Click the F5 button or the reload button on your browser)