Define users
Overview
When the number of users increases or when users move to different organizations due to organizational changes,
you will need to add users or change user information (organization, permissions, etc.).
This section explains the functions related to user definition.
Common Procedure
As a common prerequisite for defining a user, first perform the following steps:
-
Click the login name in the TimeTracker RX global navigation.

-
Select "System Settings".
-
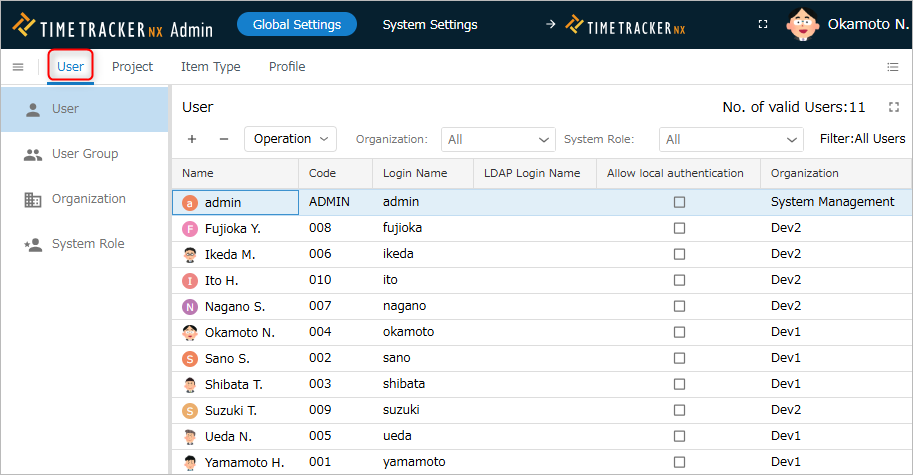
Click "Users" in the Local Navigation menu.
-
Select "Users" from the left menu.
User Registration and Deletion
Creating a New User
Add a user to use TimeTracker RX.
You can log in to TimeTracker RX using the registered login name and password.
The procedure for adding a user is as follows:
-
Click the "+" icon at the top of the user information list.

-
Enter the user information in the "User Registration" dialog and click the "OK" button.
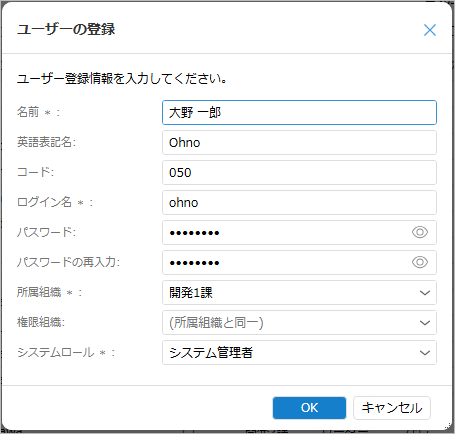
The input fields are as follows:
| No. | Item | Description | Purpose |
|---|---|---|---|
| 1 | Name | User's name | Filter for user selection |
| 2 | English Name | User's name (English) | Filter for user selection |
| 3 | Code | Code to identify the user | Search for users |
| 4 | Login Name | TimeTracker RX login name | Enter at login |
| 5 | Password | TimeTracker RX password | Enter at login |
| 6 | Organization | Organization to which the user belongs | Scope of permissions and aggregation, user search, etc. |
| 7 | Authority Organization | Scope of permissions granted to the user | See "Define an Authority Organization" |
| 8 | System Role | System role name assigned to the user | Permissions granted to the target user |
Delete
Deletes users who no longer use TimeTracker RX, such as those who have left the company.
- Deleted users will no longer be able to use TimeTracker RX.
- Deleted users are not included in the license count.
Deleting users increases the number of licenses you can use.
The procedure for deleting a user is as follows:
-
Select the user to be deleted.
-
Click the "-" icon at the top of the user information list.
 Deleted users can no longer be viewed from the screen, but they remain in the database.
You cannot register again with a username that has already been registered.
Deleted users can be restored.
Restoring Deleted Users
You can restore deleted users.
Use this if you accidentally deleted a user or if you want to restore a user.
Please follow the procedure shown in the video below.
- Select "Deleted Users" in the "Filter".
- Select the target users. Multiple selections are possible.
- Click "Actions" at the top of the user information list.
- Select "Restore".
Changing Information
You can change the information of registered users later.
Use this when changing the organization they belong to or the cost unit price.
The procedure for changing user information is as follows:

- Click the "Properties" icon in the local navigation.
- Click the "Fields" tab ① in the Properties pane.
- Click the "Edit" button.
- Edit the user information in the field.
- Click the "Save" button.
Export/Import User Information
Export
You can output user information to a file.
This is used when integrating with other systems or managing user information in a file.
- Click the "Export" button at the top of the user information list.
- Select the output format.
The output will be in CSV/Excel format in the language set in "Default Display Language" in "System Settings".
Import
You can register multiple user information entries at once.
This is useful when updating a large amount of user information, such as when introducing TimeTracker RX or due to organizational changes.
The procedure for importing user information is as follows:
- Click the "Import" button at the top of the user information list.
- Specify the import file in the "Import" dialog.
For the file format of the import file, please see "File Format". - Click the "OK" button.
- Download in CSV or Excel format.
This is convenient as it saves the trouble of creating a file from scratch.
User List File Format
Please set the following items.
- The language used for the import file should match the language set in "Default Display Language" in "System Settings".
- The "Login Name" cannot be changed during user import.
- If the same login name does not exist, a new user will be added.
- To change the login name, please do so from the screen.
| No. | Item | Description | Required | Notes |
|---|---|---|---|---|
| 1 | Name | User's Name | ○ | Up to 256 characters |
| 2 | Code | User's Code | Up to 256 characters | |
| 3 | English Name | User's English Name | Up to 256 characters | |
| 4 | Login Name | User's Login Name | ○ | -Up to 256 alphanumeric characters -If an unregistered login name is specified, it will be registered as a new user. |
| 5 | Email Address | User's Email Address | Up to 256 characters | |
| 6 | LDAP Login Name | User's LDAP Login Name | Up to 512 alphanumeric characters | |
| 7 | Allow Local Authentication | Login Allowed/Not Allowed When Using SSO | Enter one of the following. - "TRUE" : Allow - "FALSE" : Do not allow | |
| 8 | Organization Code | Code of the organization to which the user belongs | ○(*1) | Code of a registered valid organization (*3) |
| 9 | Organization Name | Name of the organization to which the user belongs | ○(*1) | Name of a registered valid organization |
| 10 | Authorization Organization Code | Code of the authority organization | -(*1,2) | Code of a registered valid organization (*3) |
| 11 | Authorization Organization Name | Name of the organization to which the authority applies | -(*1,2) | Name of a registered valid organization |
| 12 | Cost Unit Price | User's current cost unit price | Only half-width characters are allowed | |
| 13 | System Role | System role to assign to the user | ○ | Only registered valid system roles can be set |
| 14 | Actual Entry Lock Date | Date to specify for locking the user's actual entry | Input must be one of the following - Empty string: No lock - "Always" : Always Locked - YYYY/MM/DD: Locked before the specified date | |
| 15 | Description | User Description | - | |
| 16 | Deletion | User Deletion Status | Input must be one of the following - "TRUE": Deleted - "FALSE": Not Deleted |
*1 Please specify either the code or the name. If both are specified, the code takes precedence.
*2 If neither is specified, the same organization as the user belongs to will be used.
*3 If the same code is set for multiple organizations, please leave this field blank.
Setting the Cost Unit Price
Costs are calculated from the cost unit price and man-hours.
- To manage costs, set the cost unit price for the user.
- Cost unit prices are retained in history, and even if the cost unit price changes, the cost will be calculated based on the cost unit price at that time.
The planned cost/actual cost calculated for a project is calculated from the cost unit price set here as follows:
- Planned cost: The value at the time of project creation is used as the initial value and is retained for each project.
- Actual cost: The cost for the corresponding date in the cost history is used.
For instructions on how to change the information, please refer to the link: Change Information
Select the user, and from "Operations" at the top of the user information list, select "Register Cost Unit Price".

Managing Cost Unit Price History
The cost unit price history can be viewed on the following screen (Figure ① below).

The above figure ① shows the following history:
| Period | Unit Price |
|---|---|
| ~2022/9/29 | 5,000 yen |
| 2022/9/30~2023/10/1 | 6,000 yen |
| 2023/10/2~ | 6,500 yen |
To manipulate the history, please click below. (Above figure ②)
- Add: Click the "+" button.
- Change: Select the target cost unit price and click the "Edit" button.
- Delete: Select the target cost unit price and click the "-" button.
The "Add Cost Unit Price History" dialog box will appear. Please enter the "Start Date" and "Cost Unit Price".
Setting up an organization
Change the organization to which a user belongs when there are organizational changes.
Organizations retain history, and even when organizational changes occur, calculations are based on the organization at that time.
Please refer to the link for the change procedure: Change Information
Select the user, and then select "Change Organization" from "Actions" at the top of the user information list.
Managing organizational history
Organization history can be viewed on the following screen (Figure ① below).

Figure ① above shows the following history.
| Period | Organization |
|---|---|
| ~2022/2/17 | Development Department 1 |
| 2022/2/18~2023/10/30 | Development Department 2 |
| 2023/10/31~ | Development Department 1 |
To manipulate the history, please click below. (Figure ② above)
- Add: Click the "+" button.
- Change: Select the target organization and click the "Edit" button.
- Delete: Select the target organization and click the "-" button.
The "Add Organization History" dialog box will appear. Please enter the "Start Date" and "Organization".
Setting Access Permissions
Set user access permissions in TimeTracker RX.
The following are some of its uses:
- Restricting users who can edit plans.
- Restricting access to plans from other organizations.
User permissions are a combination of the following two settings:
- System Role: Sets available functions
- Authority Organization: Sets the scope of data access
Setting System Roles
Procedure
-
Select the target users. (Multiple selections are possible)
-
Click "Actions" at the top of the user information list.
-
Select "Change System Role".
-
Enter the system role in the "Select System Role" dialog.

-
Click the "OK" button.
Defining Authority Organizations
When you set "XXX below the affiliated organization" (XX: user, project, etc.) in "System Role Access Range", permissions are granted to the organization to which the user belongs and below.
However, you cannot grant permissions to an organization higher than the organization to which the user belongs (Development Department 1), such as in the following example:
Development Department         ← Scope to which permissions are to be granted
  ∟ Development Department 1   ← Organization to which the user belongs
  ∟ Development Department 2
...
In that case, specify the organization to which you want the permission range to apply, as follows:
- Affiliated Organization: Development Department 1
- Authority Organization: Development Department
With the above settings, the user can remain affiliated with Development Department 1 while having permissions to the entire Development Department and below.
Important Notes
-
When applying this setting, please set the access range to "XXX below the affiliated organization" in the system role permission settings.
This setting will not apply if you have set it to "Myself," "Members' Projects," etc. -
By default, the "Authorized Organization" column is not displayed in the user list.
Please display it from the header of the user list using the operation shown in the figure below.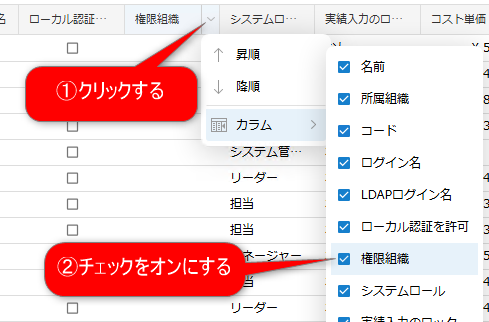
Locking Actual Data Input
You can disable actual data input for each user.
If you want to finalize actual man-hours during the monthly closing process, you can also prohibit actual data input by specifying a date.
Operation Procedure
-
Select the target user. Multiple selections are possible.
-
Click "Operations" at the top of the user information list.
-
Select "Lock Actual Data Input."
-
Specify whether to lock or unlock in the "Lock Actual Data Input" dialog.
To lock actual work hours before a specified date, enter the date.
- Lock actual work hours before a specified date
Set this by specifying a date when finalizing the actual work hours for the previous month during the closing process. - Always lock actual work hours
- Set this to prevent accidental updates when the system is temporarily unavailable due to a long business trip, etc.
- When returning and resuming actual work hours entry, unlock it by specifying "Unlock actual work hours entry".
- Set this to prevent accidental updates when the system is temporarily unavailable due to a long business trip, etc.
- Lock actual work hours before a specified date
-
Click the "OK" button.
Change Password
You can change the user's password.
Use this if a user forgets their password and cannot log in.
Operating Procedure
-
Select the target user. Multiple selections are possible.
-
Click "Operation" at the top of the user information list.
-
Select "Change Password".
-
Enter your new password in the "Change Password" dialog box.
Leaving the password field blank is optional.

- Click the "OK" button.