Setting up LDAP integration
Overview
TimeTracker RX passwords can be the same as the passwords used to log in to your Windows domain.
Specifically, by sharing the passwords of accounts managed by Active Directory,
user passwords can be centrally managed in Active Directory.
Notes
- Integration is only supported with Active Directory; integration with LDAP servers other than Active Directory is not possible.
- For frequently asked questions regarding LDAP integration, please refer to the following link. : Setting up LDAP Integration
Setting up LDAP Integration
To set up LDAP integration, follow these two steps:
- Configure the information for integration with Active Directory, which manages the domain.
- Configure the users to be integrated via LDAP.
Active Directory Integration Settings
First, enable Active Directory using the following steps:
-
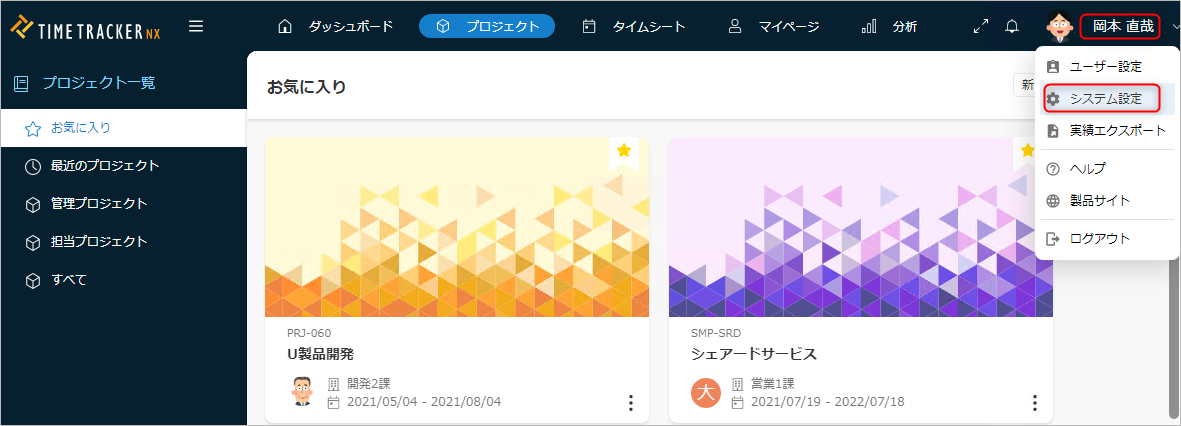
Click your login name in the TimeTracker RX global navigation.
-
Select "System Settings".
-
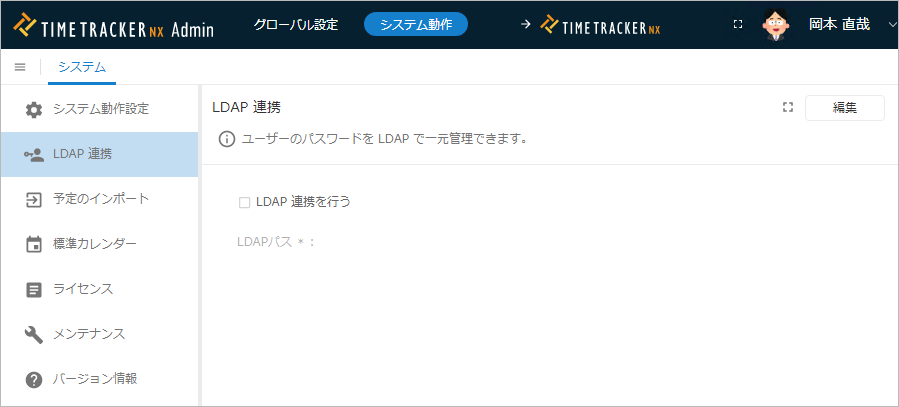
Click "System Operation" in the global navigation.
-
Select "LDAP Integration" from the left menu.
-
Click the "Edit" button.
-
Configure the LDAP integration information. The input fields are as follows:
No. Item Description 1 Perform LDAP Integration Check this box if you want to perform LDAP integration. 2 LDAP Path Enter this only if you want to perform LDAP integration.
For details, please refer to the following link: "How to Set the LDAP Path"Please confirm the specific details of the LDAP path to be set with your company's LDAP administrator. -
Click the "Save" button.
How to Set the LDAP Path
- Check your Active Directory settings.
The LDAP path format can be referenced by entering the following command and viewing the LDAP path displayed.whoami/FQDN - Set the LDAP path based on the string output in step 1.
- The path must start with "LDAP://".
- The settings will differ depending on the scope you want to apply them to, as shown in the "Specific Example" below.
- The path must start with "LDAP://".
Specific Example
Based on the string obtained in step 1 above, please set the string shown in the specific example below.
We will explain using the following string obtained with whoami/FQDN as an example.
CN=Okamoto Naoya,OU=Development 2nd Section,OU=Development Department,OU=2nd Business Division,DC=mydomain,DC=local
- Case 1: Targeting a portion of the company (within the scope of the 2nd Business Division)
LDAP://[LDAP server name (*)]/OU=2nd Business Division,DC=mydomain,DC=local - Case 2: Targeting the entire company
LDAP://[LDAP server name (*)]/DC=mydomain,DC=local
* Please include the domain name.
Setting up users for LDAP integration
You were able to enable LDAP in Step 1.
Next, configure the users to be linked via LDAP.
On the "User Settings" screen, enter the 'LDAP Login Name' of the users to be linked.
For details, please refer to the following link: "User Settings"
- Please include the domain name in the login name. Example: okamoto@mydomain.local
- For users you do not want to link via LDAP, leave the field blank; they can log in using their TimeTracker RX password.
For details, please refer to the following link: "Import/Export User List"
Important Notes
If all users are linked via LDAP, they may not be able to log in if a problem occurs.
Example: Unable to connect to the Active Directory server, etc.
We recommend leaving at least one user who is not linked via LDAP. ## Login After Successful LDAP Integration Setup
After configuring LDAP integration, please enter the following on the login screen:
- Login Name: Your TimeTracker RX login name
- Password: Password for the LDAP integration destination (the password you use to log in to Windows)