Building an evaluation environment using Docker
Overview
Build a TimeTracker RX environment using a technology called "Docker".
- You can easily start TimeTracker RX and use each function of TimeTracker RX.
- You can use TimeTracker RX without using Windows Server OS, so you can keep costs down.
Normally, you would need to enter multiple commands into the command prompt, but we've made it easy to set up the environment by running a batch file.
If you are interested, please apply through the "TimeTracker RX Trial/Evaluation Version Application Form".
How to set up the environment
We will guide you through the steps to be taken in the following conditions.
- Install: Build the environment for the first time
- Start TimeTracker RX: Start TimeTracker RX after installation (restart your PC, etc.)
- Uninstall: End the evaluation and return to the state before installation.
The batch script to be used can be obtained from the email sent by support after applying for the evaluation.
Unzip the downloaded file and store it in a folder whose path does not contain Japanese characters.
Example) C:\work/docker, etc.
Installation
Here, we will introduce the steps to build the TimeTracker RX evaluation version.
- The operations performed in this chapter are the same as those in "Installation Guide: For Docker" (https://docs.timetracker.jp/setup/docs/install-linux/install).
- During this operation, you will need to restart your PC. Close other files before proceeding.
-
Enable "Windows Subsystem for Linux" from Windows "Programs and Features".
Specifically, open the following screen from the Control Panel, check ②, and click "OK".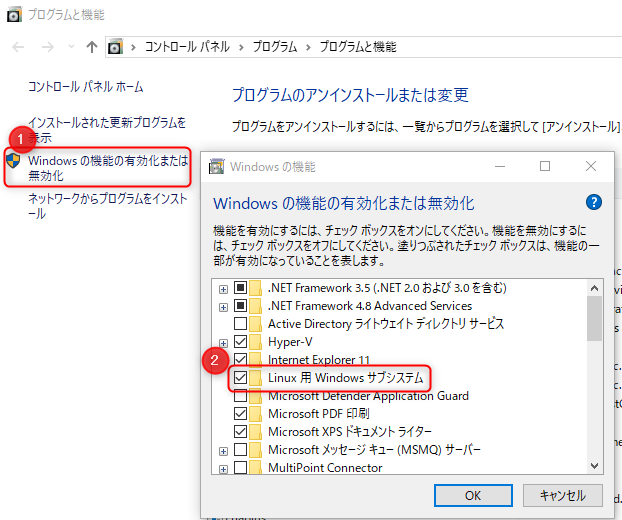 When you click "OK", a dialog box to restart your PC will be displayed. Please restart your PC as is.
 -
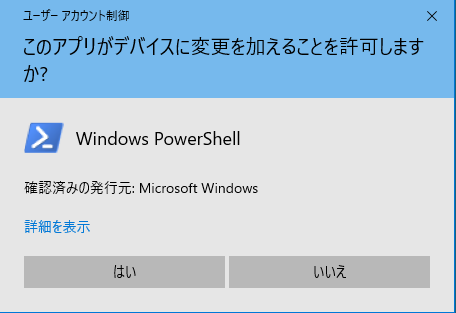
Run "01_install.bat" directly under the folder.
-
If the following dialog box appears during processing, click "Yes".
-
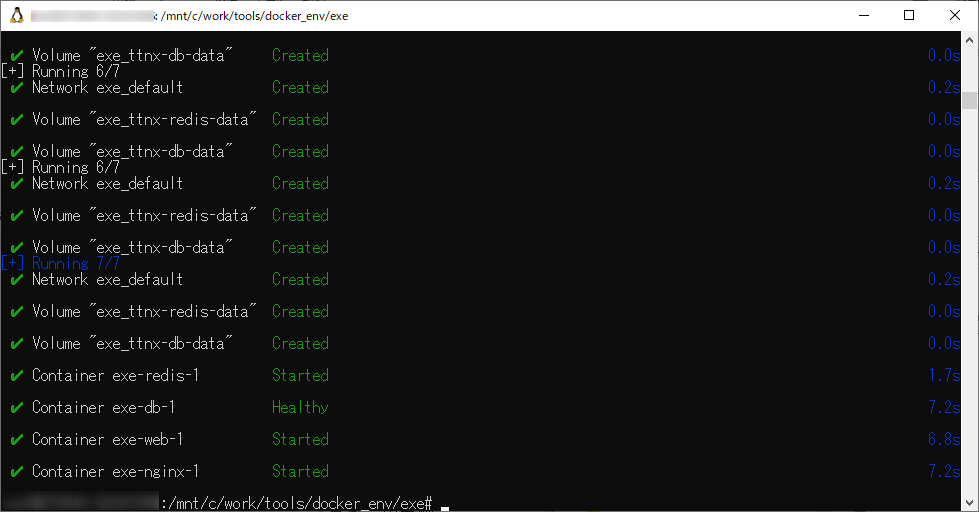
Clicking this will start the environment setup as shown below.

-
-
When the process in 1 is completed, the prompt will be as follows.
Press Enter and restart the system.
-
After restarting, run "01_install.bat" again.
This process does not restart the PC.
If the prompt is displayed as shown below, the installation is complete.
If you close it, please start it by following the procedure in "Starting TimeTracker RX" (#restart).
Access the following URL to start TimeTracker RX.
http://localhost
- Follow the procedure on the following page to perform the setup process.
- "3. Setup"
- The license key will be sent to you by email.
- "3. Setup"
- Please refer to "Notes on using Docker" before use.
- You can also access it from other PCs. Replace "localhost" above with the PC name to access it.
Please set up security such as a firewall in advance so that it can be accessed from external PCs.
State after installation
- Database: "TimeTrackerNX" and the following connection users are created.
- User name: timetrackernx_user
- Password: DbManager///
Starting TimeTracker RX
If you restart your PC or close the command prompt after installation,
run "02_restart.bat" directly under the folder.
Access the following URL to start TimeTracker RX.
http://localhost
Uninstallation
If you want to return to the state before installation, such as when you have finished evaluating TimeTracker RX,
run ``03_uninstall.bat'' directly under the folder.
- If the above process fails, start up PowerShell and run the following two commands in order.
wsl --shutdownwsl --unregister ubuntu
- If you want to build the environment again, perform ``Install''.
How to obtain optional products
If you would like to use the following optional products provided by TimeTracker RX, please refer to the link below.
| Tools | Overview | Link to detailed explanation | Installer |
|---|---|---|---|
| Excel integration add-in | Reflects the TimeTracker RX WBS in Excel in both directions. | What you can do with the Excel integration add-in | ■ |
| TimeTracker Desktop | A desktop app that provides a variety of functions, including tallying and notifying you. | TimeTracker Desktop | ■ |
Precautions when using Docker
The following restrictions apply compared to when building an environment with Windows Server OS.
- The PC on which Docker is installed must meet at least the following requirements.
- Memory: 8GB or more
- Network: Must be accessible from the PC of the user to be evaluated.
- The following functions cannot be used.
- The functions described in "Restrictions on functions provided by TimeTracker RX"
- Importing calendars from the following apps
- Microsoft 365 Outlook Calendar
- Google Calendar
- Copying and pasting items
- This applies when pasting into another tab in the browser.
- There is no problem when pasting within the same tab.
- Pasting WBS defined in Excel
- Data created in evaluation cannot be migrated to TimeTracker RX built on Windows Server OS.
Prepare a Windows Server OS and use the dedicated installer to build a TimeTracker RX environment.