From starting to entering man-hours
Overview
This page introduces the steps for users to start using TimeTracker RX and enter man-hours.
The steps to enter man-hours are as follows.
- Login
- Create a project
- Create an item
- Assign a person in charge to an item
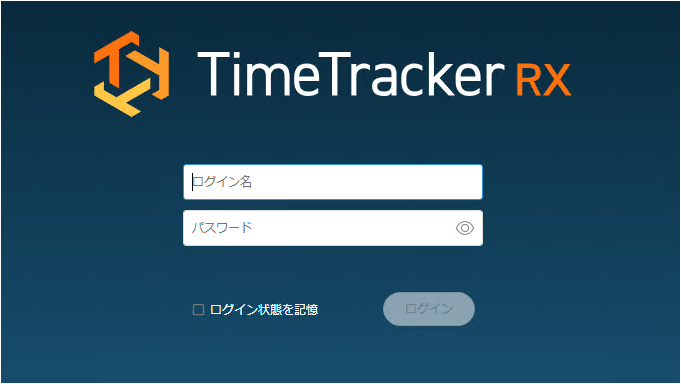
1. Login
Users should check the access URL and login information (login name and password) provided by the system administrator in advance.
Access the specified URL from a browser.
The login screen will be displayed, so enter your login information and log in.
2. Creating a project
To start inputting man-hours, you must first create the item that will be the basis for it and the project that contains that item.
So, first create a project.
With TimeTracker RX, you can freely define any business scope as a project as follows.
- Match it to the development project unit or the actual project unit.
- Create a project for each fiscal year if it is a routine task.
Please refer to the video at the following link (first one). : "Creating a new project"
2.1. Project operation procedure
-
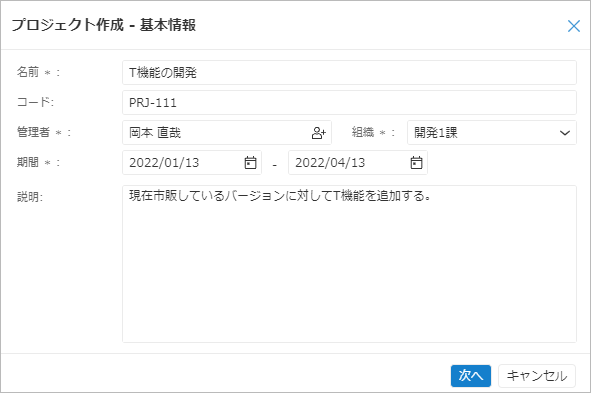
Click "Project" in the global navigation of TimeTracker RX.
-
Click "New Project" at the top of the project list.
-
Enter project information in the "Create Project - Basic Information" dialog.
-
Click the "Next" button.
-
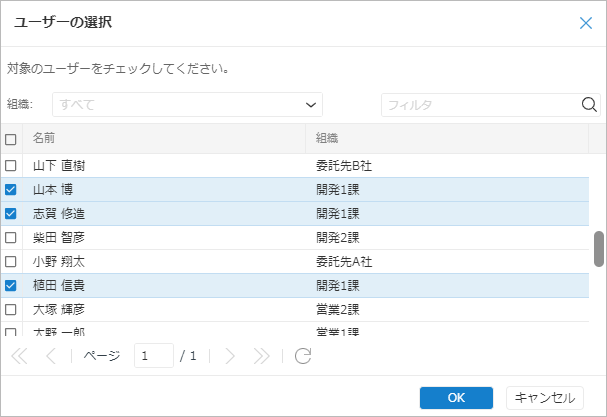
Add project members using the following procedure.
- Click the "+" button.
- Check the target users in the "Select Users" dialog.
- Click the "OK" button.
-
Click the "Next" button.
-
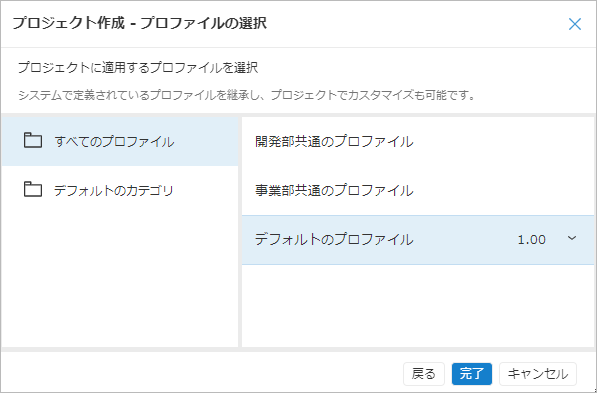
Apply the profile to the project using the following procedure.
What is a profile?A predefined collection of project settings.
By applying a profile to a project, you can reflect the setting information (field definitions, status definitions, etc.) all at once,
and eliminate the need to configure each project individually.- Select the category that contains the profile you want to apply.
- Select the profile you want to apply from the list of profiles included in the selected category.
-
Click the "Finish" button.
Set the users who will participate in the project (project members) in advance.
2.2. Points to note when creating a project
Be sure to set members
When actually creating a WBS and trying to assign members to items, we often receive inquiries saying, "I can't find any members to assign."
This is because the members of the project have not been set.
Resources are assigned to items by selecting them from the members set in the project.
When creating a new project, make sure to set the members.
Of course, you can add members later.
3. Creating items
Next, let's add individual tasks (items) to the project you created.
The most common method is to set items by the units you want to distinguish and total the labor hours.
For example, you can easily total labor hours by process or deliverable by creating items by the following units.
- Process units: "Specifications", "Design", etc.
- Deliverable units: "Design document", "XX program", etc.
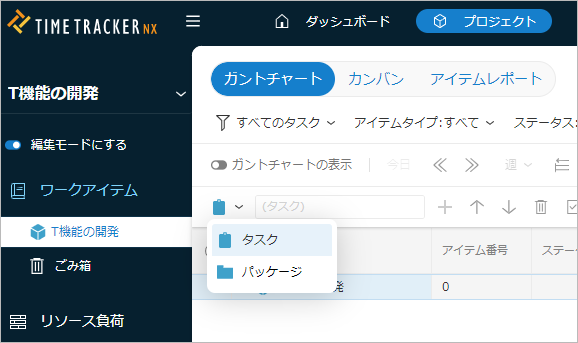
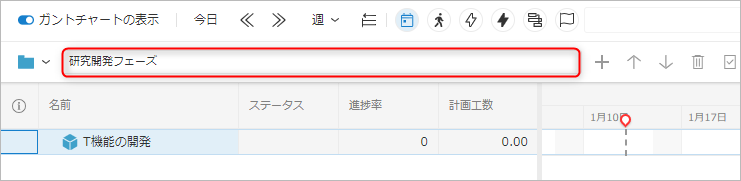
3.1. Item operation procedure
-
Select the destination to add the item to.
-
Select the item type of the item to add from the list.
-
Enter the name of the item to add.
-
Press the Enter key. Or click the "+" button.
A package is a unit that groups items together.
- By setting up a hierarchy, the total amount of work for lower-level items is automatically reflected in the higher-level hierarchy, which is very convenient.
- It is also possible to create a hierarchy of 3 or 4 levels, or up to 16 levels.
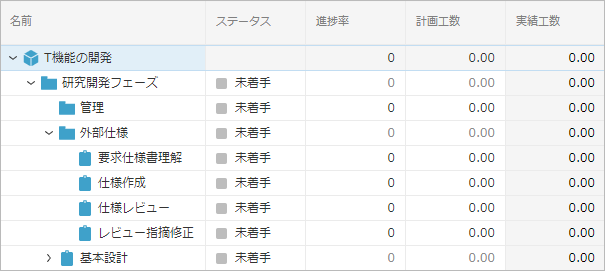
This type of hierarchical structure of items is called a WBS (Work Breakdown Structure).
Please refer to the videos (second and third) in the following link. : "Create a new project"
3.2. Points to note when creating a WBS
From here, we will explain the points to note when creating a WB.
Start with a simple WBS
We often get questions about the granularity of the WBS, that is, how much should be defined as a WBS item.
Deciding the granularity of the WBS is an important step that leads to the following.
- "Appropriate labor and project management"
- "Management of metric indicators"
- "Building a standard process"
It is best to start with a simple WBS and try to manage it, and gradually define it in detail to the required granularity so that it can be operated.
The following patterns are common for WBS.
- Patterns defined based on processes and steps
- Patterns defined based on deliverables
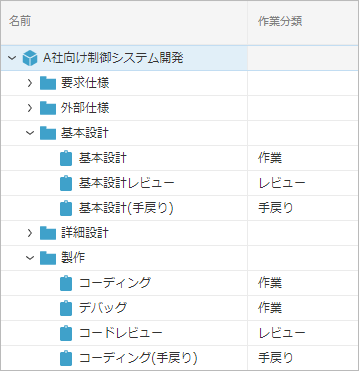
Let's take a look at the WBS below.
-
Example 1: WBS based on processes

In Example 1, a WBS is created based on a set process.
Each task in a process, such as "basic design" and "detailed design," is simply treated as one item. -
Example 2: WBS based on deliverables

In Example 2, a WBS is created based on deliverables.
It is possible to manage the man-hours for tasks related to each deliverable.
Even if you create a perfect WBS by defining the contents in detail from the first stage of trial operation, it will not work well.
First, set items according to the process and deliverables, and start by being able to manage man-hours and progress at this granularity.
The number of nodes in the WBS should be at most several dozen to around 100.
The scale of projects varies depending on the work content.
(Some projects last about a month with a few people, while others last for several years with several dozen people.)
The simplest and easiest way to manage is to match the actual project with the project on TimeTracker.
The key points are as follows.
-
For large-scale projects lasting more than two or three years, the amount of information becomes enormous, causing the following problems.
- Short-term delays are buried, making progress management difficult.
- Understanding the overall picture and making changes to plans becomes time-consuming.
-
It is a good idea to divide projects based on the following criteria so that the WBS is at most 100 nodes.
- Phases and development project groups
- Periods such as fiscal years, years, months, and quarters
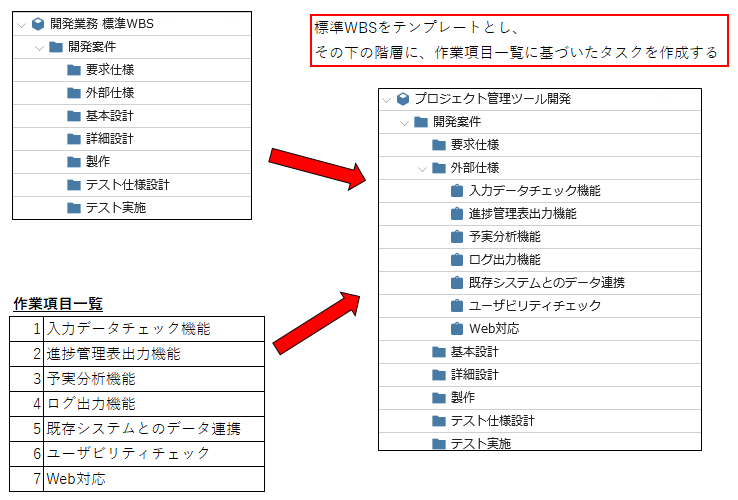
3.3. Use a standard WBS
A standard WBS is effective for formal operations.
By establishing a standard WBS, you can prevent the following from happening:
- Creating a separate WBS for each project.
- Inconsistent granularity of management.
- Leaving work out of the works.
Recommended for the following users:
- Work has already been standardized
- Processes have been established
- Items that need to be collected and analyzed are clear
For actual usage, please refer to the following link: "Copying a WBS from a template"
If you are just starting to manage man-hours and are yet to consider the work itself, please consider it as the operation progresses.
Below is an example of an actual standard WBS being created and used.
Example 1: Using the standard WBS in conjunction with project-specific items
The following method is used to create the work for the engineering process.
- Create a WBS up to a certain level as the standard WBS and apply it to each project.
- Copy and apply the levels below the standard WBS from the list of work items created when estimating for each project.
This allows you to standardize the WBS and apply it to each task, and manage it separately as follows.
- Data defined by organization: Standard WBS
- Detailed project activities: Individual work items
Example 2: Setting items for cross-project analysis
In order to perform cross-project aggregation and analysis, set the "Work classification" item for each task in the standard WBS and operate it.
Specifically, as follows.
- Set "Work", "Review", "Rework", etc. for each item in the "Work type" that is provided as standard in TimeTracker.
- Aggregation by "Work type" is possible across projects regardless of the project configuration.
- For example, you can grasp data on the quality of work, such as the review ratio and rework ratio by process.
Below is an example of settings when analyzing by "Work classification".
3.4. Points to note when creating items
When creating a WBS, it is easy to fall into the trap of
"Being too focused on ensuring perfection in the definition of the work makes it too detailed"
It is important to be thorough, but there are also the following problems, so you need to create it while keeping in mind the balance between actual operation and management requirements. **
- Defining the work in more detail than necessary makes it more difficult to manage the project.
- It also affects the maintainability of the project plan and the efficiency of labor input.
This chapter describes points to note when creating items.
Enabling labor input for interrupting work
When you actually start using it, the following problems will come up.
- The work item corresponding to the work is not set in the project's WBS.
- It is not clear which work item corresponds.
- This also applies to work that arises unexpectedly or work that comes in as an interrupt.
In such cases, the following two methods are often used to deal with this.
-
Decide in advance who will be in charge of operation, and if there is no work item, contact that person to create it.
-
Create a work item such as "interrupt" in advance and have them enter the labor hours.
If you manage it using method 2, you can see the ratio of interrupt and unexpected work hours in the quick report.
If the ratio is high, there may be a problem with the WBS structure, which will lead to reviewing and improving the WBS.
Use the monitor function to allow everyone to enter labor hours.
Many users have devised ways to allow each member to enter their daily labor hours.
The "dashboard function" is often used.
- The dashboard has a "Time input monitor widget" that allows you to check the time input status of each member.
- By utilizing the monitor function
"If the specified time (e.g. 8 hours per day) is not met, follow up frequently so that the time can be input immediately"
As a result, there are many cases where the time input rate of 100% has been achieved. - In the early cases, this was achieved within a few weeks after implementation, and it has been implemented continuously for several years without difficulty.
In order to establish the input of time, it is very important that the members themselves realize the benefits of inputting time. It is often said that by inputting time and reflecting on their own work performance objectively, "their awareness of their work has gradually increased."
Gradually expand the scope of project management without forcing yourself
TimeTracker's project management allows you to manage a lot of information, as follows.
- Effort
- Progress
- Cost
- Deliverables
As a result, we also hear the following comments.
- Trying to master everything and not being able to operate effectively
- Trying to achieve many things at once, but not getting results and feeling "useless"
For this reason, we recommend expanding little by little through the steps of project management as shown below.
-
Effort management
- Simple management of actual effort
- Resource load management
- Analysis of estimated and actual effort
-
Progress management
- Simple progress management using "scale progress" and "user input value"
- Schedule estimated and actual management
- Progress management and schedule management using earned value
It is not difficult to start the next step (cost management and deliverable management) after you have mastered the above.
Create rules for operation so that it can be used smoothly in the field
It is very important to have rules for operation in place.
-
If the rules are used differently for each project or member, it will be difficult to manage efficiently.
-
By proceeding as follows, they will become effective and reflect the actual situation of the business.
- Create the outline of the rules and apply them.
- Check and review them as you use them.
Make this content known to each member and share the understanding.
3.5. Rules that should be determined in advance when creating items
The following are rules that should be determined in advance when creating projects and WBS.
- Decide on the numbering rules for project codes.
- This has the effect of making the project list display easier to read.
- It is a good idea to set project codes systematically.
- Decide the granularity of the project.
- This is especially recommended for those who have a lot of long-term or large-scale work.
- It is a good idea to decide on a division policy for projects, such as dividing by fiscal year.
- When giving work instructions, specify the task that corresponds to the work.
- The person in charge will not be confused about where to enter the man-hours.
- Completed tasks can be "locked for actual input".
- You can prevent further man-hours from being entered.
- Decide how to handle free time between tasks.
- Leave it as free time
- Use free time tasks such as "outing" and "personal business"
In addition, the following items may be necessary in operation.
- Monthly closing processing of man-hours entry
- When to close man-hours entry
- How to handle corrections after closing, etc.
- System of activities and project categories
- Can be used for cross-project analysis.
- Standard WBS application policy
- Apply the standard WBS as a template to all projects, etc.
After creating these rules and reaching an agreement among the parties involved, explain them to each member to align their understanding and operate in accordance with the rules.
4. Assigning a person to an item
Once an item has been created, you are almost ready to enter man-hours.
Set the person in charge (resource) for each item.
The person in charge set here will be able to enter man-hours for that item.
4.1. Procedure for assigning a person to an item
The procedure for assigning a person to an item is as follows.
-
Select the work item to which you want to assign a resource.
-
Right-click and select "Assign Resource".
-
In the dialog box that appears, click the "Add" icon.
-
Select the target member from the displayed list.
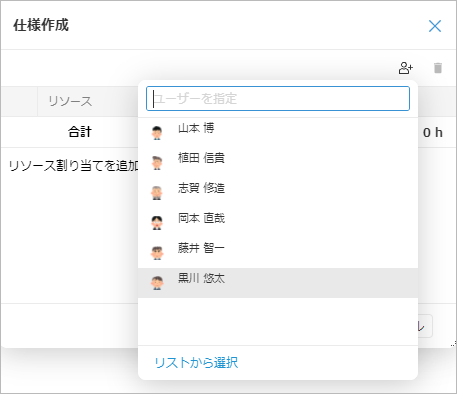 info
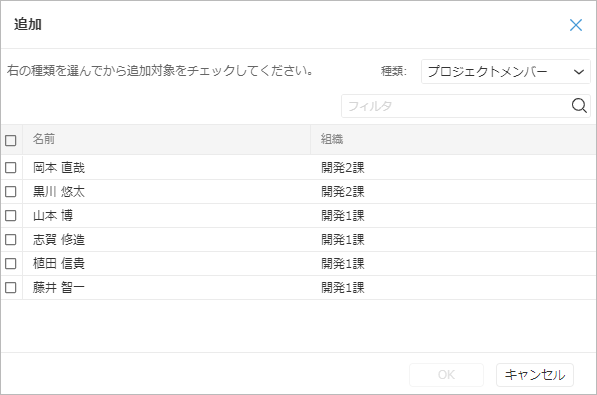
infoIf you want to select a member who is not in the list, click "Select from list" displayed at the bottom of the list and add the member in the "Add" dialog box.
-
Click the "Save" button.
The resource assignment options include users who were set as members when the project was created.
You can also add members.
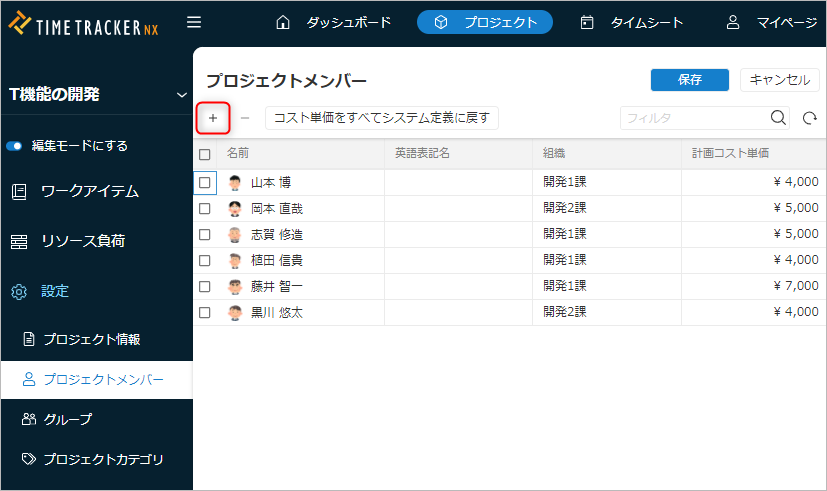
Add them from the "Settings" tab - "Project Members" tab - "Edit" button - "+" button.
With the settings up to this point, the necessary preparations for inputting man-hours are complete.
Users assigned as responsible persons to items can now input man-hours.
4.2. Points to note when assigning responsible persons to items
Assign only the necessary number of resources
Once you have created the WBS, assign members to the items.
By assigning, each member will be able to enter man-hours for the items to which they are assigned.
The key here is to "assign as many members as possible to the necessary items".
If you assign all members to all items, the assignment operation itself will be easy, but the following problems will occur.
- The amount of data will become huge and it will take a long time to load the timesheet.
- The amount of data is too large and the timesheet cannot be displayed.
- It will be a hassle to find items when entering man-hours.
- This is caused by a large number of items being assigned that will not be worked on.